Search results for: “filaments”

  • Best 3D Pens For Printing – Top 5 Picks To Consider

    Best 3D Pens For Printing – Top 5 Picks To Consider

    a girl using a 3d pens

    In the past few years, there has been a rise in consumer 3D printing, and one of the best and easiest ways to get into the 3D printing hobby is with a 3D pen. A 3D pen is a pen that is able to print in three dimensions. You can imagine the world as your canvas as you design objects with this type of product. Unlike 3D printers, 3D pens allow for freehand design, so there is no need for any knowledge of 3D modeling software when getting started. This type of pen works similarly to a glue gun; however, instead of sticks of glue, these pens use colored sticks of plastic, and the pen has a much smaller tip. When using the pen, you simply “draw” and allow your sculptures to stand freely on their own.

    ​Table of Comparison

    [amazon box=”B07L73K351, B0796HK3RK, B079FS4W2R, B07F18LJWT, B07JZCLZKK” template=”table”]

    Product FAQs

    What Is a 3D Pen?

    ​What Does a 3D Pen Do?

    ​How Does It Work?

    ​Where Can You Buy It?

    ​How Much Does It Cost?

    ​How We Reviewed

    It is our belief that accurate and honest information should be provided to our readers, and as result, we want you to understand our review process. In our reviews, we begin by searching all across the internet for product data and technical information about these products, and we extensively consider feedback from users who already own them. Then, we compare this data, which helps us to get a clear view of all angles of a product in order to present an accurate view for those who are interested in purchasing.

    ​Overall Price Range

    Most of the 3D pens that are presented in this article range from $40 to $60 in cost.

    ​Best 3D Pens

    [amazon box=”B07L73K351″]

    ​Features

    ​The Kimitech 3D Pen has adjustable temperature and speed settings so that the device can be customized to your needs and to the type of plastic filament that you are using with it, with preset modes for PCL filament and PLA filament. The LCD display screen is also clearly legible with the temperature, speed, and filament shown. Additionally, the Kimitech is compatible with PCL and PLA plastics only, which are non-toxic and odorless, making this 3D pen a perfect item for young creatives. It is designed with an ergonomic grip, making the pen easy to hold while in use.

    ​warranty

    ​This 3D pen includes a 1-year limited warranty.

    ​pros and cons

    PROS

    • PCL and PLA plastic compatibility ensures child safety, and eliminates health risk from melting plastic fumes
    • Ergonomic grip makes long doodling sessions hassle free
    • Adjustable temperature and speed

    CONS

    • Although much more environmentally friendly, PCL and PLA plastics take longer to cool than ABS plastic

    [amazon box=”B0796HK3RK”]

    ​Features

    ​The 3D Pen by 3D Pentastic is a great pen for both children and adults that can help to grow your imagination and help you to practice a creative hobby. While the 3D Pentastic is only compatible with PCL filament, like PLA plastic, it is nontoxic with no fumes, and it’s eco-friendly as well. As PCL filament has a low melting temperature, the pen only heats to 85 degrees while others heat to over 100 degrees. The low heat and compatibility with only nontoxic filament make this device great for children.

    ​warranty

    ​This 3D pen includes a 1-year limited warranty.

    ​pros and cons

    PROS

    • Low temperature and non-toxic filament
    • Fosters creativity in children
    • PCL filament will not clog the pen

    CONS

    • Only compatible with PCL filament

    [amazon box=”B079FS4W2R”]

    ​Features

    ​The Vallerton 3D Pen for Kids is a printing pen that lets your child draw in three dimensions. The premium pen has a metal body and metal buttons with an extra-long nozzle. The Vallerton 3D Pen only weighs 55 grams, which means that you can use it for longer, as it will not cause fatigue in your hand. This pen is compatible with PLA and ABS filament.

    ​warranty

    ​This pen is included under a 30-days unconditional full refund policy.

    ​pros and cons

    PROS

    • Compatible with both PLA and ABS filament
    • Great activity for parents and their children
    • Quality build material

    CONS

    • The charger included is fairly short in length

    [amazon box=”B07F18LJWT”]

    ​Features

    ​The ​MKOEM Robotics Full-Metal Premium 3D Pen is of a high-quality design and allows you to bring objects from your imagination to life. The pen allows adjusting of flow speed of your filament to fit your personal preference, and a temperature adjustment option is available as well. The OLED is easily legible and lets you monitor the flow speed and temperature of the material. Additionally, the kit includes two colors of plastic filament so that you can start creating right away.

    ​warranty

    ​With the purchase of this pen is include 1-year manufacturer warranty.

    ​pros and cons

    PROS

    • Adjustable temperature and material flow controls
    • Bright OLED display
    • This kit includes two colors of PLA plastic filament that lets you get started immediately

    CONS

    • While it is great for detailing, some users have noted the fineness of extruded filament is difficult to work with.

    [amazon box=”B07JZCLZKK”]

    ​Features

    ​The BeTIM 3D Pen set includes 20 packs of colored filament so that you can get started as soon as you open it. The pen is not hot to the touch, and it is light enough that even children will feel comfortable holding and using it. The single button control makes this pen perfect for both left-handed and right-handed creatives. This kit also includes a stencil book with 20 different templates that make learning to use the BeTIM 3D Pen Set easy and fun.

    ​warranty

    ​The BeTIM 3D Pen has a 1-year warranty.

    ​pros and cons

    PROS

    • Includes 20 different filaments and stencils along with the 3D pen
    • The pen body is not hot to the touch, and the heated nozzle is guarded with finger guards for use by children
    • The BeTIM 3D Pen is compatible with both PLA and PCL filament

    CONS

    • ​Not available

    ​Buyer’s Guide

    different colorful best 3d pens

    Image Via Flickr

    If you are interested in getting started in the 3D printing hobby, 3D pens are great devices with which you can dip your toe and gauge interest before springing for a full-fledged 3D printer. There is a lot of information to take in for newcomers, but if you follow these few tips in our buyer’s guide, your purchase of a 3D pen will be smooth and painless.

    • Make a budget for yourself. While most 3D pens are relatively inexpensive, setting a threshold for your purchase can help narrow down your options to find the perfect 3D pen for you.
    • Find features that you want, and features that you don’t. If there are features in the 3D pen that you don’t believe are necessary for your uses, this can further help you to narrow down the choices of 3D pens. Additionally, eliminating models that include features that you find superfluous can keep your cost low.
    • Seek feedback from customers who have already purchased the 3D pen. Read both positive and negative reviews left by people who already own the product. This can help you to gain a balanced viewpoint and a clear understanding of how you might like the product.
    • If you are new to the hobby, be sure to remember that you need filament for the 3D pen to be fully operable. Some 3D Pen kits include multiple filaments in a bundle that allow you to start doodling in three dimensions right away. Keep this in mind when purchasing, as you may need to purchase filaments separately.

    ​The Verdict

    person holding the best 3d pens

    Image Via Flickr

    After our thorough research, we have concluded that the Kimitech 3D Pen, 3D Pen by 3D Pentastic, Vellerton 3D Pen, ​​MKOEM Robotics Full-Metal Premium 3D Pen, and the BeTIM 3D Pen Set, are the best 3D pens. All of these pens are compatible with environmentally friendly biodegradable plastics and are designed specifically for use by both adults and children. If you are interested in the 3D printing hobby, but have no experience with advanced 3D modeling software, a 3D pen is the perfect place to start. With it, you will be able to bring your imagination to life with freehanded designs. Creating small toys and objects can also be a wonderful activity for bonding with your children, and designing miniature plastic sculptures can function as a fantastic creative outlet and hobby.

  • 5 Best Tiko 3D Printer Review – Alternatives

    5 Best Tiko 3D Printer Review – Alternatives

    On March 30, 2015, a Kickstarter project was opened to create a revolutionary new 3D printer. One month later, in April 2015, the Kickstarter had raised $2,950,874 from 16,538 backers who put up at least $179 each. Shipping was estimated to start in November 2015, approximately seven months later. The printer was going to be known as the Tiko Unibody 3D Printer.

    The designers of this printer were visionaries in every sense of the word. The Tiko 3D printer what the creators of the term “state-of-the-art” had in mind when they coined the phrase. Here are some of the planned specifications.

    • The maximum print volume was supposed to be 138.3 cubic inches.
    • The shape of the print area wouldn’t have been the usual rectangle or circle. Instead, it would have been triangular but with rounded corners. The height would have been 4.9 inches. If you were printing something with a cylindrical shape, the diameter of that cylinder could have been as large as 4.9 inches.
    • The layer resolution was supposed to be 50 to 250 microns.
    • The printing zone would have been enclosed.
    • The print bed would have been made of a flexible plastic. That would have made it easy to pop off the printed item without damaging it.
    • Tiko would have been able to connect to Wi-Fi so that you could print from virtually anywhere, including a smartphone. If Wi-Fi was not available, you could have used the printer to create a wireless access point. This would have let you print directly from your computer to the printer.
    • If the unit was ever jarred or moved while printing, a built-in accelerometer would have sensed this and shut the Tiko down automatically.
    • The accelerometer would have also had a role in the automatic calibration process.

    This was your big chance to participate in the development of cutting-edge technology. For a mere $179, you could have contributed to a Kickstarter project and gotten a new type of 3D printer, one that would have made IT history.

    The first shipment (from Hong Kong) went out in December 2016. That was 13 months after the initial expected ship date. Those units, once they were set up by the new owners, had problems. By February 22, 2017, the project was over. The Tiko 3D printer became someone’s broken dream. There were subsequent efforts to revive the brand, but nothing came of them. In the end, the biggest problem was probably not the design or planning. It was probably that the project was underfunded and couldn’t survive the bad times.

    Even though their $179 investment was gone, those who contributed to the Tiko Kickstarter project were offered an inexpensive way to acquire a 3D printer. The CEO of M3D offered anyone who lost money on the Tiko Kickstarter the opportunity to purchase a Micro 3D Printer for a discounted price of $199. It was a good deal for anyone who accepted the offer and a smart way for M3D to expand its customer base.

    There are plenty of other options available for those who were hoping to purchase a Tiko 3D printer. We will list some of those alternatives for you. But first, here is some background information on 3D printers.

    [amazon box= “B07CJQ3D6L,B07DMZ1YQD,B07HDHHBRJ,B07MLWFXHF,B0757H1Q5K” template=”table”]

    3D Printer FAQs

    How Do 3D Printers Work?

    Where Can 3D Printers Be Purchased?

    How We Reviewed

    3d Printer at the top of the table

    Image by Karolina Grabowska from Pixabay

    The printers we reviewed were chosen based on price. We were looking for printers at a price close to the $179 that would have been spent on the Tiko. Quite a bit of time has passed since the beginning of the Tiko project. In that time, technology has marched on. It is reasonable to expect that since then, prices have dropped, and functionality has increased. It is interesting to see how some of the ideas in the Tiko design have made it into currently available printers.

    All the printers reviewed here are delivered completely assembled. There are many more available in this price range that require assembly. Some even come in the form of a kit, which sounds like an extreme form of assembly. If you are good with your hands, have a sense of adventure and have the patience of a saint, you might do well to find a kit. This will give you lot more printer for the money.

    Overall Price Range of This Product

    3D Printing using the 3D printer

    Image by Lutz Peter from Pixabay

    In general, the cost of filament-based 3D printers ranges from the low hundreds to many thousands of dollars. Because we are looking to replace a $179 Tiko printer, we have decided to limit our price range to between $150 and $350.

    5 Best Alternatives to the Failed Tiko 3D Printer

    [amazon box=”B07CJQ3D6L”]

    Price

    $159

    Setup

    Assembled

    Interface

    Wi-Fi, USB, microSD

    Display

    LCD

    Technology

    FFF

    Print Area 

    4.3” x 4.3” x 4.7”

    Enclosed 

    No

    Heated Bed

    Yes

    Bed Leveling

    Auto

    Nozzle Size 

    .04 mm

    Extruders

    1

    Software Inc. 

    Cura, supports Windows XP or

    later, Mac OS X (10.6 64-bit)

    Resolution

    50 micron

    Dimensions

    14.2” x 10.4” x 16.9”

    Weight 

    30.6 lbs

    Includes

    USB cable, microSD card, power adapter, cord

    Where To Buy

    Monoprice, Amazon

    Warranty

    30-day money back guarantee, one year for repair of

    manufacturer’s defects

    This low-end printer has it all. It works right out of the box and, except for its lack of enclosure, it has all the great features of higher-end systems. Wi-Fi connectivity allows you to cut the leash to your computer. It only addresses smaller print projects, but if you can work with that limitation, this printer is for you. This model is also worth considering if you are looking to buy your first 3D printer.

    PROS

    • Wi-Fi interface
    • SD card
    • Excellent features at a low cost
    • Heated bed

    CONS

    • None

    [amazon box=”B07DMZ1YQD”]

    Price

    $349

    Setup

    Assembled

    Interface

    USB

    Display

    No

    Technology

    FFF

    Print Area 

    4.3” x 4.5” x 4.6”

    Enclosed 

    No

    Heated Bed

    No

    Bed Leveling

    Auto

    Nozzle Size 

    0.35 mm

    Extruders

    1

    Software Inc. 

    M3D

    Resolution

    50 to 350 microns

    Dimensions

    7.3” x 7.3” x 7.3”

    Weight 

    4.4 lbs

    Includes

    M3D software, USB cable, power adapter

    Where To Buy

    Amazon, M3D website

    Warranty

    Three months for manufacturer’s defects

    PROS

    • Lightweight

    CONS

    • No Display

    [amazon box=”B07HDHHBRJ”]

    Price

    $200

    Setup

    Assembled

    Interface

    USB, Wi-Fi

    Display

    No

    Technology

    FFF

    Print Area 

    5.9” x 5.9” x 5.9”      

    Enclosed 

    No

    Heated Bed

    No

    Bed Leveling

    Auto

    Nozzle Size 

    .04 mm

    Extruders

    1

    Software Inc. 

    XYZware, supports Windows 7 and above, Mac OSX 10.8 and

    above   

    Resolution

    100 microns

    Dimensions

    15.4” x 13.2” x 14.2”

    Weight 

    18 lbs

    Includes

    Starter filament

    Where To Buy

    XYZ Printing, Amazon

    Warranty

    Undetermined

    This is another excellent entry-level printer that works right out of the box. Wi-Fi connectivity is a big plus, as is that automatic bed-leveling feature. The resolution of 100 microns is good, but not great. It only runs filaments available from XYZ Printers. The proprietary XYZware software is provided.

    PROS

    • Wi-Fi interface

    CONS

    • Uses only XYZ Printing filaments
    • Resolution

    [amazon box=”B07MLWFXHF”]

    This seems to be a good entry-level printer. Remove it from the shipping carton, and it’s ready to go. It prints either from the computer or the SD card (TF card).

    PROS

    • SD Card
    • Price

    CONS

    • No Display
    • Resolution

    [amazon box=”B0757H1Q5K”]

    Price

    $269

    Setup

    Assembled

    Interface

    USB

    Display

    No

    Technology

    FDM

    Print Area 

    5” diameter x 5.9” high

    Enclosed 

    No

    Heated Bed

    No

    Bed Leveling

    No

    Nozzle Size 

    .04 mm

    Extruders

    1

    Software Inc. 

    Repetier-Host, supports Windows 7 and above, Mac

    Resolution

    50 microns

    Dimensions

    9.9” diameter x 17.5 high

    Weight 

    12 lbs

    Includes

    Flash drive, USB cable, adapter, filament

    Where To Buy

    Amazon, CoLiDo

    Warranty

    30-day return policy, one-year international warranty

    The price of this unit is at the high end of our range but, as always, you get what you pay for. This printer is different from the others in that it is configured for a circular print area. It is easy to set up, and it prints quickly due to its three-axis parallel movement system. This is an excellent printer for a beginner, but the quality and consistency are good enough for professional applications. At 30 watts, it is economical to operate.

    PROS

    • Fast printing
    • Low power

    CONS

    • No Display
    • Resolution

    Conclusion

    The Monoprice Mini Delta 3D printer was the clear winner here. For a printer with its features, the price is almost unbelievable. Wi-Fi connectivity and use of SD cards to store print files make it very user friendly. The heated bed also makes this the only printer on the list that could be comfortably used in a professional setting.

    Featured Image: Image by ZMorph3D from Pixabay

  • Robo 3D Printer Review: The High-Quality Prints

    Robo 3D Printer Review: The High-Quality Prints

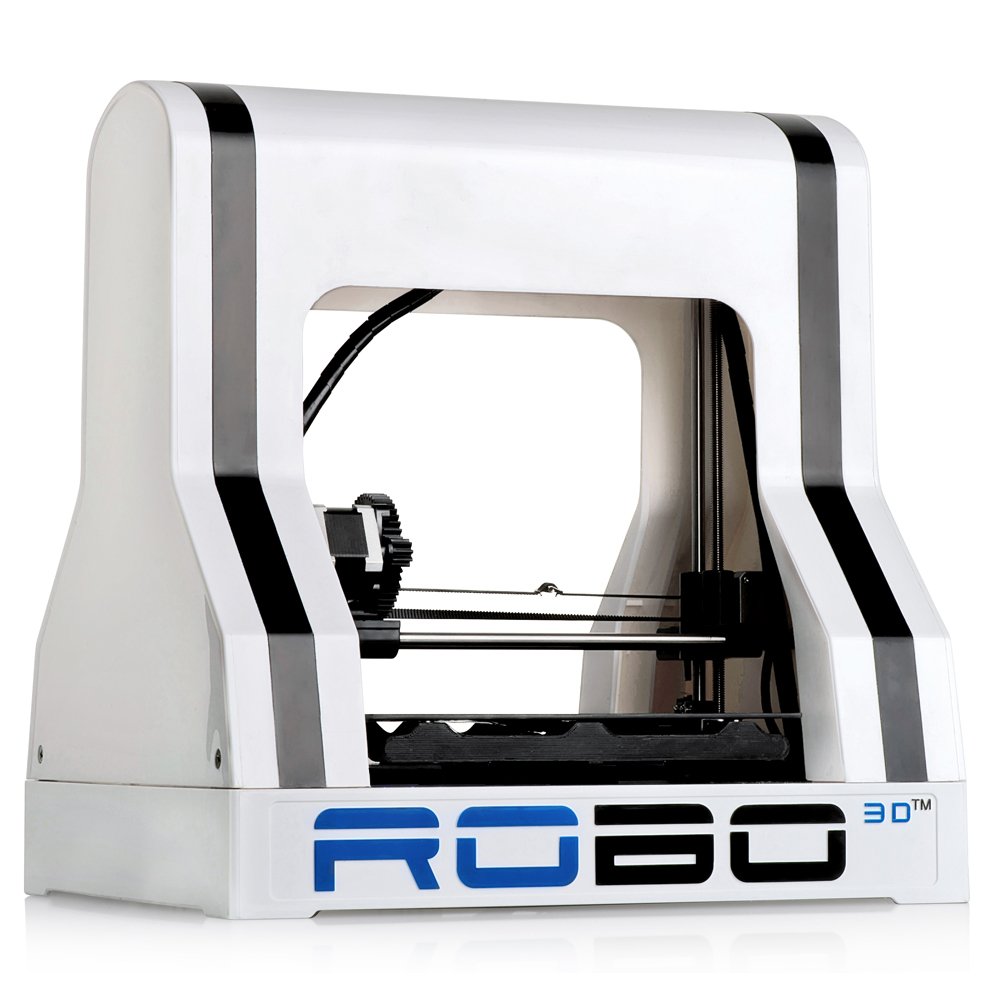
    Robo 3D Printer Review

    Robo is an emerging manufacturer of consumer-level desktop 3D printers. The brand currently sells three printer models that are easy to set up and use to start creating. This review covers the features of the Robo R1+, C2, and R2 models to help consumers decide on the best Robo 3D printer for their budgets and design needs.

    What Are Robo 3D Printers?

    Robo is a 3D printer company based in San Diego, California that launched in 2012. The company crowdsourced funds to develop its first model, the Robo R1 3D printer. They now sell and provide support for three newer models, the R1+, C2, and R2. These printers enable users to produce designs created using computer-aided design software or templates.

    Robo’s easy-to-use, consumer-level printers are capable of printing with as many as 20 or 30 different types of filament and have features designed to improve the detail, resolution, and overall quality of each print job. All three of their current printer models feature high-temperature extruders, and two out of three models have heated print beds.

    Robo printers are desktop-sized and include most of the features that hobbyists look for in these devices. Rather than relying on complex and costly CAD software, Robo printer users can use open-source modeling software or the company’s free mobile applications to design and create objects.

    Robo 3D Printer Specifications

    Robo R1+

    The most affordable model in Robo’s current line of desktop 3D printers is the Robo R1+. This value-oriented model is larger than the C2 and R2 models and is capable of printing with more than 30 filaments, allowing for a wide range of creative possibilities. The R1+ is compatible with open-source design software and iOS and Mac OS, Linux, and Windows operating systems.

    The Robo R1+ has a large 10″ x 9″ x 8″ (254 x 228.6 x 203.2 mm) print size and the overall dimensions of the printer are 17.1″ x 18.1″ x 15.1″ (433.8 x 459.7 x 383.54 mm). This desktop model weighs 21 pounds (9.53 kg). The R1+ is capable of printing in the 50 to 300-micron layer resolution range with XYZ accuracy of 11, 11, and 1.6 microns. The quick-change nozzle print head has a diameter of 0.4mm, a travel speed of up to 80 mm/s, and a print speed of up to 50 mm/s. The nozzle temperature ranges from 240 degrees Celsius (464 degrees Fahrenheit) up to 290 degrees Celsius (554 degrees Fahrenheit) with an all-metal extruder.

    The metal hot ends on this fused filament fabrication device can emit materials ranging from ABS to a variety of types of PLA, PET-G (flex and sturdy), nylons, polycarbonate, and flexible TPE and TPU. This printer is capable of processing PLAs filled with metals such as brass, bronze, copper, stainless steel, and iron, as well as conductive PLA for low voltage applications and magnetic iron. This printer features automatic leveling calibration print plate technology and a heated print bed to prevent warping. The print bed can be set up to 80 degrees Celsius (176 degrees Fahrenheit).

    The Robo R1+ printer works with the free open-source Matter Control software, which supports file slicing prior to printing. The unit supports standalone printing from an SD card, whereas the C2 and R2 models have USB stick file transfer functionality.  The R1+ ships with a power cable, spool of filament, SD card, toolkit, quick start guide, and a one-year subscription to Autodesk Fusion 360. This printer model carries a six-month manufacturer’s warranty and lifetime support.

    Robo C2

    The C2 is Robo’s compact, mid-range 3D printer model. This Robo 3D printer has a print size of 5″ x 5″ x 6″ (127 x 127 x 152.4 mm), overall dimensions of 13″ x 18.25″ x 12.75″ (330.2x 463.55 x 323.85 mm), and weighs 20.8 pounds (9.43 kg). The C2 is capable of printing with more than 20 material types including a variety of PLAs, PET-G, flexible TPE and TPU, magnetic iron, HIPS, and PVA. The R1+ and R2 models support a wider range of materials and have larger print sizes. All of these printers are compatible with Robo and non-Robo filaments.

    The C2 prints with a layer resolution ranging from 20 up to 300 microns and has XYZ accuracy of 12.5, 12.5, and 5 microns. The quick-change 0.4 mm nozzle on this device has a print speed of up to 16 cubic millimeters per second and travel speed up to 250 mm/s. The nozzle temperature can reach 290 degrees Celsius (554 degrees Fahrenheit). The print plate on this model features automatic leveling calibration technology but does not come with a heated print bed.

    Customers interested in adding a heated print bed to prevent warping during printing will need to find aftermarket parts and connect the bed to the electrical outputs on the controller. They may also need to convert the removable plastic bed on the C2 printer to another material such as aluminum for reliable and safe performance. You might also consider the affordable and significantly larger Robo R1+ printer or the much more expensive and slightly larger R2 model.

    The C2 goes beyond the limited connectivity of the R1+ by supporting Ethernet and Wi-Fi connectivity. This printer model also has the capability to function as a personal hotspot. This model supports USB file transfers and comes with a stick pre-loaded with 3D models. The C2 is compatible with a wide variety of devices including computers running Mac OS, Linux, and Windows to tablets and smartphones. Like the higher-end R2, the C2 printer works with the free Robo mobile application and Cura preparation software.

    The Robo C2 is the most affordable printer made by the company to feature an LCD touchscreen that simplifies the control scheme and allow for onboard file slicing. The screen on this model is 3.5″, which is smaller than the 5″ screen on the more expensive R2 printer. The C2 also does not feature an onboard camera for recording print jobs in progress like the R2. The C2 comes with standard printer accessories including a power cable, spool of filament, toolkit, quick start guide, and a one-year subscription to Autodesk Fusion 360. This printer model comes with a 12-month standard warranty and lifetime support.

    Robo R2

    The R2 printer is the high-end model in Robo’s current product line. This high-performance smart 3D printer has an 8″x 8″ x 10″ (197 x 197 x 250 mm) print size and overall dimensions of 16.75″ x 23.75″ x 16.61″ (425.5 x 603.3 x 421.9 mm). This fully-featured model weighs in at 30.2 pounds (13.7 kg), making this printer considerably heavier than the R1+ and C2. Like the R1+, the R2 is capable of printing with over 30 types of materials. This model features sensors that detect when the filament is running low and automatically pauses the print job in progress. The R2 features a removable print plate and a print bed with automatic leveling calibration.

    The Robo R2 also stands out with its 5-inch LCD screen with control options. This printer model has Ethernet and Wi-Fi connectivity and functions as a personal hotspot. This printer is compatible with computers running Mac OS, Linux, or Windows as well as open-source software, the free Robo application for iOS and Android devices, and free Cura Preparation Software to ready, manage and monitor the 3D print job from a tablet or a smartphone. Like the C2, this model also supports onboard file slicing for ease of use. This model also boasts a camera to record print jobs in progress and enable users to watch the footage on a mobile device.

    Enhance the functionality of the R2 printer with a forthcoming option to add a second extruder. This add-on will allow users to print designs with two different materials or two different colors of the same material at the same time. This model is capable of printing with a layer resolution ranging from 20 to 300 microns and XYZ accuracy of 12.5, 12.5, and 5 microns. The travel speed on this advanced consumer model goes up to 250 mm/s, while this printer is capable of extruding at up to 16 cubic millimeters per second.

    The quick-change nozzle on the R2 printer has a 0.4 mm diameter and reaches temperatures up to 290 degrees Celsius (554 degrees Fahrenheit). The heated print bed can reach up to 100 degrees Celsius (212 degrees Fahrenheit). This bed helps to prevent warping and comes with a BuildTak sheet to make it easier to remove print projects.

    This Robo 3D printer supports both standalone printing from a USB stick and Wi-Fi file transfer for printing directly from the brand’s application. In addition to a power cable, spool of filament, toolkit, quick start guide, and a one-year subscription to Autodesk Fusion 360, the R2 printer also comes with a USB stick loaded with 3D models. This printer comes with a one-year warranty and lifetime support.

    Pricing

    Robo offers 3D printers priced between $500 and $1500. Consumers and institutions should determine which model provides the features they want at an acceptable price point. The Robo R1+ printer has the features that most 3D printing enthusiasts want with a $499.99 price tag. This model does not have the range of connectivity and smart features that come on the compact C2 or higher-end R2 models.

    The Robo C2 has a smaller print size than the R1+ with more connectivity options including Ethernet, Wi-Fi, and USB. This model supports onboard file slicing and features a 3.5-inch display with simple controls.  The C2 printer is currently priced at $799.99. The C2 and more expensive R2 models share a number of smart features, but the R2 has a larger print size, a larger touchscreen, and an onboard camera. The C2 does not have a heated print bed, and Robo does not sell compatible beds. This model also prints with a more restricted range of materials than the R1+ or R2.

    The most advanced 3D printer by Robo, the R2, currently sells for $1,499.99. This model is set apart by its integration of a 5-inch touchscreen, onboard camera, and heated print bed. The R1+ and R2 are both capable of printing in more than 30 materials, but Robo proposes that the R2 will soon support the use of multiple extruders. There is a $1000 price difference between the R1+ and R2 and a $700 price difference between the C2 and R2 Robo 3D printer models.

    Robo also sells 3D printer bundles with C2 or R2 printer models for educational purposes. K-12 instructors may be interested in the MyStemKits bundles with three printers, one year of curriculum support, four hours of online training, and 250 student licenses. Individual users interested in 3D printing a basic quadcopter drone should consider the Robo 3D Print Project model for $99.99. The company also sells desk clock and guitar 3D print kits in the $40 range.

    How Robo 3D Printers Compare

    FlashForge 3D Printer

    Price $349.99
    Ease of Use
    Assembly Time
    Build Quality
    Warranty

    Creality3D CR-10 Mini 3D Printer

    Price $359
    Ease of Use
    Assembly Time
    Build Quality
    Warranty

    Anycubic 3D Printer Mega

    Price $368.99
    Ease of Use
    Assembly Time
    Build Quality
    Warranty

    Pros and Cons

    PROS

    • Accessible consumer desktop-style 3D printers
    • Price range from $500 up to $1500
    • Prints with many types of materials

    CONS

    • Robo printers and materials tend to be more expensive than other brands

    Conclusion

    If you want a consumer-level desktop 3D printer with a wide range of functionality, consider one of the three Robo 3D printer models in this review. The brand’s current line makes it easy to select a printer that will fit your budget and design preferences. You may be able to find a refurbished unit of your preferred printer model for a lower price. Robo also sells accessories, materials, and kits that make it easy to get started and learn about 3D printing.

  • Cetus 3D Printer Review – Is It Worth To Buy?

    Cetus 3D Printer Review – Is It Worth To Buy?

    monoprice maker select 3d printer

    Featured Image: Amazon

    What began as a crowdfunded Kickstarter project has now become a fully-fledged product that is available for retail purchase. When the Cetus 3D Printer was first launched on Kickstarter, the device was offered from Cetus3D, a subsidiary of Beijing Tiertime Technology LTD., for only $199. Now that the project has been funded, and the Cetus 3D is available to the general public, we’re here to see if the Cetus 3D can actually “Make It Happen”, as its tagline suggests. With 589 backers supporting the project with over $169,103, it seems that this 3D printer is a success. Let’s dive deeper into the features and benefits of the Cetus 3D Prints, as well as its advantages and disadvantages.

    What is the Cetus 3D?

    tiertime cetus printer

    Image via Amazon

    A 3D printer is a machine that is capable of additive manufacturing by way of creating three-dimensional objects from digital files. The additive creation process describes the creation of an object through building an object upward with successive layers until the object is complete. On the other hand, subtractive manufacturing describes the process of creating an object by cutting out or hollowing out pieces from a block of material. In this way, 3D printing is a more efficient way of manufacturing while retaining the ability to create complex three-dimensional objects.


    Using a 3D modeling software on your computer or a 3D scanner, a digital file is where the three dimensional printing begins. 3D scanners can range from industrial grade to homemade scanners that can be built for around $30, and 3D modeling software is similar in nature, with both costly professional grade programs and free open source programs available. No matter which route you take to obtain your model, you will need to prepare it for printing.


    The process of preparing your 3D model for printing is called slicing, which divides the model into a multitude of layers so that a 3D printer can build it from the ground up using additive manufacturing. This is typically done with a separate slicing software, and it should be noted that some printers might require proprietary slicing software. Once the model is sliced, you are ready to begin printing, which can be done over SD, Wi-Fi, or USB connection. When the printer receives the 3D model, it will begin printing your object layer by layer.

    Product Specfications

    3d printer with printed dragon

    Image via Amazon

    The Cetus 3D Printer is a minimalist 3D printer that is constructed from an aluminum body that can be divided into six different modules: the extruder; the build platform; the main board; and the X,Y, and Z axes. Although the machine is small and only weighs just over three kilograms, its build volume is massive for its size. The volume of the machine itself is 260x260x280mm, and the build volume is 180x170x180mm. This means that you are able to print objects that are nearly as big as the machine itself.


    Additionally, the rails are self-lubricated and maintenance free. The machine is quiet, and offers high precision without the noise that accompanies other printers. Three nozzles are also offered in different sizes for detail. A 0.2mm, 0.4mm, and 0.6mm nozzle are available, and each has its own preset profile for a hassle-free print.
    The 3mm aluminum build plate guarantees that your print surface is flat, as it is fixed directly to the linear guide, giving a flat surface that runs parallel to the X-axis. Furthermore, each Cetus 3D Printer comes from the factory with a pre-calibrated Y-axis to allow users to be able to begin printing right out of the box.

    The Cetus 3D Printer has a dedicated modeling software that utilizes a user-friendly interface that is supported on Mac, Windows, and even iOS, and a big advantage that the Cetus 3D Printer offers is the ability to work with third-party slicing software, such as Cura, Slic3r, and Simplify3D. This gives users who are more familiar with 3D printing the ability to achieve the best quality print from the Cetus 3D Printer. For particularly advanced users, the Cetus 3D Printer is Gcode compatible and can be modded in order to perform laser engravings and other functions that operate by Computer Numerical Control.

    Pricing

    The Cetus 3D Printer can be purchased for $399 from the Cetus3D website.

    How It Compares

    Cetus 3D Printer

    [amazon fields=”B07K3ZWX5X” value=”thumb” image_size=”large” image_align=”center”]


    [amazon fields=”B07K3ZWX5X” value=”button”]

    Build Volume

    180x170x180mm

    Filament Compatibility

    1.75mm

    Material

    PLA/ABS/PETG

    Warranty

    3 Months

    PROS

    • The Cetus 3D Printer is easy to use, and is a great introductory 3D printer with the power to satisfy advanced users.
    • This machine has a high build quality with a minimalist design.
    • The Cetus 3D Printer has a spacious build volume that is nearly as large as the machine itself.
    • For an affordable cost, you get a very capable 3D printer with a wide range of compatibility.
    • The fixed bed has no need to be leveled.
    • It is equipped with Wi-Fi connectivity.

    CONS

    • Some users have noted that the fan is noisy.
    • The printer uses proprietary nozzles.
    • Monoprice Maker Select Plus

    MonoPrice Maker Select Plus

    [amazon fields=”B01JBEF3T8″ value=”thumb” image_size=”large” image_align=”center”]


    [amazon fields=”B01JBEF3T8″ value=”button”]

    Build Volume

    180x170x180mm

    Filament Compatibility

    1.75mm

    Material

    ABS, PLA, XT Copolyester, PET, TPU, TPC, FPE, PVA, HIPS, Jelly, Foam, Felty

    Warranty

    30 days

    PROS

    • It offers a large build volume.
    • The Monoprice Maker Select Plus is equipped with a touch screen with an intuitive interface.
    • A wide variety of materials can be used with the printer.
    • The Monoprice Maker Select Plus is an affordable option for those who are serious about entering the 3D printing hobby.
    • It is a high quality, reliable machine.

    CONS

    • The maximum resolution of the Monoprice Maker Select Plus is average at best.
    • There is no auto-leveling feature

    Original Prusa I3 MK2S Kit

    [amazon fields=”B071YLPJVN” value=”thumb” image_size=”large” image_align=”center”]


    [amazon fields=”B071YLPJVN” value=”button”]

    Build Volume

    250x210x200mm

    Filament Compatibility

    1.75mm

    Material

    Any thermoplastic including Nylon and Polycarbonate

    Warranty

    1 Year

    PROS

    • The kit comes with its own tools, so there’s no need to own any prior to purchase.
    • The printer is easy to use, even for beginning printers.
    • While the assembly is a challenge, it can help those who are new to the hobby get to know their new machine.
    • The Original Prusa i3 MK2S Kit is compatible with a variety of different material filaments.

    CONS

    • It’s more expensive than other brands, and it is not pre-assembled.

    How We Reviewed

    original prusa printer

    Image via Amazon

    We believe that it is important to bring you accurate and honest information in our reviews, and as such, we like our readers to understand the review process. First, we search for all of the product data available for the product that is under review, and then we find some of the item’s closest competitors and research them in a similar fashion. We also take into account user feedback from people who already own each product. Once all of the data is compiled, we are able to offer factual information while also highlighting the opinions of the product’s target audience.

    Buyer’s Guide

    If you are interested in diving into the hobby of 3D printing, following these tips in our Buyer’s Guide can help you to choose the correct 3D printer to get you started. Whether you decide to begin with one of the printers that are found in this article or another 3D printer, following these helpful tips can make the purchase of your new investment hassle-free and painless.

    Set a budget for yourself, and don’t deviate from the limit that you set for yourself. If you decide to continue your research for a 3D printer outside of those models that have been covered in this article, you can begin to filter your options by maximum price. This can narrow your choices down and make the process of finding the right 3D printer for you that much simpler.


    Familiarize yourself with common features that appear in the models that fall within your price range. You can eliminate models that have features you believe you will not need or will not use during your time with the machine. By eliminating models with features that will go unused, you can once again narrow the choices for your perfect printer. This may also help to lower the cost of your machine. By that same token, make not of models that have features that you would enjoy.

    Review feedback from customers who have already purchased the 3D printer. Typically, you can find these reviews on the manufacturer’s websites. It should be noted that analyzing both positive and negative reviews is important, as it will help you to find a balanced take on how you might feel about the printer if you decide to purchase it. Once again, reviewing this type of feedback can help to thin out competitors even more in your search, because an overall negative customer rating is generally a red flag indicating that you would be better off looking elsewhere.

    Conclusion

    After our thorough review, we believe the Cetus 3D Printer is a perfectly suitable 3D printer for those who are first entering the 3D printing and plastics hobby, and for veterans alike. While some users found issues with the proprietary Cetus nozzles, and others mentioned that the cooling fan is loud, these qualms shouldn’t necessarily disqualify the Cetus 3D Printer from consideration, because this little machine has its strengths. The biggest advantage to the Cetus 3D Printer is the build volume that the device offers. For its reasonable price, the Cetus 3D Printer gives you the ability to print fairly large objects. Additionally, the Cetus is incredibly easy to use. Many users noted how quickly they were able to begin creating while their friends were frustrated with the more complicated machines that they purchased. The Cetus’ minimalist design is truly the heart of this 3D printer. It is sleek yet efficient, and it has a no-nonsense approach to 3D printing.


    That’s where you come in. Another of the Cetus 3D Printer’s big advantages is its flexibility when it comes to compatible software. If you are already familiar with slicing programs such as Cura, Slic3r, and Simplify3D, you can continue working with those programs and still use the Cetus 3D Printer. Additionally, the printer is fully calibrated from the factory, and the build platform is flat and requires no leveling, ensuring a perfect print every time. The linear rails are quiet with the frame constructions being generally solid in nature. The Cetus 3D printer also offers an extendable design for more advanced users to tinker with, and the Wi-Fi connectivity makes sending files to the printer easy to do. Tiertime, the company of which Cetus3D is a subsidiary, has been steeped in the 3D Printing industry for 15 years. This brings experience to the table, and recognition of talent.


    Speaking of recognition of talent, it bears repeating that the Cetus 3D Printer was a successful Kickstarter project. In the sea of projects vying for crowd funding, the Cetus 3D Printer was able to source the funds needed to make their printer a complete package while offering backers the printer for an unreal discount of $199. Supporters for projects such as the Cetus 3D Printer are usually people who have their finger on the pulse of newly available technology. That simple fact may be enough for some to make the Cetus printer a cut above some of its competitors who haven’t had seal of consumer approval in their pre-retail stage.


    When all of the dust has settled, the positives of the Cetus 3D Printer far outweigh the negatives, and we would be confident in recommending this 3D printer to anyone who is interested in purchasing one, regardless of experience. From its ready-to-use nature to its incredible build volume and ability to be customized for other CNC functions, this printer nearly does it all. The Cetus 3D Printer is simply one of the best available at its price point.

  • Alfawise U30 Review

    Alfawise U30 Review

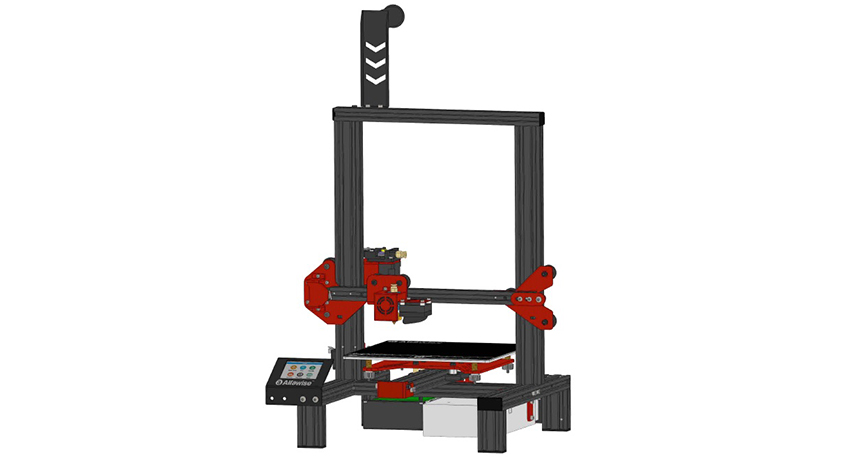
    Is this the best 3D printer under $300?

    The Alfawise U30 is another in a very long line of budget 3D printers. Little brother to the Alfawise U20 reviewed here. It seems more and more arrive every week. There are many brands with very similar models. With little to no copyright in China it’s no wonder. It’s unfair for the tech companies trying to compete but great for us end users. I here many lecture against buying from China but lets face it, no one can beat the prices. This may be the best 3d printer under 300. Although the down side is Safety seems to take a back burner when they are competing against themselves. Purchase and use the items with caution.

    One of the biggest safety concerns when it comes to 3D printers is the safety checks disabled in the Firmware which many do.

    So how do they compete in such a saturated market? Well in the case of the Alfawise U30 they have a nice touch screen with power failure recovery and filament run out detection.U30

    Check Price on GearBest!

    Alfawise U30 Specifications

    Brand: Alfawise
    Type: DIY
    Model: U30
    Engraving Area: 220 x 220 x 250mm
    Frame material: Aluminum Alloy
    Nozzle quantity: Single
    Nozzle diameter: 0.4mm
    Nozzle temperature: Room temperature to 250 degree
    Layer thickness: 0.1-0.4mm
    Memory card offline print: TF card
    LCD Screen: Yes
    Print speed: 120mm/s (max.), 30 – 70mm/s ( recommended )
    Platform temperature: Room temperature to 100 degree
    Supporting material: ABS,PLA,Wood Filled
    Material diameter: 1.75mm
    File format: G-code,OBJ,STL
    XY-axis positioning accuracy: 0.0125mm
    Z-axis positioning accuracy: 0.0025mm
    Voltage: 24V
    Host computer software: Cura,Repetier-Host,Simplify3D
    Packing Type: unassembled packing
    System support: Windows / Mac / Linux
    Connector Type: TF card,USB

    Unboxing

    The U30 doesn’t comes as most Kit printers. Packed in white packing foam. The U30 comes with a set of allen keys, a flat cutout wrench and a Micro SD card. The printer also comes with the 3 meter roll of filament. I don’t typically use the small pieces of filament because they don’t usually include enough to print the test models on the SD card. I started to print with it and it tangled up and jammed the printer. So I tossed it and moved on. Keep reading to see if this is the best 3d printer under 300.

    unboxing alfawise u30alfawise u30 3d printer3d printer3d printing

    Check Price on GearBest!

    SD Card

    As usual the included Micro SD comes with sample models and a soft copy manual pdf file. The included USB micro SD reader is junk and I had a similar one that corrupted every card I put in it. Therefore I don’t use them. I keep them in case I need one in a pinch but I have better ones to use and you should also. It also includes an older copy of the free slicer software Cura 15.

    [amazon box=”B01D9JIUU0,B0749S1S15,B07HFQ658D”template=”table”]

    Assembly

    The U30 is considered a “DIY Kit” printer, aka best 3d printer under 300. But more like a 50% assembled kit. For me I love the assembly process and this one seems like a happy medium between a fully assembled printer and the 0% ones like the Anet A6 and A8.

    The Base comes pre assembled with the power supply and mainboard wired up. That is a good thing as most users shouldn’t  be wiring up mains voltage. The manual doesn’t have much text and uses images to show you the steps. Similar to Ikea furniture.

    I won’t go over the steps but I’m including photos of my assembly and a link to the manual.

    Software

    As I mentioned in the SD section the SD has Cura 15 included with it. I would say use that and if you can afford Simplify 3D then it’s worth the investment. You can keep Cura 15 on your PC and install the newest version at the same time. Give the newest version a try and if you get bad prints then try version 15.

    Print Quality

    After the awesome prints I got from Alfawise U20I was excited to see what the U30 could do. Being the same printer with a smaller build size my expectations were high. While it’s not the same quality it isn’t to far off. At the current $250USD price point is better then the Creality Ender 3 Pro at a regular price of $323USD. This is starting to look more and more like the best 3d printer under 300

    3d printers

    Check Price on GearBest!

    PLA (Polylactic Acid) Filament

    As usual I chose to print one of the files off the SD card. It came pre sliced. Unsure what settings or slicer was used but it printed very well. That’s the thing with test prints, if they print better then your own sliced objects it proves any issues your prints have are slicer and not printer problems. It’s harder to see with the black filament but this little fox is very well printed.

    For a while now I have been wanting to print this cute cartoon gun from the my mini factory website. This image is from the site and I just wanted to show how cool it is painted up.

    Mine isn’t glued together yet but will be sanded and painted also.  I printed most in black but the black doesn’t show well in photos so I printed a white one to show you the details.

    These little bullet guys are awesome! I can’t wait to paint mine up.

    Next I printed a ghost face from thingivers.com. Again, sorry the black is hard to see. I just bought a bunch of filament and most of it is black the rest is white. I have plans to print my own RC BB8 from the BB8 Builders club. I also printed the big cartoon gun.

    Here are a couple of photos with an American dime for size reference.

    Check Price on GearBest!

    PETG (Polyethylene terephthalate) Filament

    Because my PETG was grey and almost gone I printed this little Castle Grayskull from Thingiverse. It is supper tiny and even at 300% it was still super tiny and didn’t print any of the detail. So I printed it again at 400% https://www.thingiverse.com/thing:2840544

    I was a big He-Man fan growing up. I had all the toys and watched the show regularly.

    I included an American dime for size reference. PETG is a mix of PLA and ABS(Acrylonitrile Butadiene Styrene) to get some of the ABS strength and ease of PLA. Only problem is that you have to get the temperature and retraction settings just perfect or you get strings going from one pice to another as the tip travels from piece to piece. The reason for this is that the melted filament comes out while traveling. The retraction pulls back the filament whatever distance you set in the slicer. That reduces pressure that is created while the extruder pushes the filament through the tip during printing. Mastering the retraction settings is difficult. I find a retraction distance of 8mm and a speed of 40 mm per second works well on all of my printers with bowden tube extruders. The bowden tube guides the filament from the extruder motor to the hotend. This lets you keep the weight of the motor from the X axis allowing easier movements at higher speeds. This is looking to be one of my favorite best 3d printer under 300.

    TPU (Thermoplastic Polyurethane) Filament

    TPU is an elastic type of filament that allows you to print cool things like RC Tires or flexible hinges. The flexibleness is determined by how much infill you fill the print with. So for RC tires you can print them almost empty for soft off road driving. If you add more infil you can print harder rubber tires for RC onroad driving. I printed these Mario question cube and tunnel toys with to much infill and it doesn’t flex as much as I hoped.

    The popularity of 3D printing has paved the way for many types of filaments that I have yet to try. I want to order some ASA (Acrylonitrile styrene acrylate) filament as I heard it is very strong. Nylon (Polyamide) is also a strong filament that requires an all metal hotend and high temps for printing with the best 3d printer under 300.

    Matterhackers has a nice comparison page for the filaments they make. https://www.matterhackers.com/3d-printer-filament-compare

    Modifications

    The only modification I did with this printer is flip the bed over. On the top they have a builtack surface stuck to glass. Glas and hairspray is all I use so simply flipping the glass over works well for me. The larger bed printers are usually 300mm or close to it therefore 1 foot square mirror tiles works perfectly.

    Being fairly new there isn’t much for printable mods. You could print bigger bed level knobs but the ones on there aren’t to bad.

    PROS

    • Good print quality
    • Nice design and color
    • Medium build volume
    • Touch screen interface

    CONS

    • auto load is slow
    • firmware is closed
    • noisy
    • didn’t come with usb cable

    Best 3d printer under 300Final Judgement

    This printer is the perfect mate to the bigger Alfawise U20 which is my current favorite printer.

    They have the same look and feel. It’s a bit noisier then the U20. The U30 is a direct competitor of the Creality Ender 3. The U30 has a the same price as the ender 3 and $40 cheaper than the Ender 3 Pro. Aside from the closed source firmware and the ribbon wire for the display the U30 is a much better machine. They are both good little machines but the U30 would get my vote. I hope the Alfawise grows in popularity because they are great printers at great prices.

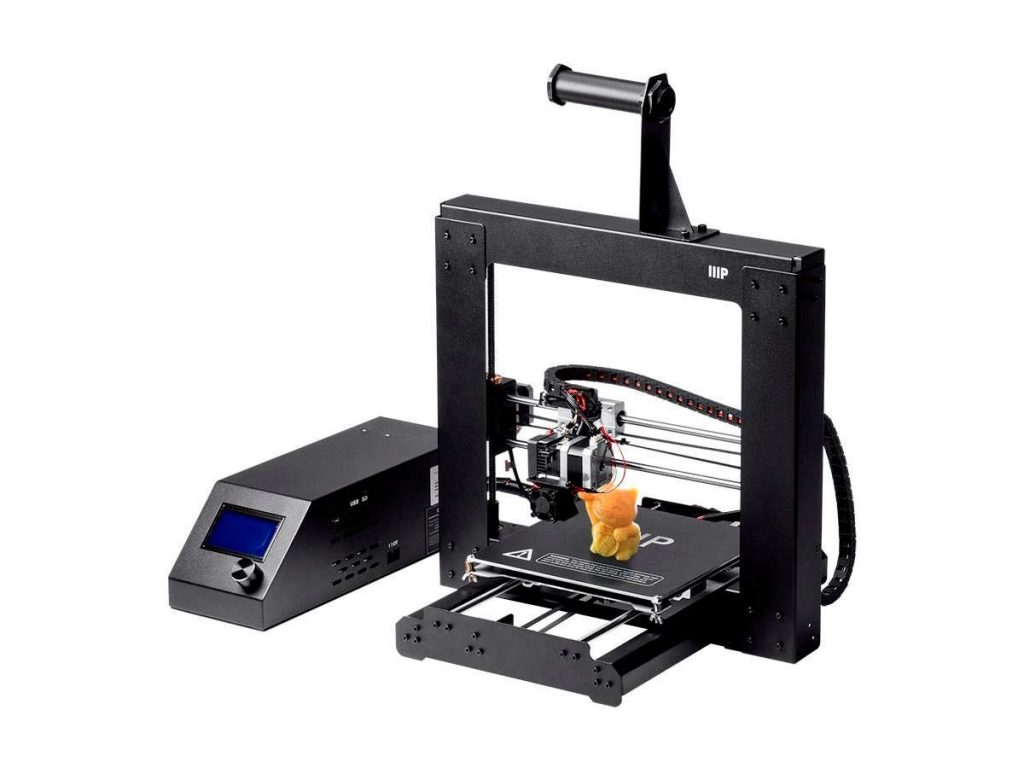
  • Creality Ender 3: Review
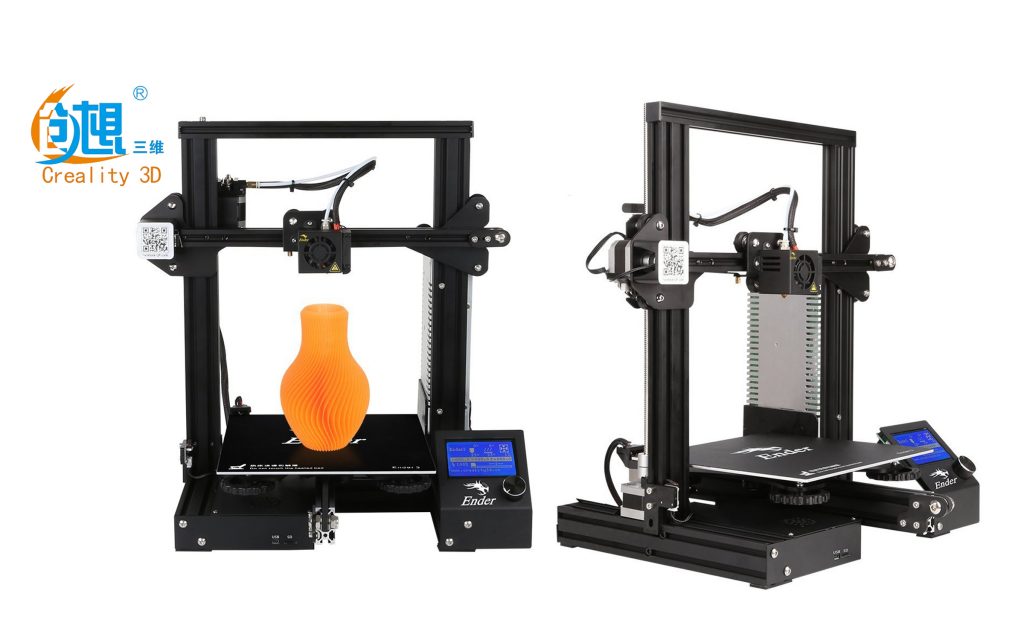
    Creality Ender 3

    Creality 3d printer

    [amazon fields=”B07BR3F9N6″ value=”button”]

    Does the Creality Ender 3 live up to the hype? Just like all the other communities, the 3D printing has its share of hyped up products. As the community grew with budget kits one printer stood out for being the first under $500 and needing little to no modifications to get great prints. That of course is the Creality CR10. Although it wasn’t without flaws and the users were quick to release improvements. Creality soon released updates to the CR10 calling it the CR10S. All the other chinese printer companies like Tevo, Anet and Tronxy followed with their own “clones” of the CR10. I use quotes because Anet tried going cheap with crappy parts and failed. Tevo copied the frame completely. Which I really liked. The Tornado being my favorite printer.

    Then Creality tried to cash in on the popularity of the CR10 with the CR10 Mini. For some reason the mini didn’t get hyped. Maybe it was timing maybe it was price. The Creality Ender 3 is super cheap and prints okay. It isn’t without issues though.

    [amazon box=”B07BR3F9N6″ template=”table”]


    creality 3d printer

    Creality Ender 3: Specifications

    Model Ender-3
    Modeling Technology FDM (Fused Deposition Modeling)
    Printing Size 220*220*250mm
    Machine Size 510*400*190mm
    Package weight 8.6kg
    Max Traveling Speed 180mm/s
    Filament 1.75mm PLA,TPU,ABS
    Input AC 100-265V 50-60Hz
    Output DC 24V 15A 360W
    Layer Thickness 0.1-0.4mm
    Nozzle diameter 0.4mm
    Precision ±0.1mm
    File Format STL, OBJ, G-Code
    Working Mode Online or SD offline
    Max Nozzle Temperature 255℃
    Max Hot bed Temperature 110℃

    Unboxing

    The Creality Ender 3 comes well packed in foam and with the extrusions wrapped with plastic wrap. Included in the box are the standard tools that come with the cheap kits. Typically that includes alen keys to put the printer together, a spatula as well as side cutters for trimming your prints.

    unboxing 3d printerunboxing parts

    SD Card

    The included 8Gig micro SD card has the standard assembly instructions and test files. I’m not good with pre sliced gcode files being included because the temp and settings chosen when sliced are specific to the filament and the users filament is likely different. And the included filament is usually too short to even print the test file. The SD card does include the driver and a copy of the free open source slicer software Cura. probably an out of date version as it’s update quite often now. Also included is a Troubleshootings pdf file.

    It is nice to have the SD card included. The micro SD card reader on the other hand is a piece of junk. Mine corrupted every card I put into it. I had to reformat them. Luckily I had a few others laying around.

    Assembly

    Building the ender is quite simple and the assembly guide was pretty straight forward. The base comes pre assembled. That is an issue for me because, as I have seen so many times before they don’t take care when assembling. In the case of the Creality Ender 3 there is a lot of people with a twisted base. Mine included. Maybe it is one person at creality assembling them with a crooked table. Also there is always loose screws that sometimes show in your prints. You can check out my Tevo Michelangelo  review to see what I mean.

    With the base built and the electronics done for you assembly is quick and easy. Mine has hot glue on all the wire connections which is bad if you need to remove one for troubleshooting or modifications. For any printer you buy needs to have pre assembled parts double checked.

    Software

    The SD card comes with two versions of Cura slicer software. An older version which I think works better then the newest one, and a newer version which is already outdated. A slicer is a program that slices the 3D object into layers, then turns it into instructions the printer can understand. If you need a free program then I would recommend Slic3r or Cura, but if you can afford it I would recommend Simplify3D.

    cura

    Print Quality

    The Ender 3 printer prints as well as the other sub $500 printers which is good because they can print as well as the expensive 3D printers. Not as consistently but most of the time. Although they need a bit of tinkering to get that level. Some even need you to spend extra money but not to much.

    PLA Filament

    PLA is my favorite filament. It prints very easily and prints well. I chose to stick with PLA for almost all prints. I have other filaments on hand for niche needs. HTPLA is a PLA that prints with higher temps. It allows you to anneal your prints for extra strength.

    I printed the 2 puppy models that came on the SD card. The kids in my wifes daycare loved them because they are big fans of the paw patrol TV show.

    puppy

    One of the best reasons to own a 3D printer is Cosplay. Before Halloween my son asked me to print some parts for his Halloween costume. I printed some goggles and a cane for him. The cane ran out of filament in the middle of the night which is a bit crazy since a filament runout sensor for a cent or two. The sensor will pause the print until you change the filament.That is one feature I put on all my printers that don’t come with them and will do the same to the Ender 3. It’s a simple thing to add and makes the printer better.

    googlesgooglesgooglescane

    I printed the mask for my sons costume on a bigger printer and he put the goggles on and painted it. It turned out great.

    mask

    The rest of my PLA prints are mods for the printer to help functionality and looks. See more in the modification section.

    TPU Filament

    TPU is a flexible filament that is good when you need a rubber type surface for things like tires, phone cases and hinges. I printed poison bottles for my sons costume but they didn’t turn out so well. I reprinted in PLA on the JGAurora A5.

    bottles

    [amazon box=”B00TI3JUTM,B01M63ZVUJ,B07DPLV4PC” template=”table”]

    Creality Ender 3: Modifications

    mods

    Modifications can serve a practical purpose or be just for looks. Some mods are a necessity though. For instance the Z alignment on the Ender 3 is so far off it needs something between the motor and the frame. If not it will bind when you try moving it. I used 2 of the cheap punched out wrenches that they send with printers for removing the nozzles. This seems to be a widespread problem because there are over 10 fixes for it on Thingiverse.com. I believe it has been corrected in the newer versions. I’m not sure how some of these things get past quality control.

    https://www.thingiverse.com/thing:2925230

    After the Z alignment fix I was able to print items over 10cm. So next I printed the Muscle car Scoop to cover the oddly placed nainboard fan. The fan is below the bed and hotend bits of filament will get in and could break the blades. Also tools or screws could fall in and short out the board. Luckily someone made this awesome muscle car scoop to divert the flow and protect the fan and mainboard.  https://www.thingiverse.com/thing:3150741

    Next I printed a cool drawer to hold tools, screws and spare parts. It fits perfectly between the center bed rail and the right frame that the display is connected to. I chose to use multiple colors for my mods so the printer doesn’t look so plain. They put the dragon logo on the bed and display which is more than most of the cheaper printers do. Tevo being my favorite when it comes to style.

    https://www.thingiverse.com/thing:2989218

    Another handy print is this little Yoda feeder guide. This helps you turn the extruder motor to feed the filament through the PTFE tube to the hot end. There are other style feeders but I like Yoda so I chose that one.

    https://www.thingiverse.com/thing:3141160

    The last mod that should be done and does help your prints is the Bullseye filament cooling fan duct. There are plenty of fan ducts but this one works great and doesn’t take to much room on the extruder carriage.

    https://www.thingiverse.com/thing:2759439

    Other mods that are more form then function are:

    Filament guide to keep the filament off the threaded Z rod. https://www.thingiverse.com/thing:2920344

    A Display cover. https://www.thingiverse.com/thing:2987100

    Wire clips to keep the display wire from dangling. https://www.thingiverse.com/thing:2960375

    Rubber TPU feet to help keep vibrations quieter. https://www.thingiverse.com/thing:3020865/files

    A cable holder to keep the extruder and x carriage wires from snagging the bed.

    https://www.thingiverse.com/thing:2949858

    Last and strictly for show, an X axis motor cover with the dragon logo on it.

    https://www.thingiverse.com/thing:2924288

    Creality Ender 3: Pros and Cons

    I’m not sure what this is and I haven’t seen this before but ½ way through all the prints I did the wheels had this odd dust on them. Both the X and Y axis.

    PROS

    • Good Print Quality
    • Good Solid Frame
    • Slim and Stylish
    • Great Price
    • Big Bed leveling knobs

    CONS

    • On board drivers
    • Mods needed shouldn’t be up to the user to add or figure out.

    PRINT QUALITY: 8/10

    BUILD QUALITY: 7/10

    USER INTERFACE & NAVIGATION: 7/10

    VALUE FOR MONEY: 9/10

    Creality Ender 3: Final Summary

    After all the hype and putting this printer together and having the Z bind up I wasn’t impressed. I went to the Creality facebook group for answers and found it was wide spread. After fixing it and cooling off for all the extra work, I printed a few things and was impressed. This little printer at its current price is pretty good and easy to recommend. Is it perfect? Not really, but better then anything in its price range.