Search results for: “filaments”

  • Best Anet 3D printers compared : Anet A8 vs A6 vs A3 vs A2

    Best Anet 3D printers compared : Anet A8 vs A6 vs A3 vs A2

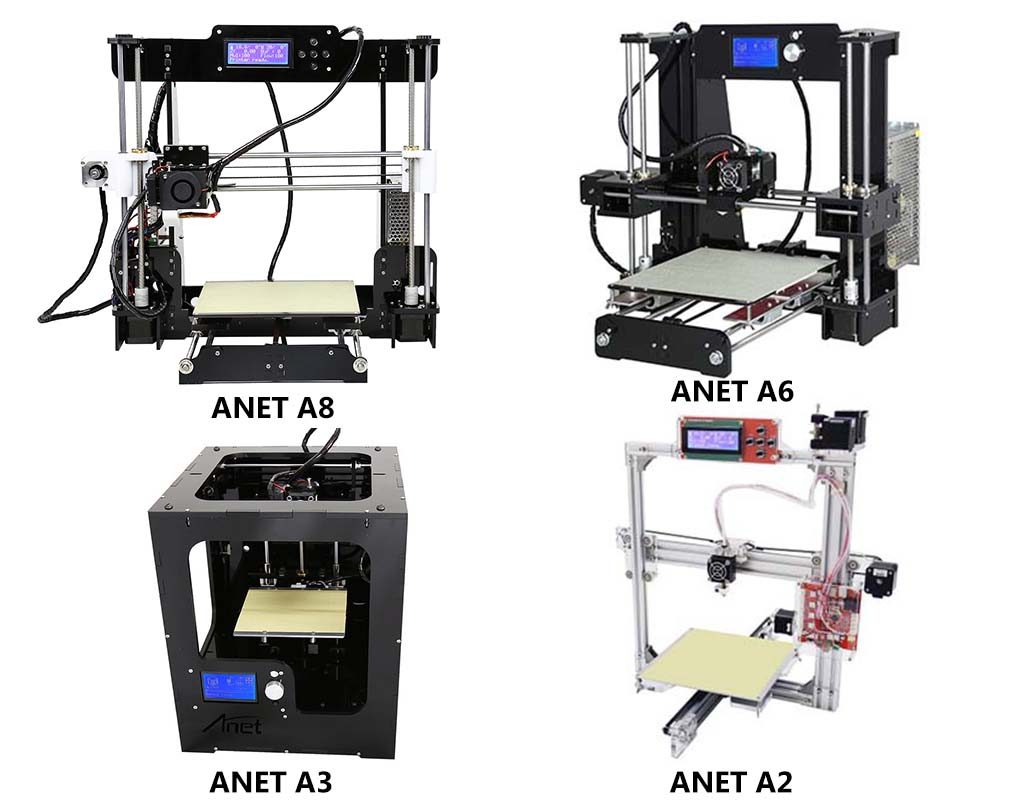
    You read online about affordable 3D printers made by Anet. Anet is a Chinese 3D printing company which manufacturers 3D printers and 3D filaments. You decided to buy an Anet printer, but that’s when the real challenge begins. There are quite a few of them and all are labeled differently, so I thought it was fitting to do an Anet 3d printer comparison.

    Worry no more.

    Frustrated with the lack of information and good side by side comparison table, I spent a few hours researching the differences between Anet printers – A8, A6, A3 and A2. In this brief article, I will do a comparison to show you what’s the difference between all Anet 3d printers.

    Until February 2017, 4 basic models of Anet printers were released.

    Before we begin, please understand that the information gathered here is based on an online research. I had help from Anet Support Groups on Facebook, Anet printer owners as well as help from the Anet support team.

    Just to clear things up, I do not own all of these printers, hence I will not be able to compare the printing quality and other similar things, though I firmly believe that because of the similarity in hardware and software all of these can print equality. You will notice that most of the differences are of functional, cosmetics and design nature.

    One more thing which confuses people quite a lot are the printers name, which quite honestly make no sense. Printers were released in this order :

    1. Anet A8
    2. Anet A6
    3. Anet A3
    4. Anet A2

    Most of the people, logically assume, that the higher number in the name means newer model. Obviously it’s not. It works quite the opposite. Furthermore, some of the models have additional variations. I will clarify those as well.

    Anet A8 vs A6 vs A3 vs A2 comparison table

    The best way to compare these printers is in a table. So I made one.

    [go_pricing id=”all_anet_printers”]

    Anet A8

    Anet A8

    is the first and the best selling printer released by Anet. It has the largest community behind it. It’s the model with highest number of modifications available. This is the printer I own, and despite plenty of modifications and huge learning curve, I am satisfied with it.

    You can read more about A8 model :

    Lately, I’ve noticed that some sellers are labeling A8-B, which is not an upgrade or anything, it just means that the acrylic frame color is black.

    Anet A6 vs A8

    A6

    has been developed on the basis of A8. It carries a larger LCD display 12864 and has a rotary button for easier navigation. Furthermore compared to A8, Anet A6 can be reset from the printer menu (on the screen). A8 can be reset only by pressing a tiny reset button on the motherboard itself.

    One more difference between the two is that the extruder is mounted differently. A8 has a vertical mount, whereas A6( and A2 and A3) has parallel MK8 extruder. Extruder, motherboard and all other parts are the same in both printers. A6 arrives with 16GB microSD card, where as A8 comes with half the size – 8GB.

    On the internet there is a table which compares A6 vs A8, but contains some errors. Understand that all of the printers use the same Anet V1.0 motherboard.

    [amazon box=”B01N5D2ZIB,B07DDC3VLN” template=”table”]

    Below is a video which compares A6 and A8 quite well.

    Update 5/1/2017 – You can now read full review that we did on Anet A6 on this link.

    Anet A3

    Out of all Anet printers, A3 is the only one which arrives fully assembled and can print right away. Its price is the highest. A3 is also the only model which has an enclosure. Design-wise A3 is the prettiest. It’s important to note that A3 has the smallest print size, as it’s maximum printing output is 150 x 150 x 150 mm. It is heaviest of all printers with an approximate weight of 10 kilograms.

    Pricing for this model varies. Check the price of Anet A3 in these stores|Amazon|

    [amazon box=”B075DBJV6S”]

    Anet A2

    Anet A2 frame is made out of aluminum and has additional upgrade options like LCD and Larger heatbed.

    Anet A2 is the only printer with a solid aluminum frame. At the same time it’s the most light-weighty of all. A2 is the most customizable one, since manufacturer and retailers sell various options for it, like LCD or extended heated-bed upgrade.

    There are plenty of variations of A2.

    First we have color variations, with 220m heated and different LCD displays.

    • A2 Black 2004– Black aluminum frame , 220mm heat bed, LCD 2004 (optional auto-level supported)
    • A2 Silver 2004– Silver aluminum frame, 220mm heat bed, LCD 2004 (optional auto-level supported)
    • A2 Black 12864- Black aluminum frame , 220mm heat bed, LCD 12864 (optional auto-level not supported)
    • A2 Silver 12864- Silver aluminum frame , 220mm heat bed, LCD 12864 (optional auto-level not supported)

    Second we have color variations, with an extended 270m heated and different LCD displays.

    Be aware, if you’d like to install an auto-leveling sensor on your A2, do not buy 12864 LCD option, since it’s not compatible with  auto-leveling.

    [amazon box=”B01N1WD9Y6″]

    Learn more about Anet 3D printers

    Anet A8: Final review in comparison to the Anet A6, Anet A3, & Anet A2

    There you have it. I hope this article helped you understand the differences between different Anet D printer models and made your choice easier.

    If there’s something I missed or you noticed an error, feel free to leave a comment below, and I’ll update both table and article.

    I do not wish to pick up all the credits for the table and information in this article. Lots of people helped me improve it and make it as accurate as possible. Special thanks goes to these guys :

  • Best Upgrades for Anet A8 3D Printer

    Best Upgrades for Anet A8 3D Printer

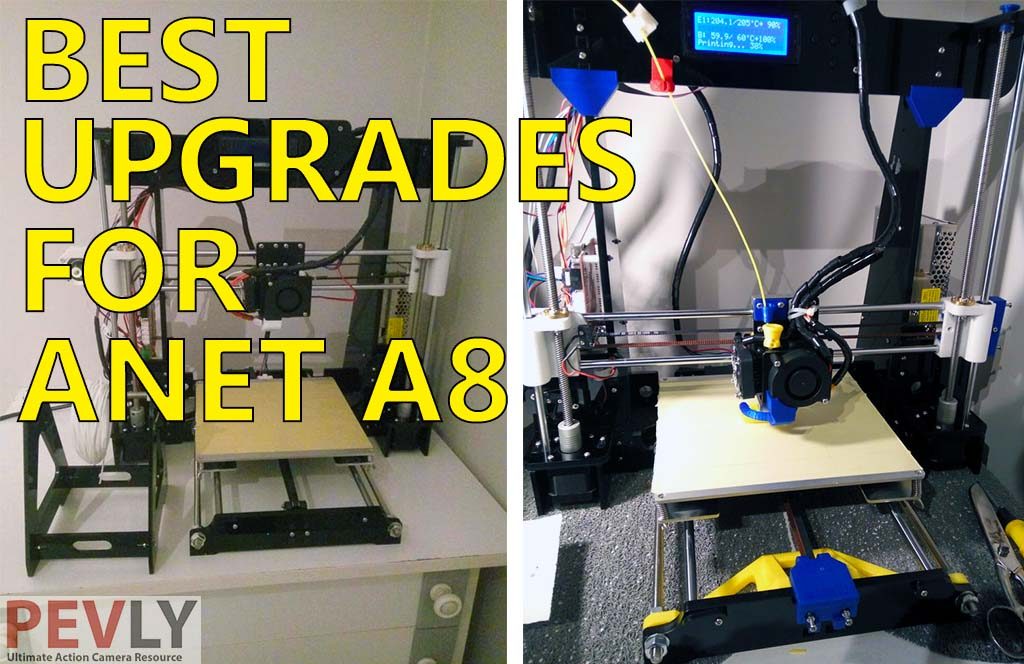
    You bought your first 3D printer, an Anet A8. It was a bit scary at first, I know. You took time to assemble it and made few mistakes along the way. Perfectly fine. You plugged it in, started printing and the end result was good, but lets make it better with several Anet a8 upgrades.

    Pimp my 3d printer – Episode 1. Before and after the overhaul and upgrades – Anet A8.

    Good is just that – good. But did you know that there are things you can do to make your A8 run even better? Make better prints, be less noisy or be more secure?

    There are two ways to have Anet A8 improvements:

      1. Printing the upgrades
      2. Buying new parts which provide better performance

    [amazon box=”B06XPRCMJS,B07BPNCNXN,B06XY5HBFX,B00ME5YAPK,B0761TLRNY,B07B2673QY,B00D7CWSCG,B07B3NBVPV” template=”table”]

    Upgrades for Anet A8 which you can print

    Good thing when you already own a 3D printer is that you can use it to print the parts with your A8. Hell, if you’re a crafty fella who knows how to 3d model, you can design parts yourself. Even though I already listed most of the printable parts in my Anet A8 in-depth review, I’d like to clarify what I am using currently and why.

    Before I begin, just little thank you to all the authors of the A8 upgrades who uploaded their designs for free, so that other users can improve their printers at no additional cost.

    Here is a list of printable A8 upgrades which I’m using. All of these files are free to download and most of them are extremely easy to print.

    A8 Duct Fan

    An Anet A8 fan duct cools your prints. The original duct fan which arrives with the A8 is not that good. As a matter of fact, replacing the Anet A8 fan  is first things most owners do.

    I found semi-circular fan duct to work the best

    While there is a variety of duct fans and modifications available, I’ve been using the Semi-Circular Fan Duct by the user named lockster.

    The only downside of this semi-duct is that you have to remove the side fan in order to mount it. This, however, gives a better seal and gives better air-flow. One more downside can occur if you’re used to removing a regular fan duct while leveling your bed. You won’t be able to see the nozzle distance properly, and removing it each time would require taking off the fan.  But if you’re using an A4 paper method to level it (which is highly recommended), it shouldn’t be a major problem.

    Personally, a semi-circular duct, fixed one more problem. If I wanted to record smaller prints with a camera it would be slightly harder to catch a perfect angle if you’re using the completely circular duct. That’s why I mount my camera in the opposite direction. I must admit that the original A8 duct gave me the best angle for time-lapse recording. I’d rather have better air-flow. So semi-circular it is.

    A8 Extruder Button

    Pressing the hex screw in order to replace a filament is one of the worst experiences I had with A8. Especially if you’re starting out, you’ll be doing it quite a lot. The screw that needs to be pressed causes a pain in the thumb. Luckily enough, there is a solution. Extruder button is one of the simplest and fastest prints you can do.

    I tried out three button designs :

    While all three work and protect your fingers well, I found Ergonomic Button the best. It has the most comfortable pressing surface and it has a mechanism to attach it tight by using plastic tie-wraps which came with A8. Its concave shape of the top prevents slippage as well.

    So, I recommend that print out the ergonomic button. It takes no more than 20-25 minutes depending on your printing speed. Your thumb won’t hurt anymore. Try it out, thank me later.

    A8 [amazon fields=”B078MWXPL3″ value=”thumb” image_size=”large”][amazon fields=”B078MWXPL3″ value=”button”] Filament Guides

    Guiding your filament to avoid its misguidance can be considered as a good upgrade as well. Even though it might have visible effects on your prints it reduces chafing of the filament. Also, it looks cool.

    I personally tried two guides and both worked well for me. I use them both. One serves as an upper guide, the other is mounted above the extruder hole. One thing though, even though I found the extruder guide helpful it makes inserting filament slightly less comfortable. It requires me to hold the filament below the tiny space from the guide and the hole to be able to put it into the hole precisely. Still, I think it’s a good upgrade.

    So my recommendation is to print them both.

    1. anti-vibration dust caps 2. T corners 3. Filament Guide (horizontal)

    I am still testing if the dust-cap really reduce vibrations. Once I am sure I’ll post more info on that.

    If you are looking for an A8 extruder upgrade, you can print a Bowden extruder from Thingiverse.

    I needed an A8 extruder replacement for testing reasons, and found this highly rated Anet A8 hotend DIY kit. View it here

    [amazon box=”B01N12G2PV,B01MZBGFQ7,B00J0ECR5I” template=”table”]

    A8 – Anti Vibration and stability upgrades

    We are all aware of the fact that acrylic frame of the A8 is not the most firm nor most stable one. There are few modifications you can do to improve the stability and reduce vibrations with printed parts.

    So far I tried these.

    T corners are one of the most printed upgrades. It’s simple and it works well. These corners will make your frameless wobbly and more firm. There are tons of front braces available, I printed the one by user Leo_N and it fitted my printer perfectly. I also noticed the reduction in vibration.

    A front brace by Leo does not require too much filament opposed to the others and it fits perfectly. Gave my printer quite a lot of stiffness.

    A8 Belt tensioners

    Though personally my most favorite printed upgrades, I left them for the end of this part, since I still believe these upgrades can improve. I’ve been using these two belt tensioners which made my belt tightening easier and helped me improve my prints making them less wobbly.

    Belt tensioners are an important upgrade. Photo illustrates X axis and Y axis improved tensioners

    So in my experience, these two printed upgrades had the biggest influence on my print quality when I started. This is mostly because I had no idea that the belts should be quite tight since the A8 Assembly Video did not go through that in much detail.

    For now, I am using the :

    There are cons of each of these. First of all, I noticed that the X belt improved tensioner puts a bit more pressure on a steel rod and if you over-tighten it, it can move it in the opposite direction. I would rather if the tension pressure was elsewhere and not on the rod itself.

    Secondly, I noticed that the Y tensioner vibrates just slightly and causes additional noise. Also when put directly the screw it uses can scratch the acrylics.

    Despite the cons, both upgrades worked well for me, but I hope somebody will listen to the feedback and remix and improve them further since they are essential modifications.

    Be aware that I tested these with my rubberized belt which allows much better stretching compared to the plastic belts which arrived with A8. Over-tightening the plastic belts may cause them to snap. So my the advice is to buy better belts, then try belt upgrades. I yet have to try these tensioners with a (eBay link) fiber-glass reinforced belt I ordered.

    Heatbed Upgrade Printed Improvements

    Update 2/15/2017

    Since I moved to printing on a Anet A8 glass bed, I decided to permanently modify my heat bed. I really hate the way the bed has to be adjusted with a screw. So by printing wingnuts, you can modify it permanently. It’s much easier and faster. Furthermore, this adjustment allows me to use the full width of the glass bed 220 x 220, since I no longer need access to the screws.

    Here are two heated bed upgrades to print. The second one should be printed only if you’re using a full-size glass.

    Someone posted this image in one of the A8 groups and it really helped me when mounting my modified thumb-wheel. Be aware that this modification is permanent, you have to drill the holes into the Y carriage to expand them, so there’s no way back.

    Since printed wing nuts will wear and tear over the time since they are plastic, I decided to order metal thumb wheel. You can get them on this link.

    Additionally, you can purchase an Anet A8 hotbed replacement here.

    Anet A8 Parts you can’t print

    While the upgrades you can print with Anet A8 offer a good base for improving your 3D printer, there are Anet A8 parts you need to purchase in order to enhance the performance.

    Anet A8 Belts

    If there is one part that I tested extensively, that has to be the belt. I tried three types of belts for A8 :

    (eBay link in photo)In my experience, rubberized belts are the most stretchy ones. Also, they are quite cost-effective, since they are 5 times less expensive compared to the (eBay link) fiberglass reinforced belts which are quite hard to find anyway.

    But after finally buying a fiber-glass reinforced belt, I must admit these ones are the best I tried so far. They are quite firm. My prints simply looked better when I installed these. The only downside is that I was having trouble finding them online. You might want to hurry up and get yours on time, who knows when they will run it out of stock.

    [amazon box=”B07JCS5BFK,B07DFHQ5SF” template=”table”]

    Mosfet Anet A8

    Even though I did not experience any problems with my connectors on a motherboard burning or anything similar, some people have. This is one of the preventive measures to make electronics on your A8 more secure.

    By adding a mosfet you will bypass the motherboard heating and put way less “pressure” on it. I am really not an expert in electronics, but plenty of people say this is an essential upgrade which will make your 3d printer safer.

    Buy a mosfet Anet A8 expansion| Amazon| BangGood

    I am still waiting for mine, and once I upgrade my printer, I will write a separate article on how to connect a mosfet. Detailed instructions on and how to guide can be found on this Wiki Page created by Anet community.

    After doing throughout research, we have found this Anet A8 MOSFET package to be highly rated and very affordable. For only $17 you get 2 heatbeds.

    [amazon box=”B06XY5HBFX,B01HEQVQAK” template=”table”]

    e3D V6 Anet A8 HotEnd

    According to the Anet community, you should upgrade to e3D V6 hotend, once you mastered other things. It takes a little time, but if you really want to get serious with your printing quality, replacing existing A8 hotend, with high-quality e3D V6 makes a huge difference in printing quality and speed as well as the versatility of materials you can use.

    e3D V6 is not a necessary upgrade. It’s considered an advanced upgrade which further improves printing quality, speed and expands variety materials you can print with.

    There are plenty of stories that this upgrade is too costly and that it’s not cost-effective to spend nearly half of the money you spent on a printer itself. I partly agree with this statement. That’s why I ordered both original and 7$ clone V6 hotend, to test if for you. Once both arrive, I’ll let write another article on it.

    So far, there are two options :

    Titan Extruder – Replaces Anet A8 Extruder

    Like with a hotend, E3D Titan extruder enables you to print wide variety of materials without clogging. According to people who own it, it’s an expensive, but worthy upgrade if you plan to print with different types of materials. The Titan Extruder preforms leaps and bounds better than the Anet A8 extruder.

    For now, I did not try this extruder, as currently I have no need to print anything else but the PLA. Once I master my A8, I might test the Titan.

    Similar to the e3D hotend, Titan also has cheaper, knock-off clones.

    Hotbed improvements

    Since this is quite a controversial topic, I’ll just list the things people use to improve their heat-bed adhesion. Currently I print with PLA on a yellow painters tape and have no problem with it, but I plan to try BuildTak and glass very soon.

    Anet A8 Glass bed

    Update 2/15/2018

    As promised earlier, I have upgraded my heatbed by putting 220 x 220 x 3 mm thick glass on top of it. If you intend to still level your heat bed with a screw, you should get a slightly smaller glass and these clips to hold it better. On my printer, I have 220 x 220 size glass with slightly drilled and extended holes, glass angle holders, and printed wingnuts.

    Personally, I have noticed visible improvements in printing quality of the first layer. Not only is the first layer much smoother on a glass, but the glass bed is way easier to maintain. I usually clean it with acetone after few prints. While I had to replace yellow tape every now and then, the glass is here to last. In the end, glass is a more cost-effective option.

    Models are slightly harder to remove from the glass than the yellow tape. Also, I have noticed an improvement in object sticking better to the glass.

    I print all my larger models with brim (Brim Adhesion in Cura 2.3.1). As a result I do not use a hairspray, but people suggest it might be a good idea to use it if you can’t get your objects to stick onto a glass.

    The only downside of printing on a glass opposed to a yellow tape, is that the heat-bed takes a little bit more time to heat.

    [amazon box=”B076V38M7R,B07B2YLWF9″ template=”table”]

    Igus DryLin Anet A8 Bearings

    Anet A8 is one noisy fella. Luckily , thanks to magnificent bearings from Ignus, it can be much quieter. Check out the test here.

    Wow. Just wow. I am amazed with how well these things are working on my printer. I was ignorant to buy only 4, so I replaced only under the heatbed.

    I bought them here, but perhaps you can find better deals on eBay, here’s the link. You will need 7 of those.

    Here is an installation video of the Anet A8 bearing upgrades. The process is fairly easy, especially if you have a ring plier tool.

    YouTube Video

    Spare parts

    Like it or not, like most of the 3D printers A8 requires regular maintenance. Even after you’ve done upgrades, things can go wrong for various reasons. In my experience it’s always good to have few spare parts for A8, so here are my top 3.

    Filaments

    Whereas there’s a wide variety of materials you can print with your A8, there’s no “best” one. This is because due to insane amount of modifications people do to their printers, it’s always hard to recommend a universal solution. Below list includes some of my favorites, but yet cost-effective 3D printing materials for my A8. Be aware that what might work for me, might not be the best option for you, due to differences in our setups.

    • PLA 3D Printing Material (made by Anet) – link
    • PETG 3D Printing Material – link
    • Flexible 3D Printing Material – link
    • Wooden 3D Printing Material – link

    [amazon box=”B06XRPYXP2,B07CVKK44J,B00TI3JUTM,B07JPL5WRC” template=”table”]

    Anet A8 Power Supply

    Some users believe that the stock Anet A8 power supply unit (PSU) is underpowered and have opted to upgrade to the eTopxizu 12v 30a Anet A8 power supply. From our experience, you will see tremendous improvements if you add both a MOSFET and power supply.

    Purchase the upgraded Anet A8 power supply

    [amazon box=”B00D7CWSCG” template=”table”]

    Summary

    As you can see, printed or bought, there are plenty of modification which will help you improve Anet A8. Once again the community behind this printer is enormous and the upgrades are evolving each day. Each and every day someone from the community prints something new designs something new. The list is not definite. It is ongoing and I’ll try to keep it updated whenever I discover something better then what I already had.

    What is your favorite Anet A8 upgrade?

    Due to my inability to test each and every upgrade, I would like to ask you for help. If you are using particular printed part or you bought something that works well for you – leave a comment below and help me and other readers improve our printer. Which upgrade do you find the most useful and why?

    Feel free to leave a link, but it would be good if you can elaborate in which way particular upgrade helped you make better prints or secured your printer.

  • Zonestar P802QR2 Double Extruders 3D Printer DIY Kit

    Zonestar P802QR2 Double Extruders 3D Printer DIY Kit

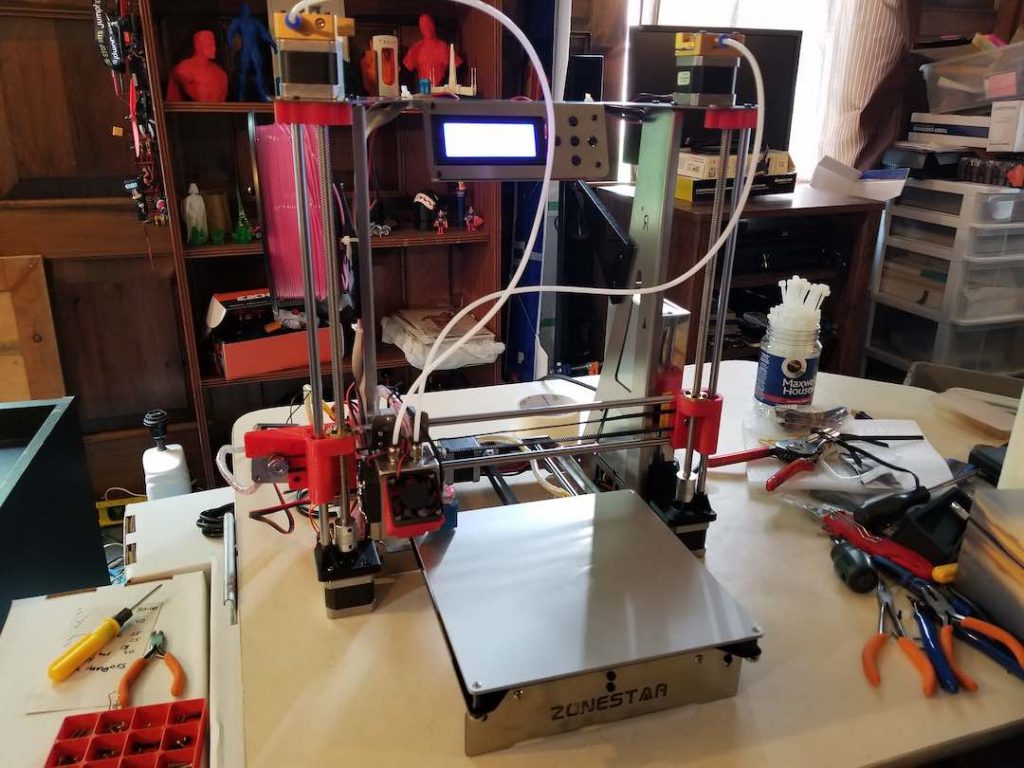
    Almost everyone who gets a 3D printer thinks about two or more extruders to create multi color prints. The Zonestasr P802QR2 is a simple to build kit that has two extruders that feed into two nozzles. It consists of a full metal 1 ½ mm thick. It has a 220X220mm bed and 240mm Z, although the Z only has 185mm actual usage. The placement of the LCD catches the PTFE tubes that guide the filament into the hot ends. I’m going to bend it 180 deg up to keep it from catching and I think it will look better. That or I’ll cut it off and design and print my own display holder in 3D computer aided design. Which is my favorite thing about 3D printing.

    Zonestar P8020R2 Specifications

    Brand Zonestar
    Model P8020R2
    Package size 58.00 x 48.00 x 12.00 cm
    Package weight 9.4000 kg
    Product size 46.00 x 42.00 x 42.00 cm
    Product weight 9.4000 kg
    Type DIY Kit
    Frame material Sheet-metal structure
    Nozzle quantity Double
    Nozzle diameter 0.4mm
    Product forming size 220 x 220 x 240 mm
    Layer thickness 0.1-0.36 mm
    Auto level sensor Yes
    Memory card offline print SD card
    LCD screen Yes
    Print speed Max 150 mm/s
    Supporting material ABS, Flexible PLA, PETG, PLA, PVA,Wood
    Material diameter 1.75 mm
    Language Chinese, English, Portuguese, Spanish
    File Format G-code,OBJ,STL ​​​​
    XY-axis positioning accuracy 0.012mm
    Z-axis positioning accuracy 0.0025mm
    Working Power 250W
    Host computer software Repetier-Host
    Packing Type unassembled packing
    System support Windows, Linux, Mac
    Voltage Range 100 – 220V
    Certificate CE,FCC,RoHs
    Cell

    I’m not a fan of the frame style. Like the Anet A8 it has little support from wobbling side to side. But you can easily print supports which you can find on the Thingiverse website. Although many complain online about the 3D printed printer parts, I’m fine with them. Sure, some parts don’t get very accurate but the great thing about these things is they can self- heal by making new parts. The Zonestar P802QR2 also comes with an auto level sensor which is a nice feature.

    zonestar p802qr2

    Unboxing

    Like most DIY kits, the Zonestar P80QR2 has a lot of parts. The only part assembled for you is the Extruder. That is because the dual hot ends are very hard to get even. They did a good job assembling mine. The parts were separated by foam to keep the parts from damage during shipping. None of my parts came broken or damaged.

    zonestar p802qr2zonestar p802qr2zonestar p802qr2zonestar p802qr2zonestar p802qr2zonestar p802qr2

    SD Card

    The SD card comes with all the documentation for all of Zonestars 3D printers. It makes sense but I believe some users may choose the wrong model because they are very close in name. It also comes with test print files. Overall, it was well done and very well organized.

    Assembly

    Assembling this printer is about the same as every other kit out there. Kits like these are fun to build, at least for me it is. I was busy at the time so I built it over a couple of days. The guides are very easy to follow and it should only take 3-4 hours to build. Having dual nozzles add a bit of complexity. Nowadays, you get kit printers that are mostly completed at the factory leaving you to put 2 to 4 pieces together.

    zonestar p802qr2zonestar p802qr2zonestar p802qr2zonestar p802qr2zonestar p802qr2


    Software

    The recommended Repetier-Host software on the SD card is not my favorite program to use with printers. The software just “hosts” a slicer engine. The slicer is the program that slices the 3D object into layers, then turns it into instructions the printer can understand. If you need a free program then I would recommend Slic3r or Cura, but if you can afford it I would recommend Simplify3D.

    Multiple Extruders

    This printer has two hot ends and two nozzles. Multi extruder machines come in two ways. The first being each extruder having its own nozzle. The second is each extruder feeds into a splitter and out ones nozzle. The multiple nozzles type has more downsides then the single. For instance, it takes more room so you have to enlarge the printer to get each extruder to reach all of the bed. Another and the most important is leveling the bed. When you have two or more nozzles, your bed and X axis have to be 100% parallel. On top of that the nozzle tips have to be 100% even. When the layer thickness is 0.1mm and some even 0.05 then you can imagine how even they need to be.

    zonestar p802qr2zonestar p802qr2

    The reason is if one is off by more than 0.1, then it will drag one of the nozzles across the top of you prints leaving ugly marks. Another problem is that if you are printing one color and the second nozzle is not hot, it can catch your prints and knock it off the bed ruining your print. It can also happen if the second is heated also. Just heated, there’s a chance it will melt it and cut through the print. Plus the supports that help your print overhangs get knocked down easy if the second nozzle is lower then the main nozzle. So you are better off having the second nozzle a bit higher rather than lower. Having two nozzles has oozing problems. While one is printing the second one oozes filament from the nozzle being hot. Therefore when you start printing with the second nozzle the tip is empty leaving holes in your print. Not to mention the oozing filament get all over your print.

    The many extruders to one nozzle type gets rid of the oozing and leveling problems but is not without its own problems. For instance, when one filament is retracted back it leaves a small thin string of filament. So when the next filament get inserted it sometimes jams from it not fitting in the tube with the string left behind. Also, the nozzle being filled with melted filament from the last color will bleed that colour into the print where it shouldn’t be. To counter that, the slicers now have a purge block where it prints the block between color changes so the bleed goes into the block and not the print. The problem with that is the block is a big waste and sometimes is more plastic then the print itself.

    It is for that reason multi color printers are not as popular as they should be. This printer comes in three models. One with one extruder. This one with two extruders and two nozzles. And the third being two extruders into one nozzle. Oh, and one nozzle gives you the big bonus of mixing the two colors.

    This is what it looks like if your bed and nozzles are not 100% level. I let this go to show you what happens when it is not level.

    zonestar p802qr2

    Calibration and Printing

    PLA

    PLA is the easiest of all filaments to print with. It sticks to the bed well, it doesn’t shrink and warp as easy as other filaments. Most use PLA unless they need to print something that needs special properties such as UV tolerance or extra strength.

    My first few prints were to calibrate the two nozzles. To calibrate the slicer and printer needs to know the distance to the second nozzle on both the X and Y axis.

    The first print I did was with the two calibration blocks that come on the SD card. There is a dual color print wizard in simplify3D. It’s a bit buggy because sometimes I open the app and the dual processes disappeared. The first one had a large layer shift. The second one printed ok and showed an x axis offset.

    zonestar p802qr2zonestar p802qr2

    The Block did give me a proper picture so I printed this target looking test print. (Not on the SD Card)

    zonestar p802qr2zonestar p802qr2zonestar p802qr2

    After setting the offset in the firmware through the menu, I printed the two-color globe. I didn’t have enough blue so I used pink for my daughter. As you can see the ooze from the nozzle not in use takes its toll on the print.

    zonestar p802qr2zonestar p802qr2zonestar p802qr2zonestar p802qr2

    After some light sanding I got most of the pieces sticking out but it didn’t come out all that great.

    zonestar p802qr2zonestar p802qr2zonestar p802qr2

    Next, I decided to try one filament just to see how the printer prints. I printed the 20mm XYZ cube and it printed pretty well.

    zonestar p802qr2zonestar p802qr2zonestar p802qr2

    In one of my reviews I printed the Star Wars clock from Thingiverse. I’ve seen this dual color Batman once and had to try it. It was a tough print and the two colors do not stick together as well as it should have. Also the second nozzles leave marks on the top layer.

    zonestar p802qr2zonestar p802qr2zonestar p802qr2

    The last PLA print was a simple single color minion. The print quality while not great is acceptable. The thing about these printers is you can always improve them if you have the patience.

    zonestar p802qr2zonestar p802qr2zonestar p802qr2zonestar p802qr2zonestar p802qr2zonestar p802qr2

    Flexible Filament (TPU)

    Flexible filaments are very cool. I usually print quishi toys for the kids. The problem with the filament being so flexible is that it can spool around the feeder gear. The Zonestar P802QR2 has extruders with a small enough gap, but because it’s so small I had trouble loading the filament. I had other ones laying around so I installed them.

    zonestar p802qr2zonestar p802qr2zonestar p802qr2zonestar p802qr2zonestar p802qr2

    One plus side to having separate nozzles is that you can mix types of filaments. That is great if you want to print something like a 3D printed hand to have hard fingers (PLA) and flexible joints. I tried but failed twice and moved on. I will give it another try when I have some time.

    zonestar p802qr2zonestar p802qr2zonestar p802qr2zonestar p802qr2

    PETG

    PETG is a tougher alternative to PLA and is widely used. The first print failed because the second nozzle kept ripping the supports down so I stopped it. Then I printed the Kratos bust that didn’t need much support. This print came out nice and you can barely see the layer lines on some parts. PETG is stringy and hard to get the retraction settings correct.

    zonestar p802qr2zonestar p802qr2zonestar p802qr2zonestar p802qr2zonestar p802qr2zonestar p802qr2zonestar p802qr2

    PROS

    • Dual hotends
    • Extra stepper driver. This lets you add another extruder.
    • Metal frame.
    • Auto level sensor
    • Prints well
    • Price

    CONS

    • Dual nozzles
    • Frame design is flimsy in the X axis.
    • 3D printed parts can be inaccurate.

    PRINT QUALITY: 7/10

    Good start and I give it 7 with room to grow.

    BUILD QUALITY: 7/10

    Metal frame is better than the cheaper acrylic printers on the market.

    USER INTERFACE & NAVIGATION: 4/10

    I’m no fan of the 5-button LCD panels. Especially since the full graphics displays are so cheap today.

    VALUE FOR MONEY: 6/10 

    The Zonestar PQ802 QR currently being sold at $250 isn’t too bad. There are cheap printers for sure. But this does have two extruders and a stop for a third. It even includes the third driver.

    Conclusion

    The Zonstar P802QR is an entry level printer for sure. And a dual color one at that. But I can’t in good conscience recommend a dual nozzle printer for any beginner.

    If you really want a cheap printer with two or more colors, I would recommend the Zonestar M8R2 Colour mixing printer first. It uses one nozzle and you don’t have to be concerned about the nozzle ruining most of your prints. Most people who get these dual nozzle ones take the nozzle off the second one and use it as a single color printer. I’m going to be making the Y splitter and feed 2 or 3 into one tip.

    Where To Buy

  • AnyCubic i3 Mega 3D Printer Review

    AnyCubic i3 Mega 3D Printer Review

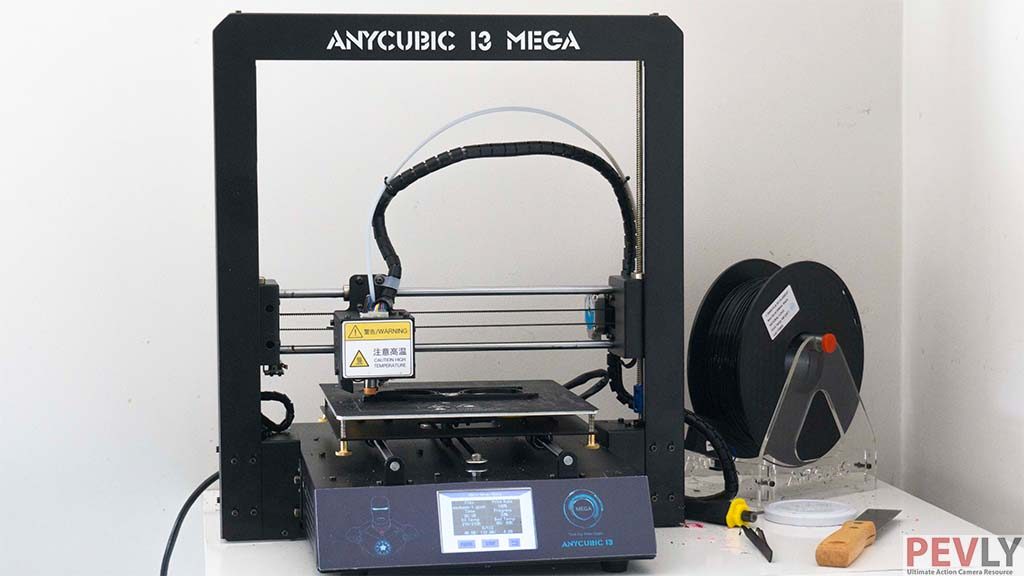
    AnyCubic i3 Mega


    I was first introduced to AnyCubic i3 Mega while I was searching the difference between the AnyCubic printers. After seeing it’s interesting features and affordable price, I decided to review it. In this review, I will test its print and build quality, stability, ease of use and many other things.

    AnyCubic I3 Mega is the third printer released by Chinese AnyCubic brand. Some of the notable features of i3 Mega are :

    • Full metal made frame
    • Auto-level
    • Filament detector
    • Resume from outage
    • Touch-screen

    Quite honestly, the printer itself picked some very good reviews online and at the first glance, it really seems like a good cheap 3D printer for beginners. But is it all that good? Let’s find out.

    AnyCubic i3 Mega: Technical Specification

    The best way to familiarize yourself with a 3D printer is to take a quick look at the technical specs of the product. In the table below, you’ll be able to see most notable features and characteristics of the AnyCubic I3 Mega.

    [go_pricing id=”anycubic_i3_mega”]

    Unboxing

    The printer comes in a huge 15kg package. Once opened, the box contains two layers of mini foam boxes. These boxes contain all the parts you need to get your i3 Mega up and running. Everything inside is very well protected and packed. Nothing arrived scratched or damaged.

    What I really loved is that AnyCubic provides not only a 1kg roll of PLA filament but also spare parts. Incredible. I am so pleased that they included an extra limited switch, gloves, spatula for removing the prints, but also bunch of tools you’ll need to assemble or disassemble the printer. One of my favorite things added is a spare hotend.

    The manufacturer paid special care that you have parts in case something brakes, so you’ll have zero investments if some of these things stopped working.

    So what’s exactly inside the box?

    • 1x AnyCubic i3 Mega base
    • 1x AnyCubic i3 Mega frame
    • 1x 1k test PLA filament (random color)
    • 1x quick start guide
    • 1x SD card reader
    • 1x 8GB SD card
    • 1x USB cable
    • 1x spare hotend
    • 1x spare endstop
    • 1x spool holder
    • 1x power cord
    • 1x tool set
    • 1x tweezer
    • 1x pillar
    • 10x screws
    • 1x scrapper
    • 1x glove

    Personally I was quite surprised to see some of the tools included such as tweezers (useful for removing extra filament from the nozzle), scrappers (extremely handy when removing printed objects from a surface) and glove (not much useful, but you’ll look like a doc while operating your 3d printer).

    Assembly

    The best thing about the  AnyCubic i3 Mega printer is that it arrives nearly fully assembled. There are few minor things you’re required to do, which, depending on your previous experience with 3D printers might take from 10 to 25 minutes.

    Assembling the printer

    First thing first, you should check if all the parts are there. Upon checking, you need to assemble the Z carriage onto the base. There are only 8 screws to screw, and you assembled the printer.

    Onto an SD card which came with the printer, you’ll find assembly instructions in PDF. Besides that, AnyCubic has a video guide on how to get your i3 Mega up and running.

    Wiring

    Even though this part may sound scary, wiring the AnyCubic i3 Mega basically means put the 3 cables into the proper connection.

    The problem I had with the cables is that mine were not labeled. So I just had to figure out myself which is which, but that’s not hard at all. Speaking of wiring, the cable management is excellent. All the cables are tidy and neatly secured and the printer looks very clean.

    Besides the 3 wires, you also need to put AC cable into your printer. Once connected, you can turn the printer on.

    Bed-leveling

    An essential thing in 3D printing is learning how to properly level your heat-bed. i3 Mega has an auto-leveling sensor already installed, which makes the whole process a bit faster, though the manual leveling isn’t hard either.

    Software adjustment

    In order to 3D print an object, you’ll have to “translate” the 3D model into a code that a 3D printer understands – G.code. Software which handles the “translation” is called a slicer. There are tons of 3D slicing software on the web. I’ve always used Cura, it’s free and it worked well for me so far.

    On the micro SD card you’ll find the Cura software. The version provided in an SD card is quite outdated 15.04.06. This is something I did not quite like, so later on, I tried with the newest Cura 2.6.1 but I was unable to make my prints work, though I must admit I did not invest much effort into it.

    To summarize, AnyCubic I3 Mega works great with supplied slicer – Cura 15.04.06 if you follow the software setup instructions carefully. Making it work with never Cura versions requires some modifications I yet have to figure out.

    In this paragraph, I will not talk much about how to configure Cura software, since the instructions manual covers that pretty well.

    After adjusting your software you’re ready to print.

    AnyCubic i3 Mega: Design and Build quality

    After closer inspection of the printer, it was obvious that one of the biggest strengths of the printer will be – well the strength. In other words, i3 Mega is quite rigid, stable and well-engineered machine. It does not feel or look cheap at all. All the wiring inside and on the outside has been well made as well.

    The only part of the whole pack, I did not like, is the stick for the filament roll, which is quite bigger than it should be. Well you can always 3D print a replacement for this one, or just put a marker or a pen instead.

    Print quality

    When you have everything set, initialize a print from a memory card or a PC (depending on if you’re having a 3D printer as an offline device or connected to the PC). Instructions on how to start print can be found in the instruction manual.

    On the card, there’s a test file which already has been sliced so you can print even before you

    First Print

    On the card, there’s a test file which already has been sliced so you can print even before you adjust the software, right after you’re done with leveling the bed. This first print turned out pretty good though some slight overhangs can be found on the top. But for 0.2 resolution, I’m satisfied with how it turned out.

    Printing PLA on AnyCubic i3 Mega 3D printer.

    PLA

    After printing some of the less challenging stuff and calibration objects, I decided to put the printer to a real test. Hollow Darudi is considered to be quite hard to print figure, especially because it’s printer without any supports. I was quite skeptical, but the print turned out great. I was impressed with the way i3 Mega handled such a complicated figure.

    Next, I decided it’s time to print some upgrades for one of my 3D printers from Anet series.

    I also 3d printed a frame which resembles the famous Wayfarer from Ray-Ban. You can download the STL file here.

    PETG

    PETG is a material which melts at a higher temperature compared to PLA. It’s slightly gloosier and easier to bend. In order to sucessfully print PETG, you’d have to put the hotend temperaure to 230-240 °C and slow down the printing speed slighty.

    I used the 235 °C and 70 °C for the heated bed, and 30mm/s speed. All other settings were the same as in the instruction manual. Results were great. However the adhesion of the PETG is even stronger, so was very hard for me to remove the objects from the heated bed.  Below you can see some of the PETG prints I made.

    Here’s the link to the PETG filament I used in this test. I am very satisfied with how it worked and would recommend it.

    WOOD

    The wooden filament is not 100% wood. It’s actually a mixture of some wooden elements and the PLA. It prints the same way as the PLA. This was my first experience with wood filament and I was shocked with how well the prints turned out. I used the same recommended settings and in my opinion wooden figures turned out better. This is probably because the temperature was about right for this type of filament.

    Benchy, Calibration cube and Marvin

    The only complaint I have when it comes to how wooden filament works with AnyCubic i3 mega is adhesion. Again, it was very hard to remove the figures from the build plate and since the wooden filament is slightly softer compared to the PLA I used, the damages caused by the spatula are obvious on first few layers. This is quite visible on the calibration cube and the Marvin leg.

    Like most of the 3d printing enthusiasts printing with wooden filament, I wanted to print out a Baby Groot, a fictional superhero appearing in the Guardians of the Galaxy. The print came out amazing, even though I re-scaled its size it down by 60%. The figure was printed in whole, not in parts, with no supports.

    I used this wooden 3D filament and I highly recommend it.

    FLEXIBLE (TPU)

    Quite honestly, I did not expect flexible filament can be printed on this printer. The reason for this is a Bowden setup which printer uses. The rule with cheaper 3d printers is that if a 3D printer has a Bowden extruder, it will either not be able to print TPU, or it would require modifications.

    Benchy – printed with Flexible filament

    Without much hope I put the Flexible filament into an extruder. I was shocked when it began printing without issues. I realized that AnyCubic i3 Mega can print flexible filament with no modifications, right out of the box. There were no jams.

    The particular flexible filament I used is SainSmart TPU 1.75mm.The end results were quite good. There was some stringing on the figures, but usually strings like that are normal for TPU filaments. I’m sure though that it can be reduced by tweaking settings.

    In order to print the flexible filament, you’d have to adjust the hotend temperature (for the filament I used, temp range is 200-220°C). Additionally it is recommended to reduce the printing speed. I set my printer to 10 mm/s for these models.

    User interface and navigation

    You might not know, but on this site, we also test action cameras. We love user-friendly action cameras with an LCD screen. This is my first 3D printer which has a touch screen navigation. I must admit it’s quite simple and easy to use. Just like with tiny action cameras, the touch screen helps a lot.

    My only complaint is that an LCD screen is not the most responsive one, so sometimes you’d have to put more pressure or press twice.

    As far as the navigation goes, the design of the interface is simple and it won’t take long before you get used to it.

    From the user perspective, i3 Mega is the remarkably user-orientated 3D printer.

    New Ultrabase AnyCubic i3 Mega

    As I was finishing this review, AnyCubic released the upgraded version of the i3 Mega called AnyCubic i3 Ultrabase. It is absolutely the same printer, but it has an improved hotbed and has no auto-leveling sensor. They also moved the filament sensor, which is a big plus. Basically with ultrabase edition they solved some of the issues.

    The AnyCubic i3 Mega ultrabase can’t be easily found online under that name. The reason for this is because they want to replace i3 Mega with i3 Mega Ultrabase. It is possible that even if you buy the regular Mega, you’d get an Ultrabase, but to be on a safe side just ask the seller you’re buying from if it says Ultrabase on the heated bed.

    Here are some stores where you can find AnyCubic i3 Mega Updated Ultrabase version


    UPDATE : The ultrabase platform is now sold separately as well, so the previous version owners can easily upgrade. You can check it out here.

    AnyCubic i3 Mega: Final thoughts

    If I could describe this printer in a single world, that would be – reliability. From the moment I unboxed it I haven’t had a single major problem with printing, which was not the case with my previous 3d printers.

    I am really impressed with the metal frame which makes the whole printer quite stable. It works right out of the box, it’s very easy and fast to assemble it. The instruction manual was quite good, though I think they should make a video about auto-leveling as well. Furthermore, I’m impressed with the cable management and features like filament, auto-leveling and outage sensor.

    One thing that I really did not like sort of a BuildTak surface the printer has. Even though it makes layer adhesion work remarkably, it’s sometimes extremely hard to remove the printed objects from it. If I would have to nit-pick, the spool holder could have been better and if I was a designer of the printer, I would’ve put the filament sensor onto a printer, not on the filament holder.

    Personally, the build volume of the printer might be an issue for some, though personally for me it was more than enough. Recently large print volume appears to be a trend, so i3 Mega is slightly smaller than some of the competitor printers which appeared on the market in similar price range.

    Pros

    • Stable, rigid and firm build quality
    • Easy to assemble
    • Great print quality out of the box
    • Prints multiple materials without any issue
    • Easy to swap between filaments
    • Bunch of spare parts included
    • Resume from outage, auto-leveling and filament sensor are great features
    • Very good and concise user manual
    • Extremely easy user navigation thanks to a touch-screen and minimalist user interface design
    • Good cable management

    Cons

    • BuildTak surface makes printed objects very hard to remove from the heated bed. Causes breakages of the figures in some cases.
    • Not the most silent printer out there
    • Touch-screen is not always responsive
    • Filament sensor sometimes gives warnings on low filament level when turned on, even though the filament is loaded.
    • Filament sensor position should be on the printer, not on the spool holder (there’s a 3D printable upgrade which solves this)

    In conclusion, I wholeheartedly recommend AnyCubic i3 Mega as an extremely well-made, mid-range 3D printer. If you are a complete newbie who can spend around 350$ for this printer, I really think you’ll be satisfied. However, if it’s a bit over your budget, take a look at some of other cheap 3d printers we reviewed. I am quite happy with the printer and I already have plenty of fun projects in mind.

    Where to buy AnyCubic i3 Mega?

    Here are some reputable stores which sell AnyCubic i3 Mega

  • Tevo Tarantula vs Black Widow vs Delta 3D Printers

    Tevo Tarantula vs Black Widow vs Delta 3D Printers

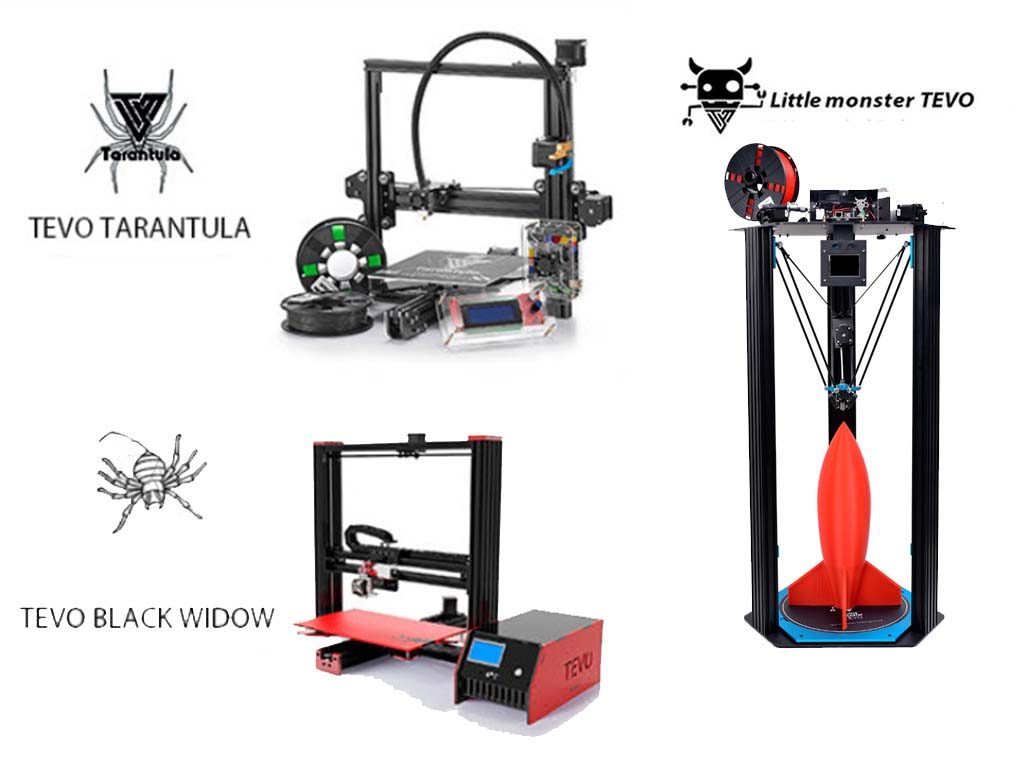
    Tevo is a 3D printing company, known for their Tarantula 3D Printer. Besides Tevo Tarantula, which is i3 Prusa style affordable printer they have two more mid-range printers in store: Tevo Black Widow and Tevo Delta (aka Little Monster).

    Tevo 3D printers
    Tevo currently has 3 printers to offer.

    In this article, I would like to compare these 3D printers side by side. There hasn’t been much information on the web while I was researching Tevo brand, so I decided to make a comparison and features table. Even though these two printers do not look like each other at all, it is essential to emphasize the differences between them, as each of those can be used differently.

    The goal of this article is to show you the differences and help you decide which Tevo printer is right for your needs.

    Tevo Printers Specification

    Specification table below depicts a major feature, technology and design difference between Tarantula, Black Widow and Little Monster (Delta).

    [go_pricing id=”tevo_printers_3d”]

    Tevo Tarantula 3D Printer Kit

    Tevo Tarantula Overview

    Aimed at the entry-level customers, this RepRap Prusa i3 style printer certainly has its advantages over some other i3 clones. Made of aluminum, with a Bowden type extruder and a 200X 200 X 200mm printing area, Tevo Tarantula certainly sounds promising for those which do not wish to break their bank.

    Besides optional heat-bed upgrade, Tevo offers two more features: extruder and auto-leveling sensor upgrade.

    What makes Tarantula stand out from the crowd is that you do not have to ponder over which part is the best, what improvements to add, and how to enhance printer’s performance. The manufacturer did this for you. Of course, both of those improvements will increase the final cost of the printer.

    Tevo Tarantula

    Tevo Tarantula Firmware

    Tarantula’s Repetier firmware is available for download from the official website of Tevo. If you wish to use the Marlin firmware, you may acquire it from other online sources. Make sure that you’re downloading the firmware that is specifically configured for this printer.

    Assembly

    For the Tevo Tarantula assembly process, you may refer directly to the Tevo Tarantula instructions manual provided by the manufacturer. You can also check other online sources where experienced users provide a detailed guide and some useful tips on how to assemble your printer kit correctly.

    How to Calibrate the Tevo Tarantula?

    Calibrating your 3D printer is easy. You just need to locate the thumb nuts on the print bed of the 3D printer. Then, lower or raise the corners of the print bed just enough to allow you to slice a thin sheet of paper right below the nozzle of the printer.

    Tevo Tarantula Parts

    Some of the parts you can purchase for your Tevo Tarantula mods and upgrades are as follows:

    • Heated Bed – for a large, heated bed upgrade
    • TEVO Volcano hotend – for 1.75mm Direct Filament 0.4mm Nozzle
    • Dual Z-Axis Upgrade Kit
    • MKS MOSFET – for the heated bed
    • Print Fan – ideal for a temperature-sensitive filament
    • Mega Anti-Tangle Spool Holder – to prevent tangles from the printer filament

    Tevo Tarantula Upgrades

    If you wish to make your Tarantula a little more than just another “newbie 3D Printing kit”, the manufacturer offers some options. Tevo offers expandable build option for the Tarantula. You can upgrade your heat-bed and increase printing size to 200 x 280 x 200 mm.

    If standard single-color Bowden extruder is not the best for you, you can upgrade it with the following options :

    • Pro Metal – this extruder allows you to print flexible filaments
    • Dual Extruder – this type of extruder allows you to print with two filaments at the same time, multicolor.
    We highly recommended that if you buy, you decide to buy Tevo Tarantula from these official sources |Official AliExpress Store| Official website|

    Besides the extruder upgrade and heat bed expansion, there’s also an optional auto-leveling sensor upgrade which involves installing an auto-leveling probe.

    With the total weight of approximately 7.8kg, Tarantula is the most lightweight of the trio.

    Aimed primarily at lower-budget customers, it is interesting that, according to the specs, its printing speed can reach up to 150mm/s, which is faster than its expensive relative – Tevo Black Widow.

    Tevo Black Widow

    The mid-range 3D printer from Tevo is called Black Widow. Its printing volume is 370 X 250 X 300mm and it weighs ~13kg. This printer is literally midst among everything between the lower-end Tarantula and higher-end Delta. One feature which I am still unable to confirm is that it has only a slower printing speed 100mm/s compared to its little brother – Tarantula.

    Tevo Black Widow

    It’s not as customizable out of the box as the Tarantula, but it has an auto-level sensor optional upgrade. Compared to Tarantula which utilizes wheels on all axes of the aluminum frame to move, the Widow uses the rod for the Z axis.

    Buy Tevo Black Widow from these official sources |Official AliExpress Store| Official website|

    Tevo Delta – Little Monster

    With the printing area of 340 x 500mm and dimensions of 600 X 600 X 1200mm it is not a surprise why this 38kg Delta machine is called Little Monster. The most robust of all three (both by design, weight, and features), Delta has the highest price tag.

    Tevo Delta - Little Monster

    Little monster pretty much dominates in all fields. It can reach up to 300mm/s printing speed, which is nearly twice as fast as the other two. One more major advantage of the Tevo Delta is that it arrives pretty much assembled. According to the manufacturer, 80% of the printer inside the box is assembled, you just have to connect a few parts and you are ready to print.

    With features and the price like this, Delta is probably neither a toy nor a beginner’s 3D printer.

    It is recommended to buy Tevo Delta from these official sources |Official AliExpress Store|  Official website|

    Final Review: Tevo Tarantula vs. Black Widow vs. Little Monster (Delta) – which one is the best?

    I hope that so far you managed to determine which printer best suits your needs. But if you are still undecided, here is my two cents. If you are a newbie on a budget and you wish to get a Tevo printer, you should probably go for the cheapest i3 style printer – the Tarantula Printer Kit. Tarantula DIY Kit offers more than enough customization options to suit almost any beginner’s need. Another good choice for beginners outside of Tevo is the Monoprice Maker Select or Monoprice Select Mini.

    On the other hand, if you want a bit more stable of a printer with larger printing volume above all, but you don’t have a fortune to spend, Black Widow is a logical solution.

    Finally, if you are an advanced user who needs tough, stable 3D printer with enormous printing volume and speed, Tevo Delta Little Monster is probably your best choice.

    Question for you

    Do you have any of these printers? What is your experience with it? Feel free to leave a comment and help us spread the knowledge. We’re waiting to hear back from you.

    Oh, and if you found any mistakes or you’re aware of more differences than provided in this article, I would appreciate if you could share it. Sharing is caring.

    Contributors

    Following members of the community pointed out to some of the mistakes I initially made in the article and helped me make this writing more accurate and complete.

    • Ben Bisares
    • jayiii (reddit)
    • Paco Raap

    Useful Links

  • AnyCubic 3D Printers Compared – I3 Mega vs Kossel vs I3

    AnyCubic 3D Printers Compared – I3 Mega vs Kossel vs I3

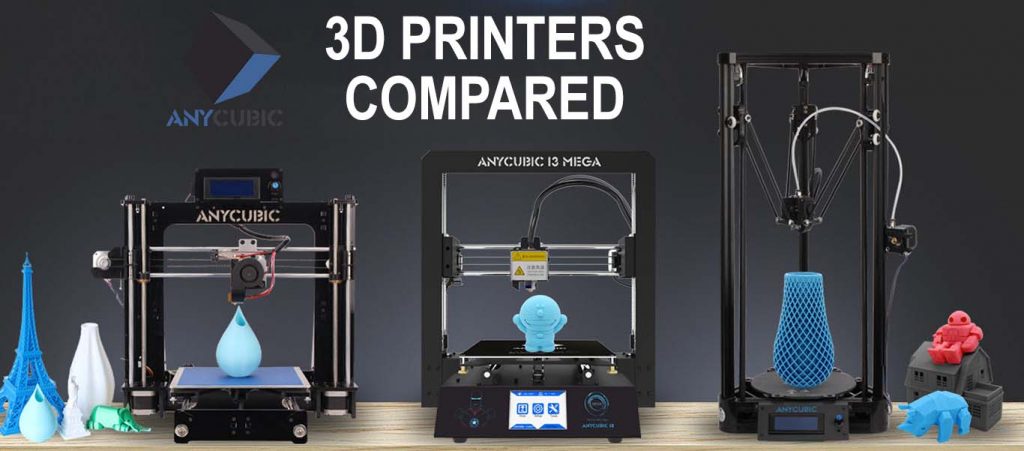
    AnyCubic is a 3D printing company from China which has been getting quite a lot of attention from the 3D community lately. Company’s focus is the production of 3d printers, parts, and filaments.

    On their website, I was able to find out that AnyCubic was founded in 2011. Their founder Bryant began making his own 3D printer after previously spending the entire savings on a MakerBot.

    In 2012 they began producing and selling printers. In the next few years, the company was growing, mainly selling their products through AliExpress, Amazon, and eBay.

    The brand name was changed to AnyCubic from Drepart Trade Co in 2015. Today, these guys have over 70 employees and 3 main 3d printers with 2 more in development.

    In this article, I would like to clear the confusion and present to you all the differences between AnyCubic printers. The printers I will compare in this article are :

    • AnyCubic I3 (Pruisa I3 style printer)
    • Kossel (Delta style pritner)
    • AnyCubic I3 Mega

    3 3D printers

    Before we unveil which 3D printer is better I3, Kossel or I3 Mega, I would like to tell you that at the time of writing this article, all the information has been gathered through the internet. I spent hours researching, reaching out to manufacturer, sellers and user groups to verify and make sure all the data is correct.

    That being said, do not take measurements and other information for granted. I haven’t done the measuring of the size, print volume and other important things myself. We will have to rely on official sources and AnyCubic.

    Specs: I3 vs Kossel vs I3 Mega

    The easiest way to compare these three 3D printers is to put them side by side and look at each product specification.

    [go_pricing id=”anycubic_printers”]

    AnyCubic I3

    I3 is the first ever printer made by the manufacturer. It is based on a famous Prusa i3. The printer is quite similar to a popular Anet A8. I3 has an acrylic frame and is the only of the three which has a direct drive extruder.

    AnyCubic i3
    i3 is AnyCubic’s first 3d printer.

    Kossel

    This delta style printer confused me quite a lot. Unlike the other two printers, this one has few variations. Officially, Kossel printer is available in four versions :

    AnyCubic Kossel Variations

    • Kossel Linear (link)
    • Kossel Pulley
    • Kossel Pulley Upgraded (link)
    • Kossel Plus (link)

    What is important about all Kossel models is that they do not come with a heated bed. This means you won’t be able to print anything besides PLA (which does not require heated surface) unless you buy a heat bed separately.

    AnyCubic Kossel Firmware Related FAQs

    What programs can you use with the anycubic kossel?

    The Kossel buyer’s guide lists down the different software that you need before you can create some 3D print. These include the Repertier firmware, Marlin firmware, Arduino, and a few drivers among others.

    The Marlin firmware can be downloaded directly from AnyCubic’s website along with the specific drivers and slicer software for your printer kit. Make sure to download the driver and slicing software that is compatible with your computer’s OS.

    How do you update AnyCubic Kossel auto-leveling firmware?

    You will have to update the Marlin firmware for this one. You can download it from the manufacturer’s website or from other reliable sources.

    Kossel Pulley vs Linear

    The difference between the pulley and the linear version is quite simple. Pulley version uses wheels on the aluminum frame to move. Kossel Linear has standard linear bearings on linear rods which it uses to move around.

    pulley and linear

    In my experience, wheels are always much more silent compared to the bearings, but bearings printers are more accurate and stable.

    Kossel Pulley upgraded is the same as a pulley, but instead of 3D printer parts, a printer has parts which were manufactured by injection molding, making them tougher.

    Kossel vs Kossel Plus

    Kossel Plus is a slightly improved version of Kossel Linear with a larger printing volume, nothing else.

    • Ø180×300 mm
    • Ø230×270 mm plus version
    Kossel and kossel plus
    The improved Kossel Plus has a larger printing area.

    I3 Mega

    AnyCubic’s latest release, I3 Mega is their most advanced 3D printer so far.  This model comes in two colors – black and blue.

    AnyCubic I3 Mega Features

    Besides its metal build quality, easy few minutes assembly and stability it has four features which certainly make it stand out from the crowd.

    • Filament sensor
    • Auto-level sensor
    • Outage resume
    • Touch screen navigation

    This Bowden type printer will detect when you run out of filament and automatically pause until you insert new filament roll.

    Furthermore, it has auto-leveling of the heated bed and will memorize the printing in case of an outage or sudden turn-off. A beautiful touchscreen LCD is responsible for quick and easy user navigation.

    AnyCubic I3 Mega Review

    Some of the things you can be excited about this printer are that it includes an Ultrabase heated bed, mechanical filament sensor, impressive user interface, SD card, and SD card reader, and most of all produces a decent print quality without costing you a fortune.

    However, there are a few complaints raised about this printer as well. For one, the filament spool is said to be of low quality, causing the filament to tangle and ooze out of the printer’s nozzle. Good thing you can use the tweezers and pliers that come with the printer to clean out the nozzle of the excess filament. Other issues included problems with the automatic bed calibration, loose cables, and the noise from the printer.

    Final Thoughts on the Different AnyCubic 3D Printer Models

    There you have it. I hope this comparison article was helpful. If you want my two cents on which one to get, it’s obvious that the newest I3 Mega has the best features and is able to print plenty of materials out of the box. On the other hand, due to its price tag, it might be a bit over your budget. In that case, based on my research, I would probably go with the Kossel Linear Plus model.

    Where to buy AnyCubic 3d printers?

    All of these printers are currently on sale on several websites. Some of these retailers have promotions quite often, so make sure to check all the links in order to get the best deal.

    I would like to thank AnyCubic user group for helping me understand the differences clearer.

    Thanks for taking your time to read this. If you have any questions, feel free to leave a comment. If you notice any sort of error in the table or comparison, I’d like to know. Do you own any of the AnyCubic printers? I’d like to hear your experience.  Don’t just read, leave a comment, come on.

    Helpful AnyCubic links: