Introduction
Welcome to SJCAM SJ4000 online manual. This series of concise guidelines has been written by TeriTerryTarry who generously decided to share it with Pevly.com readers. It is absolutely the best and most detailed guide on how to use this little camera.
If you are SJ4000 or SJ4000 WiFi user, I am sure you will find plenty of detailed and step by step instructions that will help you learn how to operate your SJ4000.
Since nearly all SJCAM cameras have similar user interface and software, large portion of the manual can be applied to cameras like : M10, M10+, SJ4000+, limited 5000x and x1000 and even SJ5000 series.
Manual has been organized into few pages to make reading easier. To view the content on a next page, just click the orange “Next Slide” button on top or bottom of the page.
For those of you who prefer to read this on a eReader like Kindle or print it out, we have a PDF version available, which you can download on this link.
A new version of PDF manual is available now.
Be aware that this is not an official manual.
Once again, huge thanks to TeriTerryTarry for a wonderful guide.
General Notes
Before we start, here are some important notes.
- When you open the camera package for the first time check the contents to make sure you have all the mounting hardware and accessories.
- Plastic film covers the camera display and lens. On the clear housing plastic film also covers the inside and outside of the lens cover and both back cover doors. Remove plastic film before using the camera.
- There are many ways to determine if your camera is genuine. Checking the security code under the scratch-off on the side of the package is one of them. Go to the SJCAM official website and enter the security code as directed to verify that you have an authentic camera. Please be aware that if you camera does not have a security code, it does not have to mean it is a fake. Here is a page where you can find out more details on how to determine authenticity your SJ4000.
- This manual is based on firmware version G20150408V02 dated 2015 April 8. Camera menus, settings or other operations might vary with other firmware versions.
- Notes are identified in parentheses () and are described at the end of each section.
External Lights
You probably noticed that SJ4000 has an LED indicator on top and behind. These lights change colors, indicating different things.
The following lights indicate the operation described and can occur in several combinations.
| Blue light on | camera is on |
|---|---|
| Red light on | camera is connected to a charger |
| Amber light on | camera is connected to a smart device via WiFi |
| Blue light flashing | camera is recording video |
| Amber light flashing rapidly | camera WiFi is turned on but not connected to a smart device |
| Amber light flashing | camera is connected to WiFi while recording video |
| Red and amber lights on | WARNING – PROBLEM WITH CHARGING. DISCONNECT CHARGER IMMEDIATELY. |
Buttons
Here is a basic explanation of all buttons and their functions that camera has.
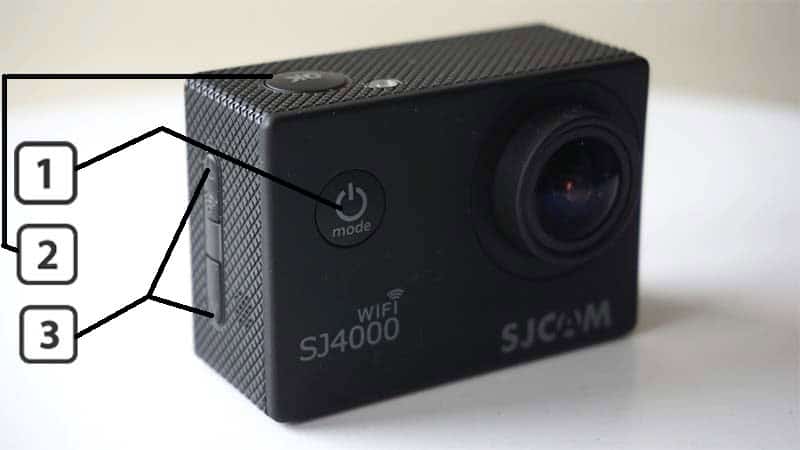
- Power/Mode: Press and release to turn on the camera. Press and release to change modes. Press and hold to turn off the camera.
- OK: Select menu items, take pictures, start or stop recording videos, start or pause video playback.
- Up and Down: Press and release to navigate through menus and change letters and numbers in Setup. Press and hold to advance through several menu items in Setup. Press and hold to zoom in or out in Record or Camera modes. Press and release to fast forward or rewind videos in Playback mode. Press and release the Up button to connect to or disconnect from WiFi in Record or Camera modes.
Modes
SJ4000 has 4 different operating modes. Different mode allows different options.
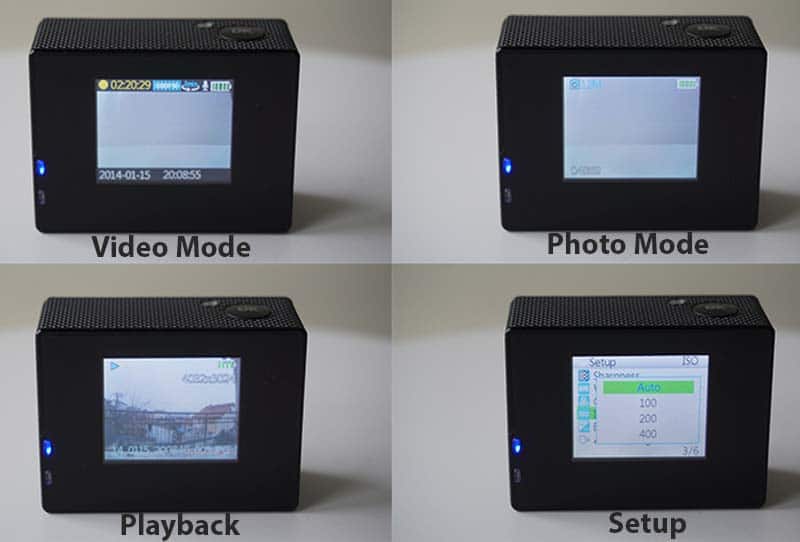
Press and release the Mode button to advance to next screen for each of the following four modes:
- Video – This is the first mode to appear after the start screen when you turn on the camera. It allows you to record videos.
- Photo – This feature is the second mode and allows you to take still images with your camera.
- Playback – You can preview media you recorder and delete it.
- Setup – Switch through different settings and adjust camera to suit your needs.
On-screen Display (OSD) Icons
When you turn on your SJ4000 you will notice that there are plenty of symbols on the LCD screen. All these icons indicate particular function or option. Below is an overview of each and every icon that appears on the screen. Be aware that depending on the mode in which camera is (Photo,Video, Time-Lapse, etc) different symbols will be shown.
Tip :If you find these icons distracting, you can turn them off in Settings>OSD Display>OFF.
BATTERY SYMBOL SHOWN ON DISPLAY
- The battery charging symbol shows bars moving across a battery from left to right.
- When all bars are full and stop moving it means battery is fully charged -OR- that the camera is connected to the charger and is operating without a battery.
RECORD MODE ICONS
The following icons will only be shown when On is selected in OSD mode in the Setup menu.
Standard recording mode icons
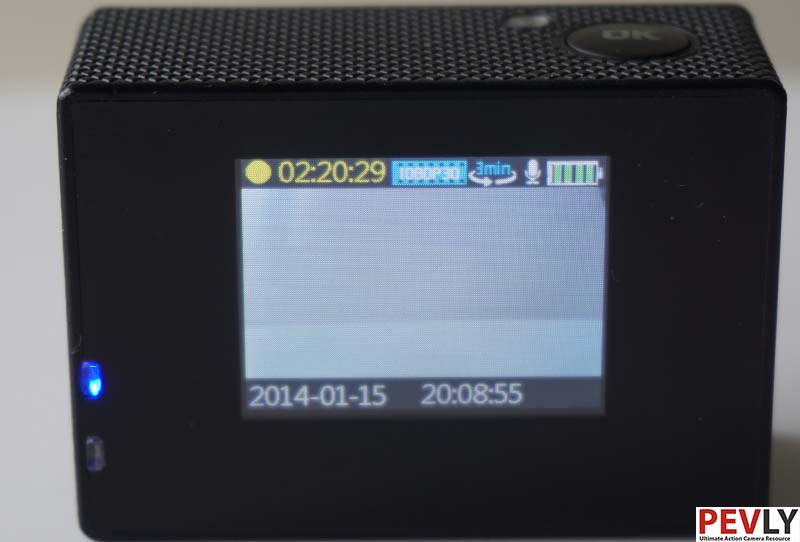
In standard Record Mode, icons across the top beginning at the top left corner-
- Steady yellow circle followed by steady yellow numbers: Record mode selected. The yellow numbers are the remaining video recording time based on available memory and recording settings. -OR-
- Alternating red and yellow flashing circle followed by steady red numbers counting up from 00:00:00: recording video with the time for that segment. Yellow or red numbers shown in format HH:MM:SS.
- White letters and numbers in a blue box: video resolution
- White arrow loop with number: shows the Cyclic Record time segments. Indicates Off, 3, 5 or 10 minutes.
- Microphone: audio recording is On
Video lapse mode icons
In Video Lapse Mode, icons across the top beginning at the top left corner –
-
- A steady yellow clock face with a number: Video Lapse mode selected with the time interval set as shown. Indicates 1, 2, 5, 10, 30 or 60 seconds -OR-
- A flashing red clock face with a number followed by steady red numbers 00:00:00: Recording in Video Lapse at the time interval shown on the clock face
Other record mode icons
All Other Record Mode icons clockwise beginning with the battery icon at the top right corner :
- Battery icon: indicates relative battery charge remaining -OR- uses a plug symbol within the battery icon to indicate that the battery is charging or that the camera is operating without a battery while connected to the charger.
- Broadcast symbol: only present while using WiFi. Flashing white indicates WiFi on but not connected. Steady blue indicates WiFi on and connected.
- Time: shows current time in 24-hour clock, HH:MM:SS. Time resets to 00:00:00 when the battery is replaced. Sometimes it resets to the current time when the camera is connected via WiFi to a smartphone.
- Date: shows current date in YYYY-MM-DD. The date resets to default when the battery is replaced. Sometimes it resets to the current date when the camera is connected via WiFi to a smart device.
- Octagon with letter F: Motion Detection is On
- Key symbol: indicates the video is protected during Delete. CAUTION: All videos and photos including protected videos are deleted when the memory card is formatted.
The following icons are described clockwise beginning in the top left corner.
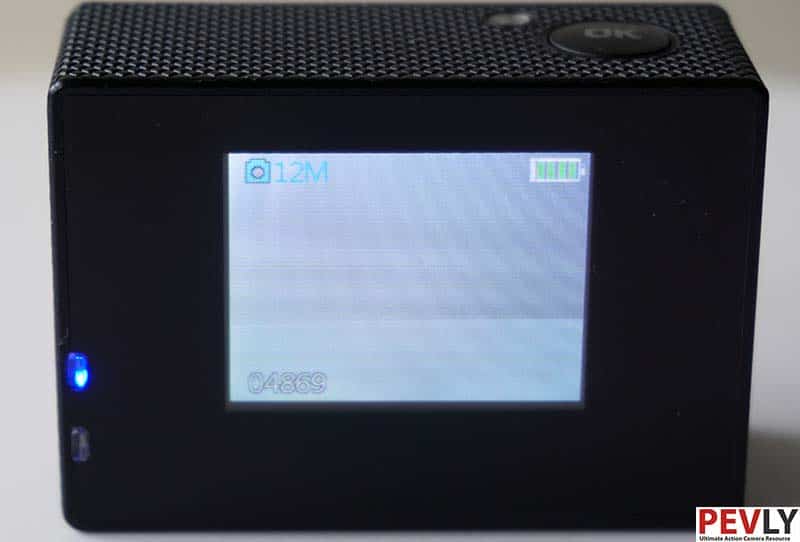
PHOTO MODE ICONS
The following icons will only be shown when On is selected in OSD mode in the Setup menu.
- Blue camera symbol: Camera mode
- Image size: in megapixels (e.g., 3M).
- Battery icon: indicates relative battery charge remaining -OR- uses a plug symbol within the battery icon to indicate that the battery is charging or that the camera is operating without a battery while connected to the charger.
- Broadcast symbol: flashing white indicates WiFi on but not connected. Steady blue indicates WiFi on and connected.
- 5 or 6 digit number: the number of photos you can take at the selected camera settings with the available remaining memory
- Yellow clock face with a number: Capture Mode on with time interval shown -OR-
- Red clock face with a number: taking photos with Capture Mode at time interval shown
PLAYBACK MODE ICONS
The following icons will only be shown when On is selected in OSD mode in the Setup menu.
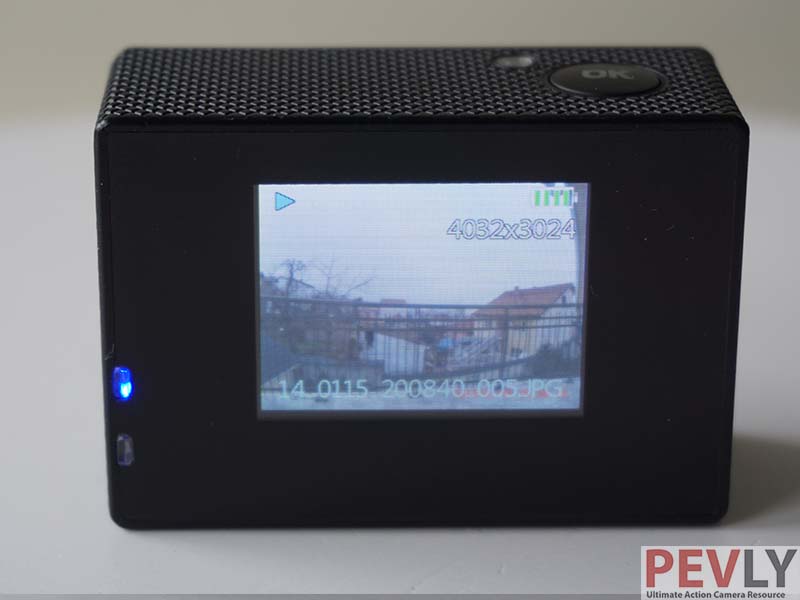
- Blue arrow: Playback mode -OR-
- Red arrow: playing back video -OR-
- Blue Pause: video playback paused
- Battery icon: indicates relative battery charge remaining -OR- uses a plug symbol within the battery icon to indicate that the battery is charging or that the camera is operating without a battery while connected to the charger.
- Resolution -OR- Image size: white letters and numbers
- File name: a string of letters and numbers across the bottom of the display as follows :-For non-protected videos: YY_MMDD_hhmmss_XXX.MOV-For protected videos: MMDD_hhmmss_XXX_EVE.MOV-For photos: YY_MMDD_hhmmss_XXX.JPGYY = year, MM = month, DD = day, hh = hour, mm = minute, ss = seconds, XXX = file sequence number, EVE = protected video, MOV = video and JPG = photo.
- Key symbol: indicates the selected video is protected
- When Off is selected for the OSD mode a Start and Stop icon will appear at the bottom of the screen and only the red arrow and blue pause icons will appear.
Basic Operation
The following describes basic operation of the camera alone. For operation when connected to a smart device via WiFi see WiFi OPERATION
CHARGE BATTERY (1)
- Plug the AC adapter into a household electrical outlet. Plug the micro USB x USB cable into the adapter and camera. The micro USB port is the upper cable connection on the side of the camera. It takes about 3 to 3-1/2 hours to fully charge a depleted battery.
- The red and blue external lights will turn on and the battery charging symbol will appear on the display. The red light shuts off when the battery is fully charged.
WARNING FOR USA OWNERS: The AC adapter is not listed by Underwriters Laboratory (UL). Therefore please carefully monitor the adapter and camera for at least 20 minutes the first time you use them to be sure they don’t overheat.
INSERT OR REMOVE MEMORY CARD
- Use a Class 10 microSD or microSDHC memory card up to 32GB.
- Insert the memory card into the memory card slot on the side of the camera. The slot is spring-loaded and the card should be pushed in until you hear a click.
- The memory card only fits into the slot one way. If it won’t go in don’t force it; turn it over and try again.
- To remove the memory card press it in until you hear it click. The spring mechanism will pop out the card far enough to be pulled out.
TURN CAMERA ON OR OFF
- If the camera is not connected to an adapter then press the Mode button to turn on the camera. The first screen to appear is the SJCam logo followed by the SJ4000 start screen followed by the Record mode screen
- If the camera is connected to an adapter with or without a battery installed and the camera is off, press the Mode button to turn on the camera. The first screen to appear is the SJCam logo followed by the SJ4000 start screen followed by the battery charging screen. To advance to the Recording mode screen press the Mode button.
- Press and hold the Mode button to turn off the camera.
- If the camera is off and you then connect the camera to an adapter, with or without a battery the camera turns on automatically and the battery charging screen appears after the SJ4000 start screen. To advance to the Recording mode screen press the Mode button. When you disconnect the charger the camera turns off automatically.
- The camera also turns on automatically when you connect it to a computer using a USB cable. The dialog box for “Mass Storage” or “PC Camera” appears after the SJ4000 start screen. It turns off automatically when the cable is disconnected.
- Also see Car Mode below to set the camera to turn On and Off automatically.
RECORD VIDEO
- Record mode is the first mode screen to appear on the display when you turn on the camera. If you are not in Record mode, press and release the Mode button until the Record mode screen appears.
- Press the OK button to begin recording. The steady yellow circle icon will change to an alternating yellow and red flashing circle. The recording time appears at the top of the display in red numbers. Press the OK button to stop recording.
- Press the Mode button while recording to protect a video from accidental deletion. A key icon will appear on the display.
- Press and hold the Up button to zoom in up to 4x. Press and hold the Down button to zoom out. (2)
PLAYBACK VIDEO
- Press and release the Mode button until the Playback mode screen appears on the display. Press and release the Down button to advance to the next video. Press and hold the Down button to advance through several videos. An image of each video and photo will appear. Press the OK button for playback. The blue arrow icon changes to red. Press the OK button again to pause. A blue pause symbol replaces the red arrow. Press the up button to go back to the previous video.
- When playing back a video, press and release the Down button once to fast-forward (FF) at 2X speed, press again to FF at 4X, again to FF at 8X. Press and release the Up button during FF to decrease by one setting. Press and release the Up button once during playback to rewind at 2X speed, press again for 4X, again for 8X. Press and release the Down button to reduce rewind speed by one setting.
- Also see TV-Out in the Setup Menu section below for playback using an HDMI connection.
TAKE PHOTOGRAPHS
- Press and release the Mode button until the Camera mode screen appears on the display.
- To take a photo, press the OK button.
- Press and hold the Up button to zoom in up to 4x. Press and hold the Down button to zoom out. (2)
VIEW PHOTOGRAPHS
- Press and release the Mode button until the Playback mode screen appears on the display. Press and release the Down button to advance to the next photo. Press and hold the Down button to advance through several photos. An image of each photo and video will appear. Press the Up button to return to the previous photo.
- Also see TV-Out in the Setup Menu section below to view photos using an HDMI connection.
CAR MODE (Dash camera function)
SJ4000 can be used as a dash-camera (camera in your vehicle). Following explains how to use SJ4000 in a car camera mode.
- Press the Mode button until the Setup menu appears. Navigate to Page 5 of the menu, select Car Mode then select On.
- Adjust any other settings on the Setup menu to your preference
- Plug the camera into a 12V adapter and plug the adapter into a 12V outlet in your vehicle. Car Mode works with or without a battery in the camera
- When you start your vehicle the camera turns on and starts recording video automatically. When you shut off your vehicle it stops recording and turns off automatically. You can also turn off the camera manually while recording.
- Camera and Playback modes are disabled while recording in Car Mode and no setting can be changed. Video Lapse is disabled during Car Mode even if it’s turned On
- After the camera turns off you can turn it On manually and operate it as normal if there is a battery in the camera
- CAUTION: Be careful not to use a continuously powered 12V outlet when Car Mode is On because the camera will operate continuously whenever it’s connected and might drain the vehicle battery.
COPY FILES TO A COMPUTER
- Connect the camera to computer using a micro USB x USB cable.
- The camera turns on automatically and a dialog box on the camera display asks if the camera is Mass Storage or a PC Camera. Highlight Mass Storage and press the OK button. A blue screen with the words Mass Storage will appear on the camera.
- Alternative Method: Remove the memory card and insert it into a card reader. An SD card adapter might be needed.
- With either method follow the procedures you normally use to download videos and photos.
DELETE VIDEOS AND PHOTOS
- To delete selected videos and photos except protected videos, use one of the following two methods. (3)
1.1 a. During Playback navigate to a specific video or photo. Press and hold the Up button.
b. A “Delete” box will appear with “Delete Current?”, “Delete All?” or “Cancel”.
c. Select “Delete Current?”. When prompted to “Erase This?” select “OK”.
1.2. a. Press and release the Mode button until the Setup menu appears on the display.
b. Navigate to page 6 of the Setup menu and select Delete.
c. Highlight “Delete Current” and press the OK button.
d. When prompted to “EraseThis?” highlight “OK” then press OK button. - To delete all videos and photos except protected videos, use one of the following two methods. (4)
2.1. a. During Playback navigate to a specific video or photo, press and hold the Up button.
b. A “Delete” box will appear with selections “Delete Current?”, “Delete All?” or “Cancel”.
c. Select “Delete All?”. When prompted to “Erase All Images?” select “OK”.
2.2 a. Press and release the Mode button until the Setup menu appears on the display.
b. Navigate to page 6 of the Setup menu and select Delete.
c. Highlight “Delete All?” and press the OK button.
d. In response to “Erase All Images?” highlight “OK” and press the OK button. - To delete all videos and photos including protected videos, use the following method.
a. Press the Mode button until the Setup menu appears on the display.
b. Navigate to page 6 of the Setup menu, highlight Format and select by pressing the OK button.
c. In response to “All data will be deleted” highlight “OK” and press the OK button. - Alternative method: To delete some or all videos and photos including protected videos, remove the memory card and insert it into a memory card reader connected to your computer. Download video and photo files and select and delete them as you would normally on your computer. You can also use your computer to format the card to delete all files.
UPDATE FIRMWARE
Before you attempt to upgrade the firmware, you should know that new firmware upgrades bring improvements to camera software and fix issues. Also by not following instructions carefully or installing a wrong firmware, you may brick your camera which can cause it to malfunction.
Before you decide to upgrade, make sure to check manufactures site and ask for assistance unless you are 100% sure you know what you are doing. Do a little big a reasearch on YouTube, as for most upgrades there are video tutorials.
Here is a step by step instruction on how to upgrade the firmware, but once again, process may vary depending on your camera model.
- Make sure to check official manufacturers site for correct FW version
- Inside camera settings check the firmware version already installed on your camera.
- If the version is already the same as the one on the manufacturers website, that means your camera has the latest version.
- If you notice the difference (for instance you see 1.6 in the camera and on manufacturer website latest one is 1.8 or 2.3) you can attempt to upgrade your camera. If by any chance you have doubts in your camera authenticity, DO NOT UPGRADE prior to contacting the manufacturer.
- Download FW from official website. For SJ4000 here is where you can download them. (For other cameras Find |Firmware| section in the navigation menu andchose adequate model).
- Unzip the folder
- Plug in your camera into the PC via the USB cable.
- Turn it on and chose Mass Storage
- Enter the memory card from the PC (My Computer>MemoryCard name)
- Copy the firmware file with the name .BIN into a root of the MicroSD Card
- Turn off the camera
- Turn it on again
- Wait while it upgrades (30 seconds usually)
- If will turn on automatically
- Chose Mass Storage again, and DELETE .BIN file, otherwise your camera will upgrade again
- Once .BIN is deleted, turn the camera off, and it should work on the latest firmware
USE HOUSING WITH WATERPROOF OR SLOTTED BACK DOOR (4)
- WARNING: The waterproof back door looks nearly identical to the slotted back door. Be sure you’re using the waterproof back door before immersing the housing in water.
- To use the housing, insert the camera facing forward, close the back door and place the back edge of the latch along the top of the back door. Press the latch down and forward until you hear it click into place.
- To remove the camera, slide the tab on top of the latch in the direction indicated while lifting up on the front of the latch. The latch will loosen and the housing can be opened. Carefully tip the camera out of the housing.
- To change the back door, open it 90 degrees and push it back off the main housing at the hinge. To install a door press it onto the main housing at the hinge at a 90 degree angle.
NOTES FOR BASIC OPERATION
- The camera can be operated without a battery if it is connected to the charger. The zoom is electronic, not optical. It operates by enlarging and cropping a recording, not by adjusting lenses
- If you attempt to delete a protected video a blue pop-up will appear with the word “Protected!”. Writing will then appear across the screen and you will not be able to change modes using the Mode button until you have played the video for a moment.
- If you attempt to delete a protected video a blue pop-up will appear with the word “Protected!”.
- Be sure the battery is adequately charged before placing the camera in the housing.
Setup Menu
Press and release the Mode button until the Setup menu appears on the display. Use the Up and Down buttons to navigate the menu. Press the OK button to select a menu item. (1)
Page 1
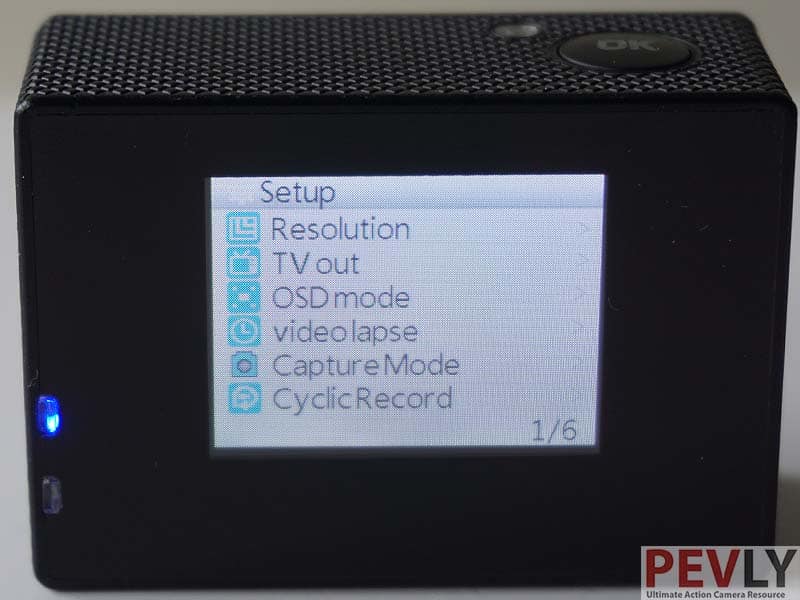
- Resolution: video resolution. Press the Up or Down buttons to see selections. Choose: (1080FHD 1920×1080 (default setting), 720P 1280×720 60fps (2), 720P 1280×720 30fps, WVGA 848×480, VGA 640×480)
- TV Out: view a live camera feed or view recordings or videos stored on the memory card using a TV or monitor with an HDMI connection. Select TV Out from the menu, choose On, connect the camera to the TV via a micro HDMI x HDMI cable, turn on the TV and select the input for the HDMI connection. However, the camera will automatically switch to TV Out On when connected and change back to TV Out Off when disconnected without going through the menu. Recording videos is disabled when connected via HDMI.
- OSD Mode: choose On or Off. When turned on, icons and on-screen data such as recording resolution, image size and others will appear on the camera display.
- Video Lapse: takes a series of photos at timed intervals while in Record mode. These can be played back as a time lapse video. Choose Off or 1, 2, 5, 10, 30 or 60 second intervals. Default Setting is Off. (3)
- Capture Mode: takes a single photo or begins automatic shooting at timed intervals in Camera mode. Choose Single or 3, 5, 10 or 20 second intervals. Default Setting is Single. (3)
- Cyclic Record: time length of file segments that a video recording is divided into. In Playback mode you can skip through segments. Select Off or 3, 5 or 10 minutes. Default Setting is 3 minutes.
Page 2
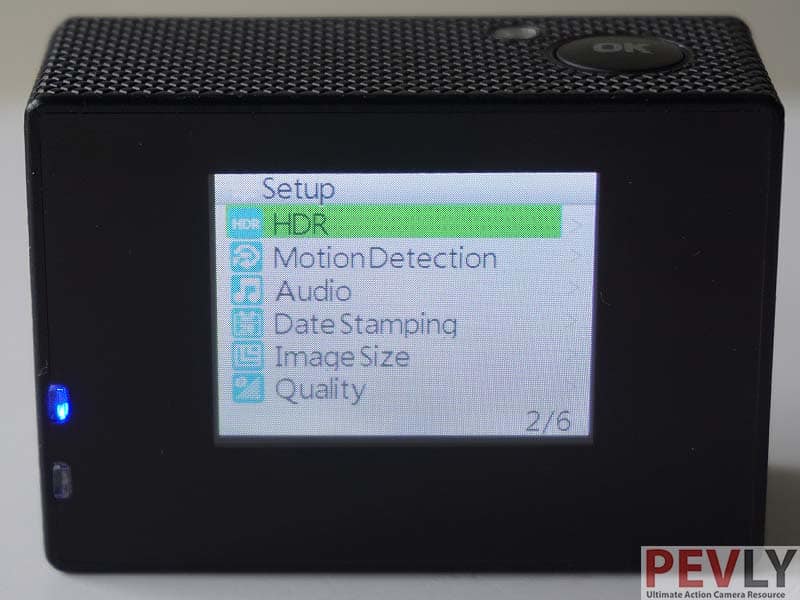
- HDR: High Dynamic Range. Turn On. Default Setting is Off.
- Motion Detection: when the camera detects movement, it begins recording video. It stops recording after 10 seconds but starts again as soon as it detects motion. To turn on Motion Detection select On. Motion Detection range is about 5 centimeters. (4)
- Audio: select Off or On. Audio is recorded along with video when On is selected.
- Date Stamping: select Off or On. The date and time will appear on recordings and photos when On is selected.
- Image Size: size of photographs. Select from 12M, 10M, 8M, 5M, 3M, 2MHD, VGA or 1.3M. Default Setting is 12M. (5)
- Quality: choose from Fine, Normal or Economy. Default Setting is Normal. (6)
Page 3
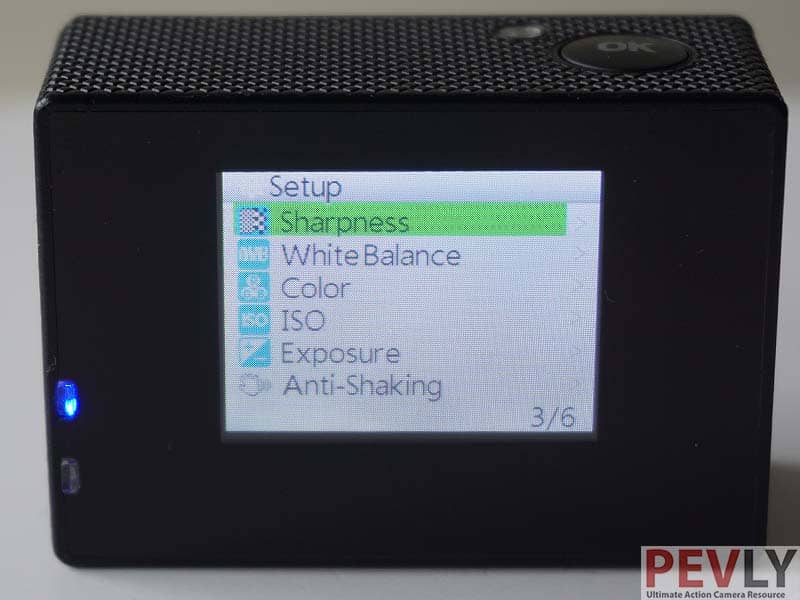
- Sharpness: choose from Strong, Normal or Soft. Default Setting is Normal. (6)
- White Balance: choose Auto, Daylight, Cloudy, Tungsten or Fluorescent. Default is Auto.
- Color: choose from Color, B&W or Sepia. Default Setting is Color.
- ISO: sensitivity to light. Lower numbers are less sensitive, higher numbers are more sensitive. Select Auto, 100, 200 or 400. Default Setting is Auto. (6)
- Exposure: choose +2.0, +5/3, +4/3, +1.0, +2/3, +1/3, +0.0, -1/3, -2/3, -1.0, -4/3, -5/3, -2.0. Default Setting is +0.0. Increasing exposure makes videos and images look lighter. Decreasing exposure makes videos and images look darker.
- Anti-Shaking: image stabilization. It helps to decrease the effects of unintended camera movements when taking an image. This does not have the effect on a video. Default Setting is Off. (6)
Page 4
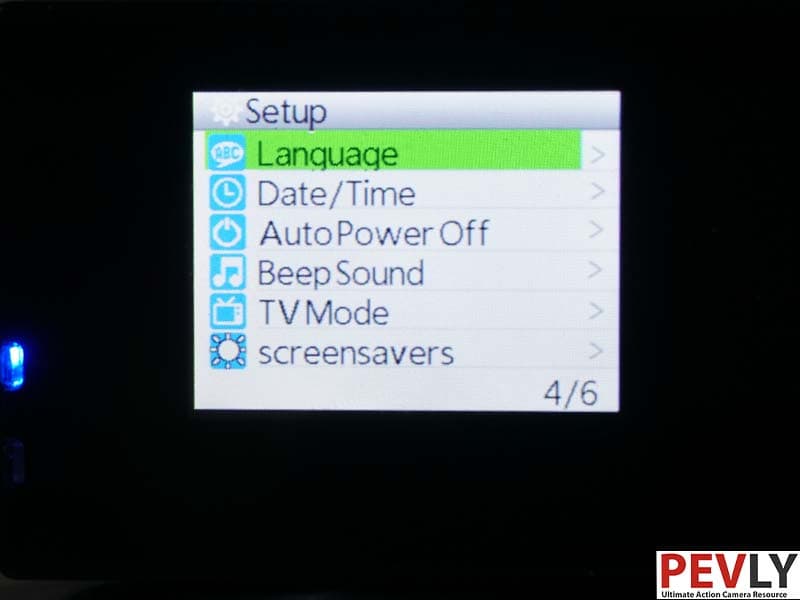
- Language: select among several languages for the display and menus. (7)
- Date/Time: set the date and time to be used for Time Stamp. (8)
- Auto Power Off: amount of time before the camera automatically turns itself off. The camera will not automatically shut off while in Video Lapse or Capture Mode, if Motion Detection is on or while recording. Choose 3, 5 or 10 minutes or Off to shut off the camera manually. Default Setting is 3 minutes.
- Beep Sound: turns the beep sound On or Off when pressing camera buttons.
- TV Mode: NTSC or PAL. This deals with frames-per-second, color encoding and other technical details for video recordings. In the US select NTSC.
- Screensavers: the amount of time before the display goes dark with the camera is still on. Choose 30 seconds or 1, 3 or 5 minutes. Choose Off if you want the screen to stay on whenever the camera is on. Default Setting is 1 minute.
Page 5
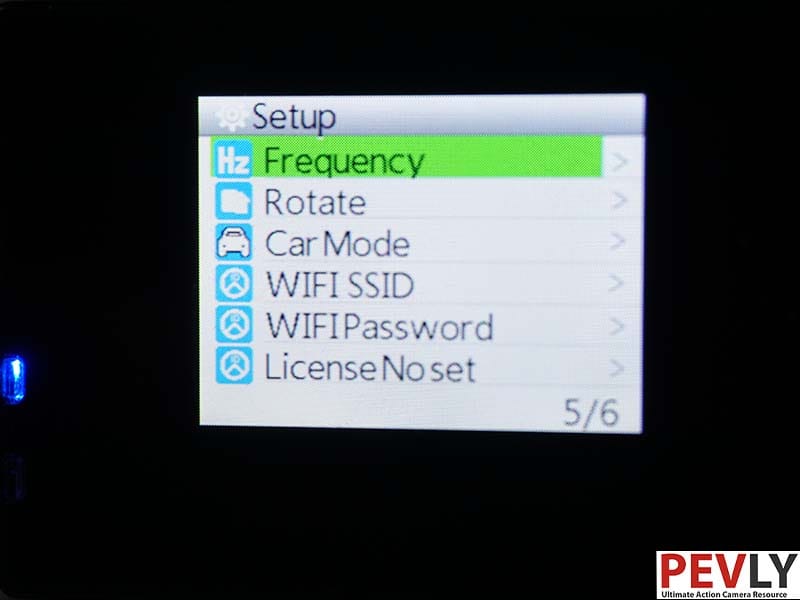
- Frequency: frequency of household electricity. Choose 60Hz for USA.
- Rotate: rotates your photos and videos 180 degrees. Use this if you need to mount the camera upside down. Choose On to rotate.
- Car Mode: choose On or Off. With Car Mode On the camera will turn on automatically when it detects power while connected to a 12V adapter.
- WIFI SSID: name of camera WiFi network. (9)
- WIFI Password: initial factory setting is 12345678. Change to any combination of up to 8 letters and numbers or leave blank for no password.
- License No Set: camera name. To enter a name for your camera, press the Mode button to enter the submenu. Press and release the Mode button to go to each entry. Use Up and Down buttons to change the value of the entry then press the OK button to select. When complete, press and release the Mode button until “OK” is highlighted then press the OK button.
Page 6
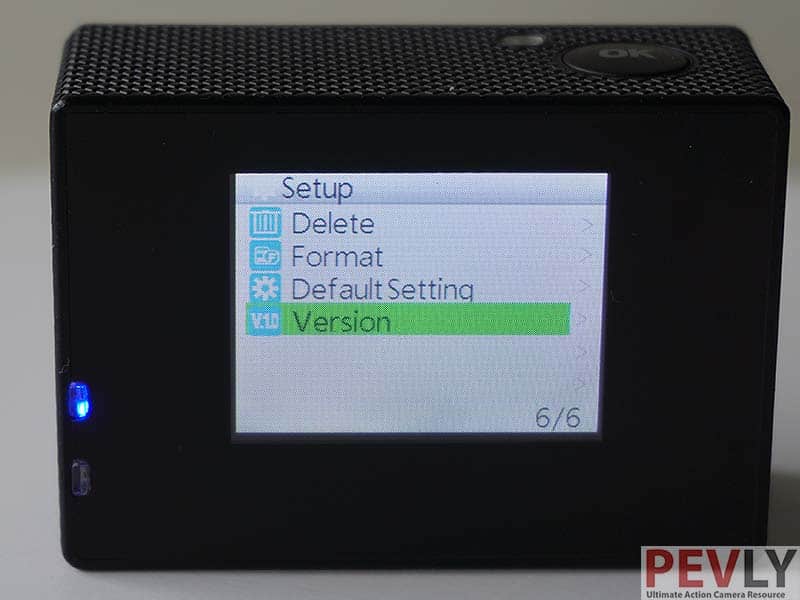
- Delete: delete all or selected images and videos except protected videos.
- Format: formats the memory card. Format a new card when you insert it into the camera for the first time. CAUTION: All videos and photos including protected videos are deleted when you format the memory card.
- Default Setting: returns camera settings to default values. (9)
- Version: shows the model name, firmware version, date of firmware and company name.
NOTES FOR SETUP MENU
- Not all settings are retained after you turn off the camera. Check your settings when you turn the camera on again.
- The 720p60 setting is a double frame rate, not a true 60fps.
- Resets to default when the camera is turned off.
- This feature is disabled during WiFi operation.
- Images larger than 3M are resized by interpolation.
- This setting can’t be adjusted during WiFi operation.
- The WiFi app is always in English.
- When you remove and replace the battery the time resets to 00:00:00 and the date resets to default. Sometimes it resets to the current date and time when the camera is connected via WiFi to a smartphone.
- When you select Default Settings the WiFi network name resets to original factory name.
WiFi OPERATION
There are two versions of SJ4000. WiFi and Non-WiFi. Having a built in WiFi allows camera to be operated remotely via the smartphone. You first need to install an app. There are both Androird (SJCAMHD ) and iOS apps ( SJCAM Zone iOS).
If yours is not a WiFi, you can skip this page.
TO CONNECT TO SMART DEVICE VIA WiFi:
- Turn on WiFi on camera by pressing and releasing the Up button.
- Turn on WiFi on smartphone. Select the connection to the camera if necessary.
- After the smartphone verifies the WiFi connection, open the SJCam application by touching CONNECT YOUR CAMERA.
APP ICONS ON SMART DEVICE: (1)
The following describes the application icons beginning in the top left corner and continuing clockwise with the device in landscape orientation.
- Resolution: white letters and numbers such as “1080P” in Video mode -OR-
- Resolution/time interval: video resolution and time interval in seconds in Timing Video mode such as “1080P/1S” -OR-
- Image size: image size in megapixels such as “3M” shown in Taking Pictures mode -OR-
- Image size/time interval: image size in megapixels and time interval in seconds such as “3M/3S” shown in Time Take Photos mode
- Broadcast symbol: indicates WiFi on and connected.
- Battery: relative battery charge remaining on camera or battery charging.
- Blue circle and line: camera power on
- Red button: in Video or Timing Video mode touch the red button to start or stop recording. In Taking Pictures or Time Take Photos mode touch the red button to take photographs.
- Wrench: Settings
- Movie camera: Video mode -OR- Still camera: Taking Pictures mode -OR- Movie camera with clock face: Timing Video mode -OR- Still camera with clock face: Time Take Pictures mode
- 5 or 6 digit number in Camera mode only: the number of photos you can take at the selected camera settings with the available remaining memory
- 4-leaf: opens a list of files currently stored on the camera’s memory card. On the file list touch the reel icon to copy a file to the smartphone. Touch the garbage can icon to delete file.
- Date stamp: shows date in YYYY/MM/DD and time in 24-hour clock
SMART DEVICE APP MODE SELECTION:
- Touch the movie camera, movie camera with clock face, still camera or still camera with clock face icons to show a dialog box with the following mode menu selections:
- Touch “Video” for Record mode.
- Touch “Taking Pictures” for Camera mode.
- Touch “Timing Video” for Video Lapse mode.
- Touch “Time Take Pictures” for Capture mode.
SMART DEVICE APP SETTINGS MENU:
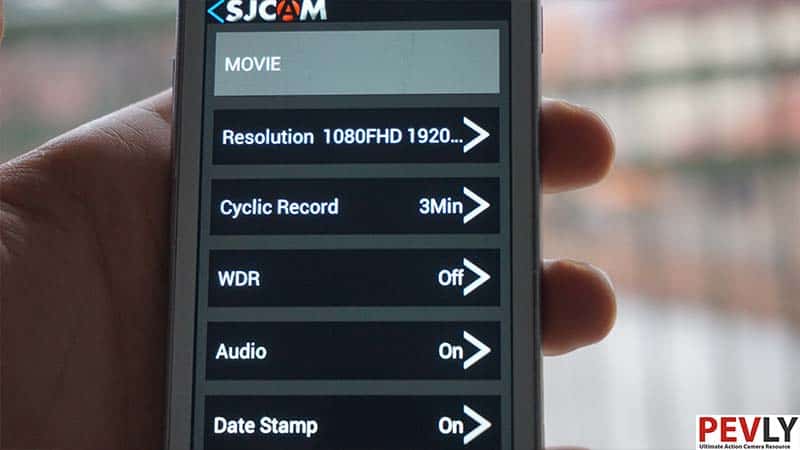
MOVIE – settings are for Video mode
- Resolution: Video resolution (1080FHD 1920×1080, 720P 1280×720 60fps (2), 720P 1280×720 30fpsWVGA, 848×480,VGA 640×480)
- Cyclic Record: time length of file segments that a continuous video recording is divided into. In Playback mode you can skip through segments. Select Off or 3, 5 or 10 minutes.
- WDR: Wide Dynamic Range. Turn on.
- Audio: select Off or On. Audio is recorded along with video when On is selected.
- Date Stamp: select Off or On. The date and time appear on recordings and photos when On is selected.
VIDEO TIME LAPSE – setting is for Timing Video mode
- Video Time Lapse Set: takes photos automatically at timed intervals while in Record mode. Choose 1, 2, 5, 10 or 30 second or 1 minute intervals. There is no video capture between photos. This is the same as Video Lapse in the camera Setup menu or Timing Video in the app Video/Photo Submenu. (3)
PHOTO – settings are for Taking Pictures mode
| Image Size | size of photographs. Select from 12M, 10M, 8M, 5M, 3M, 2MHD, VGA or 1.3M. (4) |
|---|---|
| White Balance | choose Auto, Daylight, Cloudy, Tungsten or Fluorescent. Default is Auto. |
| Exposure | choose +2/3, +1/3, +0.0, -1/3, -2/3, -1.0, -4/3, -5/3, -2.0. Default Setting is +0.0. |
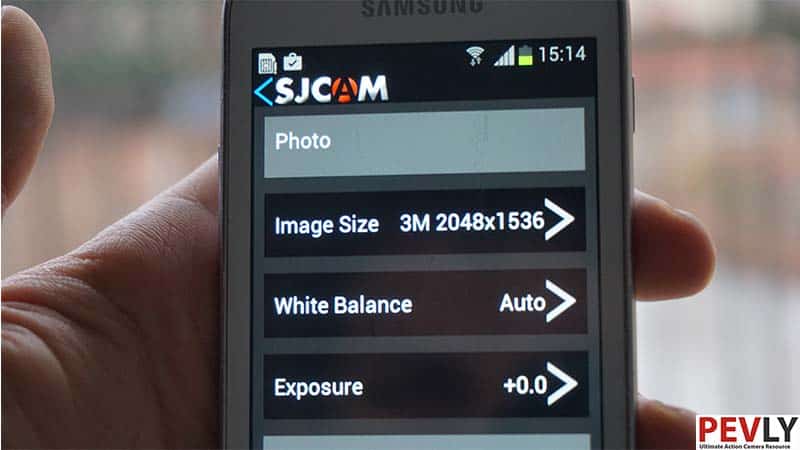
PHOTO TIME LAPSE – setting is for Time Take Pictures mode
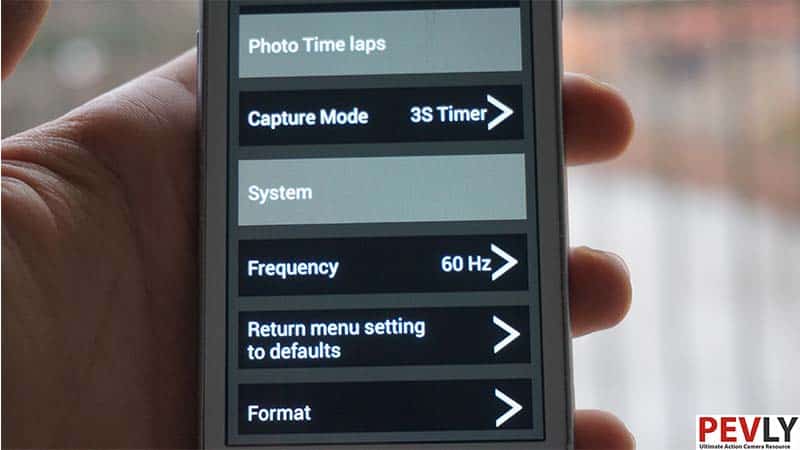
- Capture Mode: takes a single photo or begins automatic shooting at timed intervals in Camera mode. Choose 3, 5, 10 or 20 second intervals. This is the same as Capture Mode on the camera Setup menu or Time Take Pictures in the app Video/Photo Submenu. (3)
SYSTEM
- Frequency: frequency of household electricity.
- Return menu setting to defaults: returns camera settings to default values. (5)
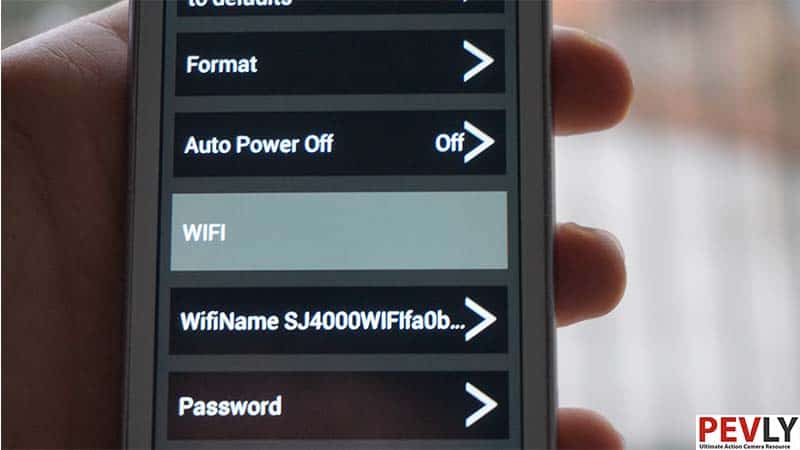
- Format: formats the memory card. Format a new card when you insert it into the camera for the first time. CAUTION: All videos and photos including protected videos are deleted when you format the memory card.
- Auto Power Off: amount of time before the camera automatically turns itself off. Camera does not automatically shut off when recording video, in Video Lapse or Capture Mode, or if Motion Detection is on. Choose 3, 5 or 10 minutes or Off to shut off the camera manually.
- WiFi Name: name of camera WiFi network. (6)
- Password: initial factory setting is 12345678. Change to any combination of up to 8 letters and numbers or leave blank for no password.
FOOTNOTES NOTES FOR WIFI Operation
- Some smart device icons that are not part of the app appear around the perimeter of the screen.
- The 720p60 setting is a double frame rate, not a true 60fps.
- This resets to the camera default setting when camera is turned off.
- Images larger than 3M are resized by interpolation.
- When selecting default settings the WiFi network name will reset to the original factory name.
- If you select Default Settings on the camera when not connected via WiFi, the WiFi network name resets to the original name.
GENERAL NOTES FOR WIFI OPERATION
- After the WiFi connection has been established, all functions at the camera are disabled except taking photos and starting or stopping video recording.
- The SJCam WiFi application must be installed on your smart device in order for WiFi to function. The app allows you to see the camera view in real time, record video, take still photographs, and change some camera settings.
- The WiFi app is in English regardless of the language chosen in the camera Setup menu.
- Zoom, Motion Detection and Protected Video functions are disabled during WiFi operation.
- Adjustment of settings for Quality, Sharpness and ISO are disabled during WiFi operation.
- Anti-Shaking can’t be turned On or Off during WiFi operation.
- The app has an On or Off setting for WDR (Wide Dynamic Range). The camera has an On or Off setting for HDR (High Dynamic Range). WDR and HDR are the same thing.
- Files are not stored directly on your smart device when recording videos or shooting photos via WiFi. To view them on the smart device they must be copied to to it.
- Settings changed during Wi-Fi operation are retained by the camera after Wi-Fi is disconnected.
- You can check the version of the app by touching the gears icon on the app start screen.
- This OPERATING CAMERA FROM A SMART DEVICE VIA WIFI section describes WiFi operation with app Version 2.9.8 (422) using a Samsung Galaxy S4 smartphone. Menus, settings, operation, etc., might vary with other firmware versions or other Android or iOS smart devices.
General Information
- The camera can record about 1-1/2 to 2 hours on a fully charged battery at 1080p30 with the display and WiFi off.
- Additional batteries and external single- and dual-battery chargers are available separately.
- To change the battery, open the battery compartment door on the bottom of the camera by sliding the tab and lifting up on the door. Remove the existing battery by pulling up on the battery strap. Install a freshly charged battery and push it all the way down into the compartment. Make sure the tab is up and the battery contacts line up with those in the bottom of the compartment. Replace the compartment door. For convenience, leave the battery tab sticking out when you replace the battery compartment door. This makes it easier to open.
I hope you enjoyed this manual. Do not forget to check full review of SJ4000 and video review for more information on this camera. For those of you who prefer printed document, you are free to download this manual in PDF. All other action cameras including later releases of SJCAM models can be found on this page.