Search results for: “JGAurora A5”

  • JGAurora A5 Review

    JGAurora A5 Review

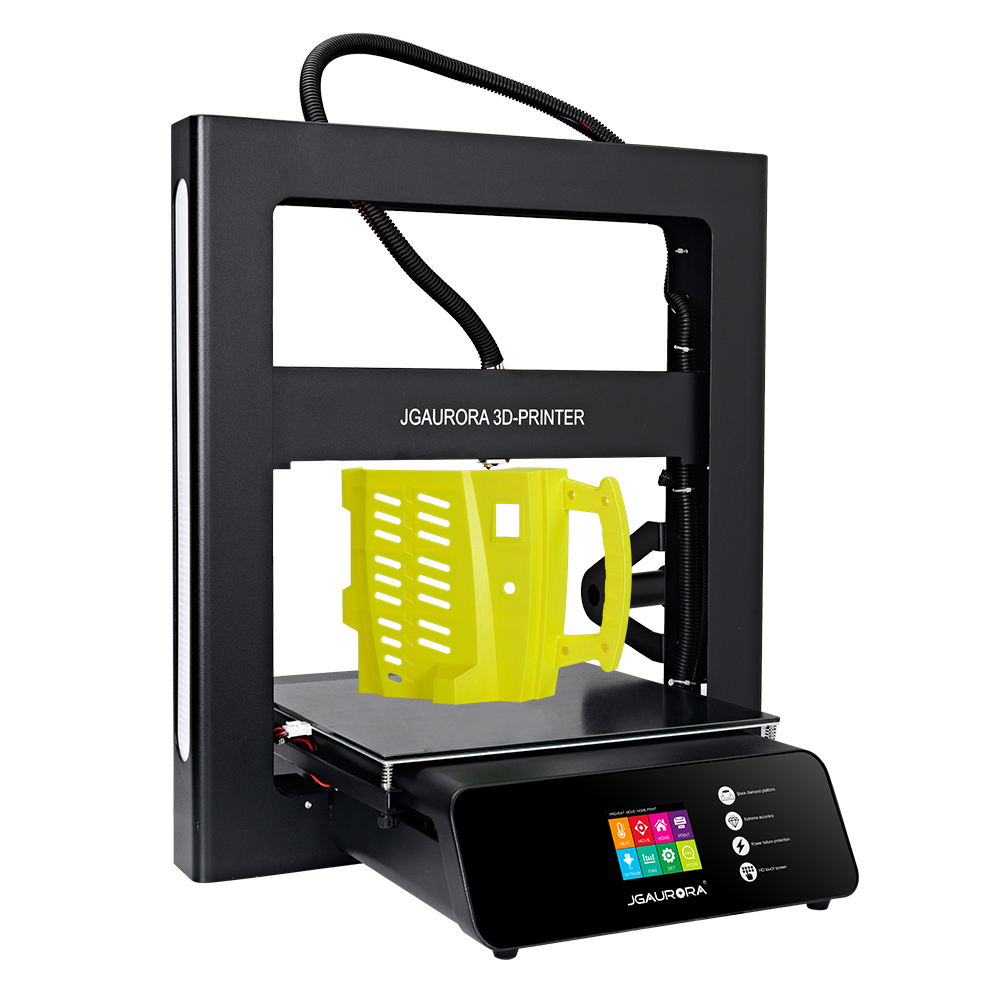
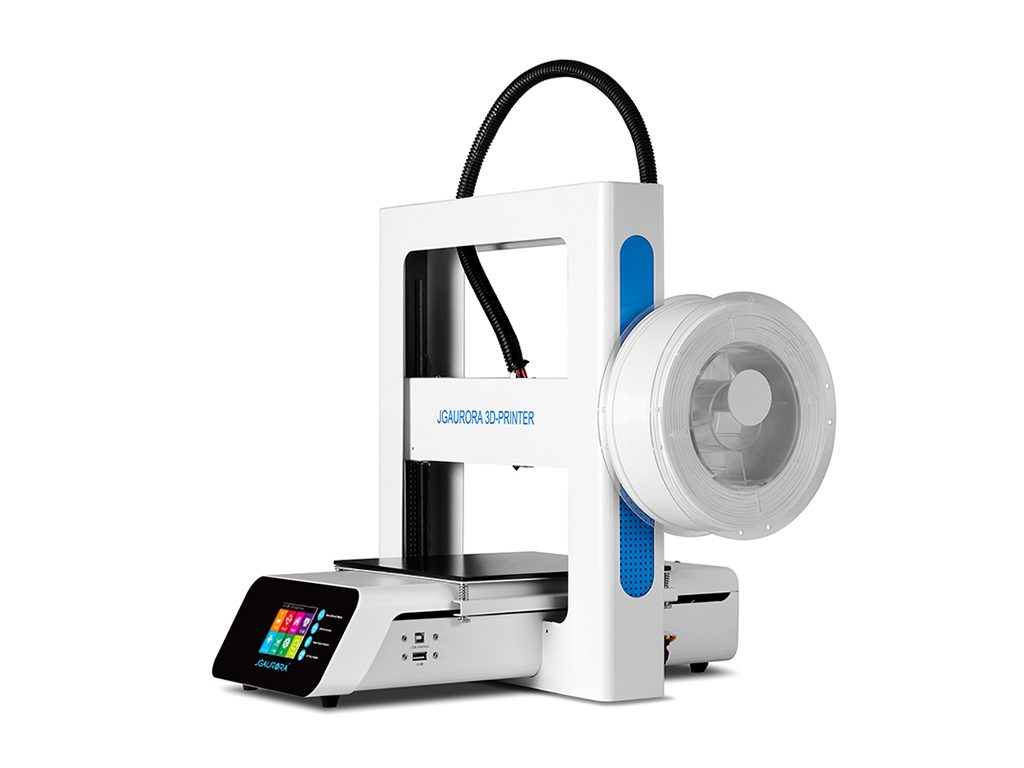
    JGAurora A5 Review

    Is the JGAurora A5 just a bigger copy of the A3S? Let’s find out!

    A5 3d printer

    After reviewing the JGAurora A3S and liking that printer very much, the A5 is welcome. This printer was sent to me for review, and I haven’t been paid for doing it, nor have received anything except the printer to review. The findings are therefore based only upon my opinion and experience. 

    The A5 looks slick and professional. When I first reviewed the A3S JGAurora I had a problem with the power supply, and their customer support. Since then, they have been on top of things and are listening to their customers. From the Facebook group talks they learn what is wrong with their products – and improve these as they go. For instance, the Z-axis smooth rod upper supports were 3D printed, and kept breaking during shipping. They since replaced this with aluminum parts.

    Technical Specifications

    [go_pricing id=”jgaurora_a5_5b2cf323e1154″]

    Unboxing

    I really don’t grasp why those unboxing videos are so popular! I understand that people are curious, though. I’m more into looking at the finished product and it functions.

    The A5 comes in three pieces: its base, the upper portion, and the spool holder. Also included in the box are a few Allen keys, a 16GB SD stick, and  250g roll of PLA filament. It’s nice they include filament, as the most companies do not, or they just throw in a 10m piece that can’t print much. Also, the added length usually is not very good and often jams in the printer.

    USB Stick

    Most 3D printers use micro SD, or standard SD cards. These are okay, but are typically harder to access as these are placed in the motherboard, or behind the LCD screen. The A5 uses standard USB stick which is cheap and easier to deal with. Not all computers have SD slots, and very few have micro SD slots.

    The USB comes with the JGAurora-branded Cura. Also on the stick is the User Guide, and a 4-seconds long (!) assembly video; the same as with the A3S.

    Assembly

    Assembling this printer is so easy that anyone can do it. It consists of placing the two pieces together and fixing 4 screws into the bottom. After that, simply screw in the filament holder to the side, and plug in four wires to the side of the base. The entire thing was ready for operation in less than 5 minutes. As I said, there is an assembly video on the USB Stick, but it is only 4 seconds long, and why they made it so short is beyond me.

    Print Quality

    I have been 3D-printing for quite a while. Almost any printer can print well, given enough understanding, time, and effort. It’s always a surprise when some model prints extremely well right out of the box. The A5 does it, and so is the perfect beginner’s printer. At least that has been my experience with it. It’s right up there in output quality with the prints of the Tevo Black Widow and Tornado. Even better, in my experience. With the Tornado I had to install the TL Smoothers on the X and Y motors to remove the salmon skin from the prints. Salmon skin are lines on the print that look like a piece of sliced salmon. It’s no big deal and easy to fix.

    I’m sure the PLA filament that comes with the printer is probably some cheaper stuff, but it printed the Chinese Money Cat that comes pre-sliced on the SD card very well. I’m sure I’ll find a good use for this filament.

    Select PLA

    PLA being the easiest to print, there has been an influx of PLA types recently. A Canadian company asked me to review their Select PLA. The filament prints beautifully and is premium at a good price.

    What is a 3D printer review without printing a 3DBenchy? Benchy (short for benchmark) is a little boat that was developed to test print aspects; such as the text on the bottom, and overhangs like the front of the boat. You can find out more about it at www.3dbenchy.com. The Benchy I have printed came out perfect!

    One issue people have while printing things is tolerance. Most of 3D printing is printing many parts of an object, and putting the pieces together. If you print a 5mm peg that needs to be inserted into another part with a 5mm hole you can’t just print them the same size. The size of the filament being extruded will vary. So you need to either make the hole bigger, or the peg smaller. To figure out how much, you need to print a tolerance test. A Youtuber named Maker Muse created a good one that has the biggest gap in the center. It makes the printout double as a fidget spinner. It consists of 6 outer circles and 1 inner one. Each has a different gap – from .5mm down to .05mm. The A5 printed a tolerance of .2 with ease. Most printers struggle with the .2mm precision.

    Many model makers on the internet didn’t keep the tolerance in mind when they made their models. Items like the wrench that actually works are hard to print on printers valued below $500. But it works on this printer and it makes the A5 a great value. I also printed a 20mm cube that was off by a fraction of a millimeter only.

    After I have printed a drawing robot and an articulating horse for my daughter, I then printed some highly detailed things; like the Moon, Tyrannosaurus Rex, and a Batman bust. As you can see they  all look great.

    PETG

    The A5 prints well with every filament that I tried. PETG doesn’t shrink like PLA and is stronger, like ABS. But ABS is being used less and less. I won’t print with it because I read it was toxic to inhale its vapors. PETG is a good alternative but it’s stringy and hard to get the retraction settings right.  I printed parts I needed for the Tesla phone-charging station. https://www.thingiverse.com/thing:1585498 and it came out with zero stringing. Which is in big part due to settings.

    Flexible Filament (TPU)

    Printing flexible filament is very cool and I like to test how well a printer copes with it! I print squishy little Pokemon or such figures for the kids. If the extruder gear has a lot of space between it and the Bowden tube, then it could get wound around it and ruin the print. To print TPU properly you should print it at 15-20mps with no retraction. The A5 prints flexible filament with no problems at all.

    Software

    Cheap printers always arrive with free open-source software. JGAurora re-branded their own version of Cura 2.5 which is open source and comes on the USB stick. I, for one, do not like Cura 2 and 3 at all, but Cura 14 and 15 seem OK. But luckily there are others you can download – such as Slic3r and Craftware.

    Upgrades and Modifications

    Being almost perfect out of the box, this printer doesn’t need much in the sense of upgrades. I printed new part cooling nozzle that cools the print from both sides (which is important).

    https://www.thingiverse.com/thing:2757866

    I opened my printer because of its bed size. When you are using cheaper printers it’s always best to install an external MOSFET if the bed is over 200 by 200mm in size. This one being 300 x 300mm, it’s better to be safe than sorry. Reviewing these printers I like to have extra MOSFETs at hand. Some companies, like Tevo and Creality3D, include these with their printers. It helps to keep the  high current draw of the beds from going through the motherboard MOSFETs. (Here’s one from aliexpress)

    Pros, cons, and evaluation

    PROS:

    • Full-metal construction makes this printer solid and heavy.
    • The A5 does have a heated build plate. Heated build plate is not necessary, but is recommended.
    • Full-color touchscreen. The touchscreen is a nice feature and makes the printer look more high-end. After using this touchscreen for a while, dealing with buttons and knobs becomes annoying.
    • The A5, also the A3S, is the easiest kit printer I have built to date. No assembly knowledge is needed for this printer and it gets built in minutes.
    • The printer looks great in black and with white side panels. It looks great beside the A3S
    • Filament run out sensor! This is an awesome feature. I love how it pauses and uses a filament load and unload feature to change the filament. No more worrying whether there is enough filament to finish the job.
    • Power Off recovery. I love this because I have had to use it already. Living out of the city, you are prone to experience frequent power cuts.
    • USB stick instead of the SD card. Using USB is great. USB is faster than the SD cards when writing the Gcode to the drive. Sticks are easy to get and harder to lose than the tiny cards.

    CONS:

    • Black Diamond Bed. This didn’t last on my A3S. I had to cover it with glass and use hairspray. After the third print didn’t stick, I covered the A5 with a mirror and every print has stuck since.
    • Hard to work on. The nice metal frame and enclosed bottom half make this printer difficult to work on. For instance, when I tighten the belts I have to carefully disassemble quite a lot to gain access.
    • While I love the touchscreen controls and it being the same as the one on the A3S, the A5 screen is more sensitive and one-touch often results in two touch responses.

    Evaluation

    The A5 is a great printer. Unlike the Tevo Tornado and other larger volume printers, it’s in one piece. This makes it easy for me to move. I know most people don’t move their printers but I do it often, as I frequently get new printers and have to get rid of older ones. I’ll say this; I will be keeping the A5 for a long time, if not for good! It will have to be a special printer to replace this as my new go-to printer.

    All that being said, I don’t think you can go wrong with the JGAurora A5 printer. I know there are reviews out there that are more critical, but I’m a member of the official JGAurora Facebook group and they are listening to their members. For instance, after my Power supply issue on the A3S, they have updated it with a better unit that can handle the 100deg C temperature on the bed. Also, the first A5’s had issues. Like the 3D printed parts holding the Z axis smooth rods breaking in shipping. Now those parts are machined aluminum. The users complained the white panels were not fixed well and rattled. Now thes eare screwed in an are very secure.

    One thing I have to criticize is that the filament run-out sensor has changed from the A3S, and isn’t as user-friendly. I had issues feeding the filament at the beginning, but I have since figured it out. The A3S extruder was easy to feed from the beginning. After leveling the bed and followed by weeks of constant printing, it has stayed level. The design makes it secure and keeps it level.

    PRINT QUALITY: 9.5/10

    Again, the quality of the prints is impressive. It prints as well as the industrial printer we use at work.

    BUILD QUALITY: 9/10

    The build seems to keep space in mind. There is no wasted space like the other larger volume printers that keep the electronics in a tethered box attached to the printer. Simple to pick up and move, and doesn’t take much room on the desk.

    USER INTERFACE AND NAVIGATION: 7/10

    Although it has a nice colour touchscreen display, the sensitivity is an issue to me. I can’t say it’s a one-time deal as I have seen it in other reviews. But I know it can work as great as it does on my A3S.

    VALUE FOR THE MONEY: 9/10

    At $320 USD this printer is a steal. You can’t go wrong. It’s cheap but packed with features.

    Where to buy:

  • Jgaurora A3S 3D Printer Review

    Jgaurora A3S 3D Printer Review

    UPDATE: After a couple of weeks I received 2 power supply’s. It’s great that I got a response from the company as well as themselves. While slow the costumer support works out great.

    3D printing was invented in the 1980s and has come a long way in a short time. That is since the Stratasys patents expired in 2009. In 2005 Dr Adrian Bowyer started the Rep Rap project which basically means printers which can create the parts to make other printers.

    Joseph Prusa came up with the simplistic i3 design in 2012 which started the Chinese clone frenzy which, in turn, brought cheap sub-$500 printers to the mainstream. Since then, there has been little advancements in the cheaper printers. Creality came out with the CR-10 , a large volume printer under $500, using an extruded aluminum frame. Now the main Chinese printer companies have been copying one another, and pushing prices lower and lower. Reviewing basically the same printers with different volumes is OK, but I have been craving some advancements.

    In comes the Jgaurora A3S. This is a standard i3 design with some new features which come mainly on the higher end printers. A3S comes with a full metal powder-coated frame that looks great. I prefer this look over the cheap acrylicli frames and the basic-looking extruded aluminum. With the exception of the awesome looking Tevo Black Widow , which I reviewed back in September.

    The A3S also comes with a filament run out sensor that pauses the printer and lets you insert a new roll to continue the print. That should be on EVERY printer regardless. I don’t know how many times I had filament snap and come to find a partial print on the bed. We did review a printer called AnyCubic i3 Mega which has that feature and is in similar price-range as the Jgaurora A3S.

    Another awesome feature which I’m not sure how much it would cost to include, is the touchscreen display. The display is colored and uses a 4X2 square block menu which works great. But after all that, they added my favorite feature which blows me away. As I’m living in the countryside, where power outages are frequent, with the A3S I no longer need to worry. When the power fails, or if someone trips the plug, the printer will ask if I’d like to continue the next time it powers up.

    On top of all that, the printer comes with what they call the Black Diamond Bed. It is a glass bed with a special coating similar to the BuildTak surface. So far it has been very durable. Hopefully, it stays that way, because it doesn’t look removable.

    So-called Black Diamond heat bed of Jgaurora A3S is one of its interesting features.

    All these features on a sub-$500 printer gives me hope that the community isn’t sitting still. Joseph Prusa even added those features to his newest printer, along with many other things for around US$800.

    Technical Specification

    [go_pricing id=”jgaurora_a3s”]

    Unboxing

    Unboxing this printer is pretty straightforward. It comes in two main parts, plus accessories that include power supply, spool holder, filament, and all the tools to put the printer together.

    USB Stick

    Most 3D printers use micro SD or standard SD cards. These are okay, but are typically harder to access as these are in the motherboard, or behind the LCD screen. The A3S uses standard USB stick which is cheap and easier to deal with; as not all computers have SD slots – and very few have micro SD slots. The USB comes with the Jgaurora-branded Cura. Also on the stick is the User Guide and a 4-second assembly video.

    Assembly

    Assembling this printer is so easy that anyone can do it. It consists of placing the two pieces together and fixing 4 screws into the bottom. After that, simply screw in the filament holder to the side, and plug in four wires on the side. The entire thing was ready for operation in less than 5 minutes. There is an assembly video on the USB Stick, but it is only 4 seconds long. Why they made it so short is beyond me.

    Print Quality

    The print quality with this printer is OK. Not the best I’ve seen, but the other features make up for it. With some slicer setting tweaks, it can improve. I have a few different types of filaments I’d like to test, starting with PLA as it comes with a 250g roll. Many don’t come with more than 10 meters of material.

    PLA

    The included PLA is definitely not high-end quality material, but it’s nice to have it. It reduces the cost to get printing right away. The first print I tried was a fan shroud that is an STL model on the USB stick. This failed miserably, but that was my fault because I forgot to add the supports into the slicing software.

    I don’t know why I print those little cubes. People say they measure accuracy to 20mm cubed but I don’t think it should be done at such a small size. There are better means of calibrating the axis. I print it to see how smooth it prints walls. With this one I didn’t put infill and not enough top layers, so it has holes in the top. Holes could also result from insufficient part cooling and too much heat.

    It’s always good to know the tolerances of your printer. It means how far apart your pieces and walls need to be in order to print without fusing together. This print has gaps from .05 to .5. Typically printers have a .2 tolerance with a .4 nozzle. This printer struggled at .2 which isn’t the greatest but not too bad either.

    This little guy is cute, so I wanted to print it to see how it fared without supporting it. Big overhangs do show artifacts. This is the baby Grim Reaper found on Thingiverse or MyMiniFactory.

    ABS

    ABS shrinks while cooling, so the bed needs to be minimum 100 C° but 110 is recommended. The power supply included is very underpowered. My one-and-only attempt fried the power supply. After popping it open, I discovered a very bad burn on the PCB.

    PSU which arrives with the printer is under-powered and may cause burnouts when printing with power-intensive materials like the ABS.

    After my incident with the power supply, I reported the issue to the manufacturer. For the reasons which I will explain a bit later, my replacement part delivery was quite delayed. Luckily, at work, they had a 24V power supply, so I borrowed it to finish the review. At the time of writing, my replacement part is traveling from China to my location.

    So with PSU replaced, I continued my print quality tests on the Jgaurora A3S.

    PETG

    PETG is the go-to for parts that need to withstand higher temperatures like ABS, but without the warping that comes with printing ABS. Very common for parts people print for their 3D printers. Since it withstands the heat required to print ABS, it also does not require the bed to be over 80°C. It’s my only blue filament, so I printed the TARDIS from Doctor Who. It didn’t turn out that great. I also printed a corner bracket I’ve designed in Fusion 360 for my life-size TARDIS chicken coop.

    Flexible Filament (TPU)

    Flexible filaments are one of the coolest filaments out there. I purchased a roll not knowing what I wanted to do with it. I did print a set of tires for the Open RC Formula 1 project. But now that I have 4 of them, I’m going to print squishy Pokemon. I first printed a small one from the Jgaurora download page. It had an issue with the mouth of the model. After fixing it with Microsoft 3D Builder, I scaled it up and reprinted. Hard to see in pictures, but it looks awesome in person. The pictures don’t do it justice because it’s so glittery.

    PLA+

    For this review, I opened 2 rolls of PLA+ that I haven’t used until now. What a surprise! PLA+ (also known as PLA Plus) is PLA that uses higher temperatures like ABS without all the headaches of ABS. This is going to be my new go-to filament because it prints much better than ABS, and even PETG. For my first print, I printed this cool optical illusion on Thingiverse. This was created by a guy with the YouTube channel called Make Anything. I encourage you to look him up.

    Software

    Cheap printers always come with free open-source software. Jguarora had re-branded their own version of Cura 2.5 which is open source and comes on the USB stick. I, for one, do not like Cura 2 and 3 at all, but Cura 14 and 15 seem OK. But there are others you can download – such as Slic3r and Craftware.

    If you want the best it will cost you $150 USD. That is called Simplify3D. It is great because you can customize your support structure, and it prints well: www.Simplify3d.com

    Upgrades and Modifications

    The A3S is new on the market and there are no updates and Mods for it, yet. There is also A5 model which is the same as the A3S, but with a bigger build volume, so modifications for them should be interchangeable.

    Customer service

    This is a new section of the review; a process I have yet to write about. I thought it important because of how things went with the power supply. Not because it stopped, but because of the process of getting tech support from Jgaurora. Their website has an email address, and they have a Facebook group. I emailed them and joined the group. I got a bit worried when I read a post saying they would give a full refund for positive reviews.

    That’s just wrong. Knowing their target audience is people spending under $500 for their printer, they would likely be happy to oblige. Full disclosure, my printer was sent to me from for a review. They don’t expect me to be biased. So after contacting the company and days wasted by them telling me to go through for a warranty replacement part, they finally gave me a tracking number for the power supply.

    I would like to talk about the Facebook group, though. After a few days there I was, having a discussion with another member about the problems he was having. I simply didn’t think the issues were as bad as he was saying. So they removed the entire conversation and said they don’t allow comments that are negative toward their products. Imagine people going there for help, and not being able to say what is on their minds – from fear of getting removed from the group!

    We formed a Non-biased group for Jgaurora owners to get help. You can find it here if you buy one of their printers.

    Pros, cons, and evaluation

    PROS

    • The A3S is the quietest printer I have had yet. With the printer sitting on the desk beside me I found myself looking to see if it stopped because it was so quiet at times.
    • Black Diamond Bed. This is new to me so I don’t know the longevity of it but it is a positive so far. Prints stick very well while printing and are not to hard to remove when cooled.
    • Full-metal construction makes this printer solid. On top of that, it is powder-coated and won’t scratch easily.
    • The A3S does have a heated built plate. Heated build plate is not necessary, but is recommended.
    • Full-color touch screen. The touch screen is a nice feature and makes the printer look more high-end. After using this touch screen for a while, dealing with buttons and knobs is annoying .
    • The A3S is the easiest kit printer I have built to date. No assembly knowledge is needed for this printer.
    • This printer looks great with the white powder coating and blue side panels.
    • Filament run out sensor! This is an awesome feature. I love how it pauses and uses a filament load and unload feature to change the filament. No more worrying whether there is enough filament to finish the job.
    • Power Off recovery. I love this because I have had to use it already. Living out of the city, you are prone to accept frequent power cuts.
    • USB stick instead of the SD card. Using USB is great. USB is faster than the SD cards when writing the Gcode to the drive. These are easy to get and harder to lose than the tiny cards.

    CONS

    • Hard to work on. The nice metal frame and enclosed bottom half make this printer difficult to work on. For instance, when I tighten the belts I will have to carefully disassemble quite a bit to gain access.
    • Side panels look good but they are not screwed or glued to the printer. I will print something to make them more secure, or glue them in myself.
    • The biggest con for this printer is the under-powered Power Supply. If they didn’t advertise that it can run at 110° then it wouldn’t be such a problem. That is, it would still be a problem, just not a big one. ABS is not an option for this printer, so if that is what you need, then pass on it.
    • Not an open source. The company doesn’t have a link to download the firmware, so there is no way to update it with an auto level sensor. I emailed and asked for it, but no reply at all.
    • Hard to level the bed. The previous point brings me to this one. The bed level nuts are hard to turn because they are stiff and very close to the bed. Typically you could print bigger knobs for them but there is no room for bigger nuts.
    • Loose belts. The belts are loose, and I’m sure if I can tighten them the prints may look even better.

    Evaluation

    I really like this printer. The under-powered Power Supply and poor customer support is a big minus. The new power supply is on the way. They finally got it sorted, but I shouldn’t have had that much trouble dealing with them. Beyond that, it’s a good printer and I’m pleased with the prints. My scoring probably would have been higher if it weren’t for said issues. Although, those issues are dwarfed by the power failure, filament run out, and all the other positives of this machine.

    PRINT QUALITY: 

    The quality is good and will likely be better with the tightened belts. So far no one has mentioned loose belts in the Facebook groups, so it could be a one-off with my machine.

    BUILD QUALITY: 

    The quality of this printer is good. Could be better – with a proper power supply and the side panels being properly installed.

    USER INTERFACE AND NAVIGATION: 

    I can’t say enough about the touch screen. Easy to navigate and understand.

    VALUE FOR THE MONEY:

    The printer is more than enough for the money. Having higher-end features and a solidly built frame makes this printer a great buy.

    FINAL JUDGMENT:

    While I love this printer, it is hard to look past the customer service issues. That said, it is ahead of the curve and I hope those features become more mainstream with the printers under $500. Even with the customer support, you can’t go wrong with this printer because there are plenty of friendly people willing to help on the internet.

    Where to buy

  • Cheap 3D Printer Alfawise U20 Review

    Cheap 3D Printer Alfawise U20 Review

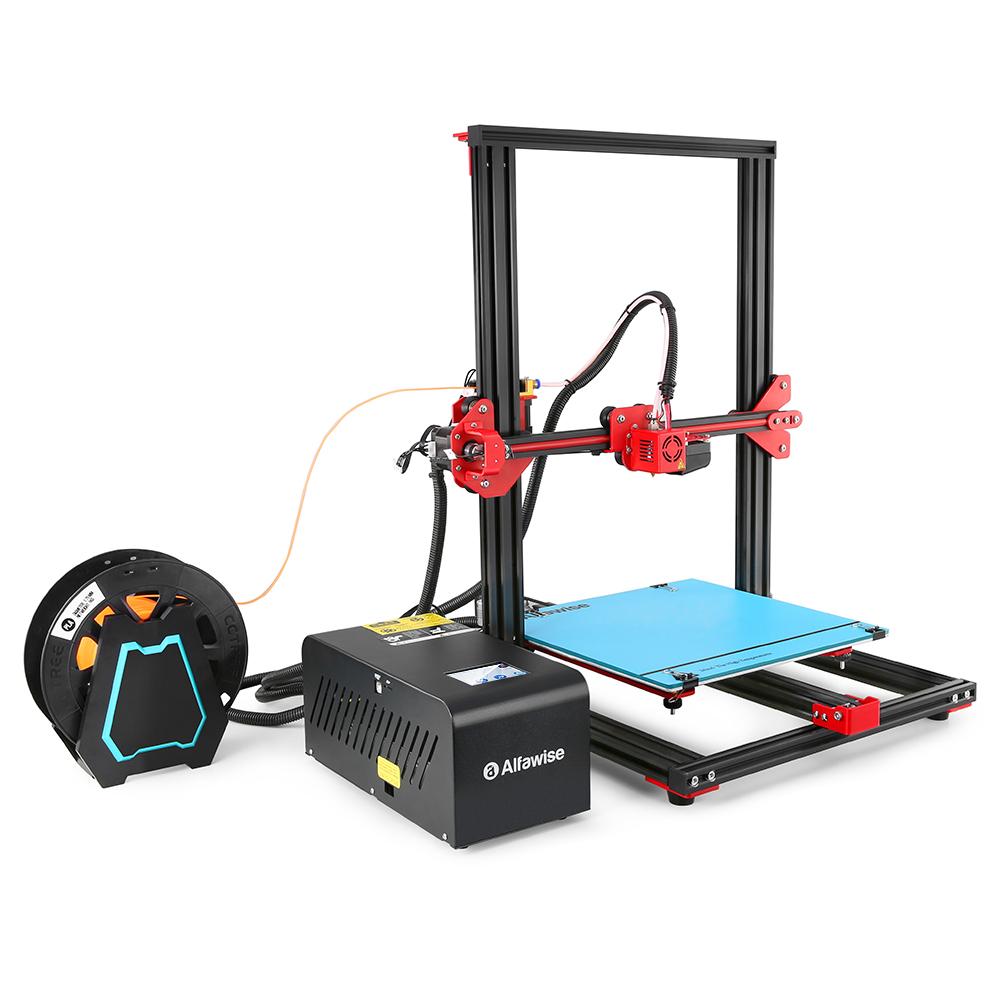
    Is this the best Cheap 3D Printer: Alfawise U20

    The Alfawise U20 is a hidden gem in a sea of 3D printers, even more so as a cheap 3D printer. At least this has been my experience so far. Looking at it, it looks like another CR10 style printer. It is similar to the Creality CR10 and the Tevo Tornado. The Alfawise U20 is a cheap 3d printer that has a couple of other features that puts it ahead of those two though.

    Alfawise U20

    Is this the Best Cheap 3D printer?

    3D printing has been a very distracting hobby. I like to tinker with them as much as I like to print with them. The Alfawise U20 doesn’t need tinkering though. I did add a filament cooling fan duct from thingiverse.com. It cools the filament from both the left and right side of the nozzle. This is typically the first modification done by hobbyists when they get a new printer. Which makes me wonder why the manufacturers don’t include them. The part cooling from the two sides can improve the prints in a big way on some printers. The Alfawise U20 didn’t seem to need it but I put one on anyway for this cheap 3D printer.

    fan duct

    Alfawise U20 3D printer: Specifications

    Brand:

    Alfawise

    Type

    DIY

    Model:

    U20

    Engraving Area

    300 x 300 x 400mm

    Frame material:

    Aluminum Alloy

    Nozzle quantity:

    Single

    Nozzle diameter:

    0.4mm

    Nozzle temperature:

    Room temperature to 250 degree

    Layer thickness:

    0.1-0.4mm

    Memory card offline print:

    SD card

    LCD Screen:

    Yes

    Print speed:

    20 – 150mm / s

    Supporting material:

    ABS,Carbon Fiber,PLA,TPU

    Material diameter:

    1.75mm

    Language:

    English & Chinese

    File format:

    G-code,STL

    XY-axis positioning accuracy:

    0.012mm

    Z-axis positioning accuracy:

    0.004mm

    Voltage:

    24V

    Host computer software:

    Cura,Repetier-Host

    Packing Type:

    unassembled packing

    System support:

    Windows / Linux / MAC

    Connector Type:

    SD card,USB

    Product weight

    12.0000 kg

    Package weight:

    14.3200 kg

    Product size:

    61.20 x 57.50 x 39.50 cm / 24.09 x 22.64 x 15.55 inches

    Package size:

    66.00 x 56.00 x 30.00 cm / 25.98 x 22.05 x 11.81 inches

    Unboxing the Alfawise U20

    The Alfawise U20 is packed like most cheap 3D printer kits these days. They come in packaging foam in layers. The top layer is the base with the bed. Under that you have the upper frame with the control box and box of tools and parts. Included with the printer is a set of allen keys, cutters, putty knife, a nozzle cleaner and full color manual. Also, with the U20 you get a 250g roll of PLA filament. It’s nice to see companies including more than the useless 10m pieces you see with many printers.

    SD Card

    The SD card comes with the typical free models free software and the manual in pdf format. I have been saying for some time now that Cura went downhill after version 15. I think the manufacturers know this too as they all include version 14 or 15 in their SD cards and USB sticks.

    Assembly

    Assembling this style printer is quick and easy. The Alfawise U20 comes about 90% complete like the Tevo Tornado and Anet E12. I prefer kits to be 0-20% pre-built, like I said above I love to tinker. I understand why they don’t for customers who are not as good at building things. It would be good if they offered different levels of completion like the Tevo Flash. To assemble the cheap 3d printer, the Alfawise U20 you just need to bolt the upper frame to the base and connect the wiring.

    There is one added feature to the Alfawise U20 that all printers mostly assembled should have. There are two bolts keeping the x gantry from moving during shipping. Be sure to remove them before you attempt to run this printer. The reason they need to be secure is that the Z motor get stretched and can break. The wiring is nicely marked with little plastic tags. You have to refer to the manual if you don’t know which is the x, y and z axis. I mixed up the X and Y on my first printer.  The bed is the Y axis.

    Also important when assembling the printer is that you set the power supply voltage before you turn it on. If it is set to 110 and you put 220 into it it’s going to kill the printer. Although if it is set to 220 and you put 110 into it you would be fine. It will not power on but it will not kill it either.

    Here are some pictures of my printer and inside the control box but I would advise you not to open your control box unless there is a problem and you know what you are doing.

    alfawise u20

    This cheap 3D printer comes with these little bed level knobs seen here on the left. The larger ones on the right are from the Ender 3. It would be nice to have the larger ones on all printers that have room for them.

    Software

    As I mentioned in the SD section the SD has Cura 15 included with it. I would say use that and if you can afford Simplify 3D then it’s worth the investment. You can keep Cura 15 on your PC and install the newest version at the same time. Give the newest version a try and if you get bad prints then try version 15.

    Cheap 3D Printer: Does it have Quality?

    The print quality of the Alfawise U20 was an awesome surprise with it being a cheap 3D printer. I thought maybe it would print similar to the Tevo Tornado and the JGAurora A5. It was nice to see it prints better than those two. That is my experience anyway. I spoke to a few others who have also said they also had a nice prints from the U20. And with mine it printed awesomely with no modifications.

    PLA Filament

    PLA is my favorite filament and getting a nice 250g roll with the printer is where I started. And to my surprise the included filament printed very well.

    Using the included roll, my first print was this little helix and this toolbox to hold the included tools.

    This is the bottom of the tool holder. I started the print with the hotend to far from the bed. Well I guess that is inaccurate, as the way the printer works the bed is set to low from the hotend. That is because the hotend starts at the same height every time and the bed is adjusted higher and lower to level the bed. The bottom layer should be smooth and solid.

    Being a batman fan and a Lego fan I printed a giant Lego Batman from thingiverse.com, the place to find almost anything you want to print.  There are a few lego Batman’s there.

    What is a review without a Benchy or two? The Benchy short for benchmark was made to test the printer’s ability to print different things like text, overhangs, bridges, circles, etc. and have something to display or give to a child after. Also there is a marvin keychain that does a similar thing. With the cheap 3D printer, the pictures don’t do these prints justice. They are very well printed compared to many other sub $500 printers. You can even see the super tiny 3D Benchy text on the back of the boat.

    PETG Filament

    PETG being an ABS alternative can be a pain to print because of it’s stringing. The two rolls I have, have not been nice to print. I thought it was the filament but after printing these I now know it was the printers. I printed the Benchy and Marvin to compare with the PLA. At first it started off under extruding so I bumped the heat by 10 degrees and it started printing very nice.

    So I then reprinted them at the higher temperature and to my surprise they printed very well. I know my past problems with the filament couldn’t have been just settings because I used those same settings here except the temp.

    So after that, I printed what I purchased the grey filament for. The Millennium Falcon! And boy did I like the results. I’m not a big fan of the shininess of the grey but it looks better in person then it does on camera.

    TPU Filament

    The one disappointment of this printer is TPU and flexibility. Because they are so flexible they are hard to feed down the long bowden tube to the hotend without it bunching up. Also when there is too much space between the feeding gear and the extruder casing then the filament can get wound up around the gear and jam. But there are prints on thingiverse that lessons the gap for flexible filament. I printed one before I got the printer, but it doesn’t fit the way the extruder is designed. I’m sure if I play with the settings and slow it down even more then the 20mmps I could get it to print. I just didn’t have time.

    The part I’m holding is supposed to fit where I put the other green box. But as you can see it will not fit.


    Modifications

    Like I said above the only mod I needed was this fan duct.

    As you can see the Tool holder was printed without the fan duct and it still printed great.

    PROS

    • Price and Quality 
    • Touch Screen Display 
    • Filament runout
    • Power recovery features
    • Well built construction

    CONS

    • Touch screen is flat on control box
    • Auto load and unload is to slow
    • Firmware is closed source so I can’t change things like the load/unload speed
    • Sleeves on the wires are not good and noisy as they rub on the frame

    PRINT QUALITY: 9.5/10

    BUILD QUALITY: 7/10

    USER INTERFACE & NAVIGATION: 8/10

    VALUE FOR MONEY: 9/10

    Final Judgement: Is this the best cheap 3D printer?

    You can’t go wrong with this printer. In fact, I would choose the Alfawise U20 over the Tevo Tornado or the JGAurora A5. The touch screen is a nice feature with a ton of settings for both the printer and the print. The flat angle is annoying but a small price for such a good printer. I’m sure someone if not me will design something to put it at a better angle. Learning 3D CAD would be fun. I did have to loosen the eccentric nut on the right side of the X gantry to prevent a bit of z tension. The look is nice with just enough of color and branding. The bed is removable glass with build tack on the top. Being a fan of glass beds I simply turned it over. So at any point on glass with hairspray and I can simply turn it back over to be stock. Also, this bed is the flattest bed I have had to date. This cheap 3D printer has so much going for it, I wish it was around when I purchased my first printer. If you purchase this printer I’m sure you won’t be disappointed. I don’t see many people with issues on the Alfawise U20 Facebook group.

    So Happy Printing and Welcome to the Hobby!

    Be sure to like us on Facebook!

  • Creality Ender 3: Review
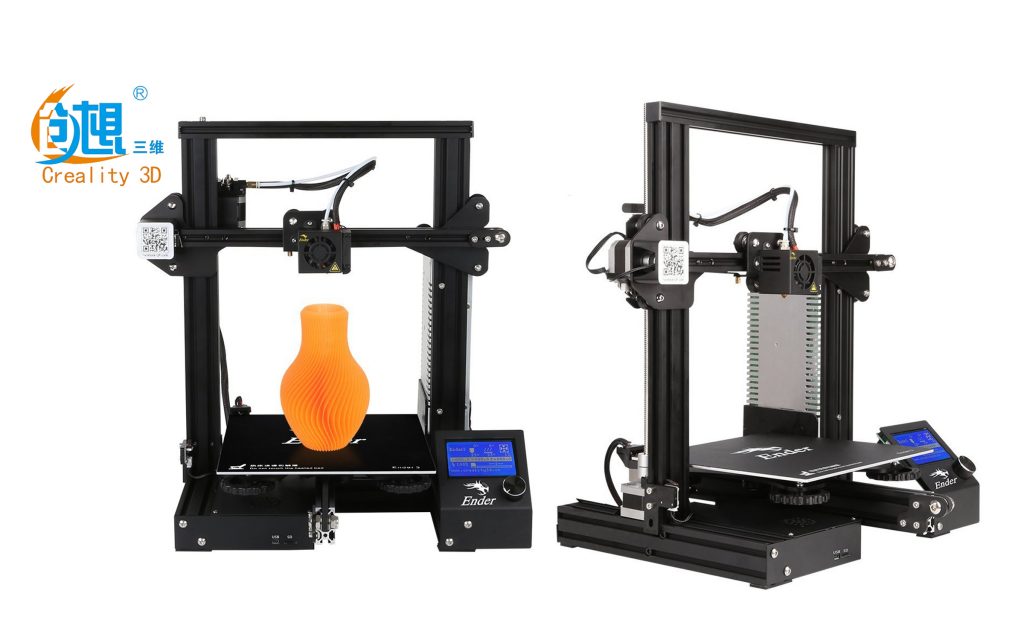
    Creality Ender 3

    Creality 3d printer

    [amazon fields=”B07BR3F9N6″ value=”button”]

    Does the Creality Ender 3 live up to the hype? Just like all the other communities, the 3D printing has its share of hyped up products. As the community grew with budget kits one printer stood out for being the first under $500 and needing little to no modifications to get great prints. That of course is the Creality CR10. Although it wasn’t without flaws and the users were quick to release improvements. Creality soon released updates to the CR10 calling it the CR10S. All the other chinese printer companies like Tevo, Anet and Tronxy followed with their own “clones” of the CR10. I use quotes because Anet tried going cheap with crappy parts and failed. Tevo copied the frame completely. Which I really liked. The Tornado being my favorite printer.

    Then Creality tried to cash in on the popularity of the CR10 with the CR10 Mini. For some reason the mini didn’t get hyped. Maybe it was timing maybe it was price. The Creality Ender 3 is super cheap and prints okay. It isn’t without issues though.

    [amazon box=”B07BR3F9N6″ template=”table”]


    creality 3d printer

    Creality Ender 3: Specifications

    Model Ender-3
    Modeling Technology FDM (Fused Deposition Modeling)
    Printing Size 220*220*250mm
    Machine Size 510*400*190mm
    Package weight 8.6kg
    Max Traveling Speed 180mm/s
    Filament 1.75mm PLA,TPU,ABS
    Input AC 100-265V 50-60Hz
    Output DC 24V 15A 360W
    Layer Thickness 0.1-0.4mm
    Nozzle diameter 0.4mm
    Precision ±0.1mm
    File Format STL, OBJ, G-Code
    Working Mode Online or SD offline
    Max Nozzle Temperature 255℃
    Max Hot bed Temperature 110℃

    Unboxing

    The Creality Ender 3 comes well packed in foam and with the extrusions wrapped with plastic wrap. Included in the box are the standard tools that come with the cheap kits. Typically that includes alen keys to put the printer together, a spatula as well as side cutters for trimming your prints.

    unboxing 3d printerunboxing parts

    SD Card

    The included 8Gig micro SD card has the standard assembly instructions and test files. I’m not good with pre sliced gcode files being included because the temp and settings chosen when sliced are specific to the filament and the users filament is likely different. And the included filament is usually too short to even print the test file. The SD card does include the driver and a copy of the free open source slicer software Cura. probably an out of date version as it’s update quite often now. Also included is a Troubleshootings pdf file.

    It is nice to have the SD card included. The micro SD card reader on the other hand is a piece of junk. Mine corrupted every card I put into it. I had to reformat them. Luckily I had a few others laying around.

    Assembly

    Building the ender is quite simple and the assembly guide was pretty straight forward. The base comes pre assembled. That is an issue for me because, as I have seen so many times before they don’t take care when assembling. In the case of the Creality Ender 3 there is a lot of people with a twisted base. Mine included. Maybe it is one person at creality assembling them with a crooked table. Also there is always loose screws that sometimes show in your prints. You can check out my Tevo Michelangelo  review to see what I mean.

    With the base built and the electronics done for you assembly is quick and easy. Mine has hot glue on all the wire connections which is bad if you need to remove one for troubleshooting or modifications. For any printer you buy needs to have pre assembled parts double checked.

    Software

    The SD card comes with two versions of Cura slicer software. An older version which I think works better then the newest one, and a newer version which is already outdated. A slicer is a program that slices the 3D object into layers, then turns it into instructions the printer can understand. If you need a free program then I would recommend Slic3r or Cura, but if you can afford it I would recommend Simplify3D.

    cura

    Print Quality

    The Ender 3 printer prints as well as the other sub $500 printers which is good because they can print as well as the expensive 3D printers. Not as consistently but most of the time. Although they need a bit of tinkering to get that level. Some even need you to spend extra money but not to much.

    PLA Filament

    PLA is my favorite filament. It prints very easily and prints well. I chose to stick with PLA for almost all prints. I have other filaments on hand for niche needs. HTPLA is a PLA that prints with higher temps. It allows you to anneal your prints for extra strength.

    I printed the 2 puppy models that came on the SD card. The kids in my wifes daycare loved them because they are big fans of the paw patrol TV show.

    puppy

    One of the best reasons to own a 3D printer is Cosplay. Before Halloween my son asked me to print some parts for his Halloween costume. I printed some goggles and a cane for him. The cane ran out of filament in the middle of the night which is a bit crazy since a filament runout sensor for a cent or two. The sensor will pause the print until you change the filament.That is one feature I put on all my printers that don’t come with them and will do the same to the Ender 3. It’s a simple thing to add and makes the printer better.

    googlesgooglesgooglescane

    I printed the mask for my sons costume on a bigger printer and he put the goggles on and painted it. It turned out great.

    mask

    The rest of my PLA prints are mods for the printer to help functionality and looks. See more in the modification section.

    TPU Filament

    TPU is a flexible filament that is good when you need a rubber type surface for things like tires, phone cases and hinges. I printed poison bottles for my sons costume but they didn’t turn out so well. I reprinted in PLA on the JGAurora A5.

    bottles

    [amazon box=”B00TI3JUTM,B01M63ZVUJ,B07DPLV4PC” template=”table”]

    Creality Ender 3: Modifications

    mods

    Modifications can serve a practical purpose or be just for looks. Some mods are a necessity though. For instance the Z alignment on the Ender 3 is so far off it needs something between the motor and the frame. If not it will bind when you try moving it. I used 2 of the cheap punched out wrenches that they send with printers for removing the nozzles. This seems to be a widespread problem because there are over 10 fixes for it on Thingiverse.com. I believe it has been corrected in the newer versions. I’m not sure how some of these things get past quality control.

    https://www.thingiverse.com/thing:2925230

    After the Z alignment fix I was able to print items over 10cm. So next I printed the Muscle car Scoop to cover the oddly placed nainboard fan. The fan is below the bed and hotend bits of filament will get in and could break the blades. Also tools or screws could fall in and short out the board. Luckily someone made this awesome muscle car scoop to divert the flow and protect the fan and mainboard.  https://www.thingiverse.com/thing:3150741

    Next I printed a cool drawer to hold tools, screws and spare parts. It fits perfectly between the center bed rail and the right frame that the display is connected to. I chose to use multiple colors for my mods so the printer doesn’t look so plain. They put the dragon logo on the bed and display which is more than most of the cheaper printers do. Tevo being my favorite when it comes to style.

    https://www.thingiverse.com/thing:2989218

    Another handy print is this little Yoda feeder guide. This helps you turn the extruder motor to feed the filament through the PTFE tube to the hot end. There are other style feeders but I like Yoda so I chose that one.

    https://www.thingiverse.com/thing:3141160

    The last mod that should be done and does help your prints is the Bullseye filament cooling fan duct. There are plenty of fan ducts but this one works great and doesn’t take to much room on the extruder carriage.

    https://www.thingiverse.com/thing:2759439

    Other mods that are more form then function are:

    Filament guide to keep the filament off the threaded Z rod. https://www.thingiverse.com/thing:2920344

    A Display cover. https://www.thingiverse.com/thing:2987100

    Wire clips to keep the display wire from dangling. https://www.thingiverse.com/thing:2960375

    Rubber TPU feet to help keep vibrations quieter. https://www.thingiverse.com/thing:3020865/files

    A cable holder to keep the extruder and x carriage wires from snagging the bed.

    https://www.thingiverse.com/thing:2949858

    Last and strictly for show, an X axis motor cover with the dragon logo on it.

    https://www.thingiverse.com/thing:2924288

    Creality Ender 3: Pros and Cons

    I’m not sure what this is and I haven’t seen this before but ½ way through all the prints I did the wheels had this odd dust on them. Both the X and Y axis.

    PROS

    • Good Print Quality
    • Good Solid Frame
    • Slim and Stylish
    • Great Price
    • Big Bed leveling knobs

    CONS

    • On board drivers
    • Mods needed shouldn’t be up to the user to add or figure out.

    PRINT QUALITY: 8/10

    BUILD QUALITY: 7/10

    USER INTERFACE & NAVIGATION: 7/10

    VALUE FOR MONEY: 9/10

    Creality Ender 3: Final Summary

    After all the hype and putting this printer together and having the Z bind up I wasn’t impressed. I went to the Creality facebook group for answers and found it was wide spread. After fixing it and cooling off for all the extra work, I printed a few things and was impressed. This little printer at its current price is pretty good and easy to recommend. Is it perfect? Not really, but better then anything in its price range.

  • In-Depth Review: Flying Bear DLP 3D Printer (Shine UV Resin Color Touch Screen)

    In-Depth Review: Flying Bear DLP 3D Printer (Shine UV Resin Color Touch Screen)

    In-Depth Review: The Flying Bear DLP 3D Printer Shine UV Resin Color Touch Screen.
    The Flying Bear DLP 3D printer’s messy but fun to play with. The detail in the prints is crazy high. Plus it works great and I barely had any problems with it.

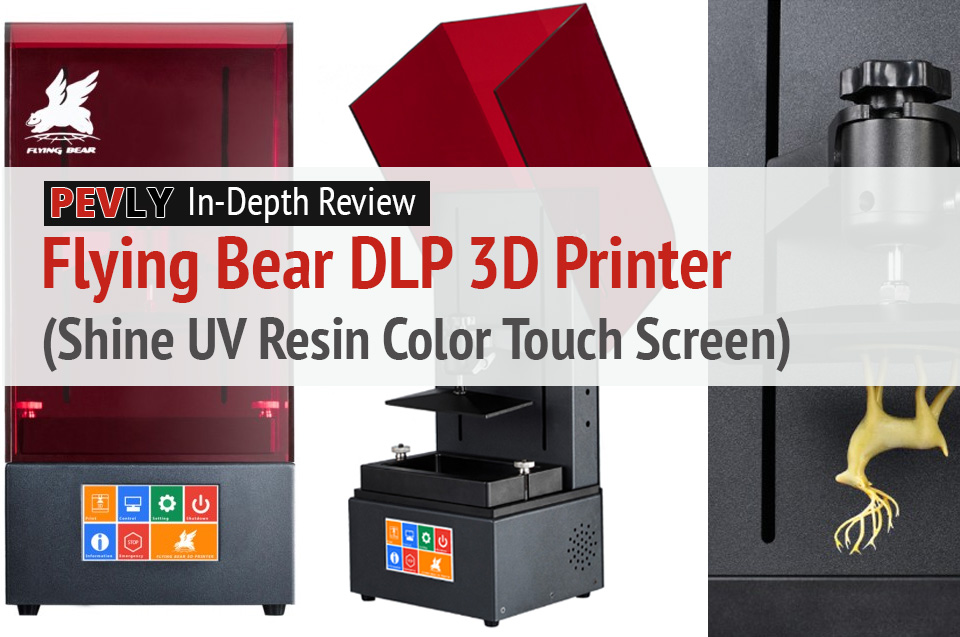
    3D printing has been a wonderful hobby. The kids like it, the wife not so much. But she tolerates it because she knows anything positive to take my mind off my chronic pain is a good thing. I can only do so much at a time, but it’s better than nothing.

    Until now it has been Fused Deposition Modelling (FDM, also known as FFF, or fused filament fabrication), which takes spools of plastic and extrudes the plastic at a small width (.4mm most common). This process places them layer upon layer. There are many types of 3D printers that use a variety of materials including metal powder, PLA filament, and liquid resins. Metal printers are industrial-grade and very expensive, and back when I started this hobby the resin printers cost over $2000.

    Resin printers are also known as Stereolithography. That is the process of projecting an image to cure the resin. With DLP 3D printing, a digital light processing(DLP) provides a light source for curing the materials to form the objects through an LCD screen.

    The recent influx of cheaper FDM printers was a sign of  DLPs coming down in price. From over $2000 down to less than $1000. This one is less than $600 USD at the time of writing this review.

    The Flying Bear DLP 3D printer has been a messy but fun printer to play with. The detail in the prints is crazy high. This printer works well and I had very few problems with it.

    Photo of the Flying Bear DLP 3D Printer
    The Flying Bear DLP 3D Printer.

    The Flying Bear DLP 3D Printer: Specifications

    [go_pricing id=”flying-bear-sla-dlp-3d-printer-specs”]

    The printer specs are similar to those of other SLA and DLP printers. I’m assuming the cost of the resin is the reason for the small print size. This printer has a 120 x 68 x 210mm build volume which is quite small in terms of 3D printing, but not for SLAs or DLPs. The board or screen has WiFi built in and is configured through a text file. I’m not sure if it’s my WiFi network or the printer, but I haven’t been able to get it working. It connects to my network but not to any of the software. The 4-inch colour touchscreen is a great interface, much better than the text and turn-dial menu system.

    Unboxing the Newest Flying Bear Shine UV Resin DLP Color Touch Screen 3D Printer

    The printer was well protected in the box with foam shaped to the contours of the printer. The tools were packed inside the printer in their own foam box. This 3D printer comes with a power supply, rubber gloves,  a scraper and an Allen key. It was supposed to come with a bottle of resin but it wasn’t there. I contacted the company and they said they can’t export the resin to some countries. Which I don’t believe, because I can buy resins from any other site.

    Unboxing the Flying Bear DLP 3D Printer
    Flying Bears sends this 3D printer securely packed in foam.
    Unboxing the printer.
    Once you remove the styrofoam, you can unwrap it.
    Photo of the Flying Bear Shine UV DLP Resin 3D printer in pristine condition.
    The Flying Bear Shine UV DLP Resin 3D printer in pristine condition.
    The Photo of the Flying Bear DLP 3D Printer - front view.
    A frontal view of the new Flying Bear DLP 3D printer.
    Photo of Flying Bear Shine with the User Manual.
    Lift the cover to finish unpacking the printer. The Flying Bear Shine comes with a user manual.
    Photo with a rear view of the printer.
    A rear view of the printer.

    Printer Navigation

    The touchscreen is a very nice full-color display. The main screen has a seven-button layout. Three of those are basic commands. You can click the others to display screens with controls, settings, and information.

    Photo of first set of options on the printer's LCD screen.
    The first screen displays a menu with your options for printing, controls, and settings, shutting the printer down, displaying printer info, stopping a print job, and information about the company.

    The first button brings you to the Print screen. To prevent accidental starts, you first have to confirm that you want to print.

    Screen cap with printer options.
    When you’re about to print, this screen shows you the file you’ve selected and tells you if the printer’s ready to print.

    The Control button takes you to a screen where you can do things like adjust the axis and turn the LED on or off.

    This screen lets you set the controls before printing.
    Here, you can choose from more options – or stop the printer if you need to.

    Next is the Settings screen. The display consists of two files. The first is the sysconf (system configuration) which I won’t mess with. The other is the wificonf where you can enter two lines; your WiFi SSID and the password.

    Screen shot with printer's sysconfig and wifi connection options.
    Here you can add your WiFi connection and password to connect the printer to your network.

    When you click the (for info) option, the following screen appears with your IP address, screen mode, and other information.  like the IP address for your network.

    The i (info) option displays a screen with your IP address, screen mode, and more.
    When you click the i option, information about your network and the printer appears.

    The fifth button simply powers down the machine. The next is the emergency stop. This isn’t for stopping the print, it’s to stop the homing if there is a problem. To stop the print there is a stop button on the print screen.

    Last is the Company info screen.

    Company Info screen for Flying Bear printers.
    This screen tells you the model name (Flying Bear Shine), the tech support email, and other information in case you need help.

    Print Quality

    I expected the quality of this printer to be awesome, but it is better than I expected. I have seen many prints online and have wanted an SLA or DLP printer for a long time. It is only recently that companies like Flyingbear released DLP printers cheap enough for everybody. On FDM prints the .1 layer height has been considered high quality. On the DLP as well as the SLA, .1 is considered low quality and .025 is high quality. At those resolutions the layer lines are almost invisible.

    Print of the Eiffel Tower

    The first print I wanted to do was the Eiffel Tower. I have always liked this model and it’s usually one that is done when showing off a DLP or SLA printer. It printed very well but I messed up the post-processing. I dipped it in alcohol then put it in the sun. The problem is that resin that remained between the parts has left a thin film of resin that hardened there.

    Photo of printout of Eiffel Tower: Front view.
    Printout of Eiffel Tower: Front view.
    Second photo of Eiffel Tower printout - overhead view.
    Eiffel Tower printout with an overhead view.
    Photo of Eiffel Tower 3D printout with closeup of the top.
    Eiffel Tower 3D printout with a closeup of the top.
    Photo of Eiffel Tower 3D printout with closeup of the bottom.
    Eiffel Tower 3D printout with a closeup of the bottom.

    Print of a Medieval Castle

    Another model I love that is popular for showing the detail your printer can print is a castle on a hill with lots of tiny trees. And if you look at the image of the bottom you will see another mistake I made. Putting it in the sun in the window made it stick to the wood a bit and pulled off a bit of the finish.

    Photo of medieval castle front view.
    Print of medieval castle with trees.
    Photo of melted part of medieval castle.
    This part of the castle was too close to a sunny window.
    Detail of trees surrounding medieval castle.
    Closeup of trees from medieval castle print.
    Photo of medieval castle - front view.
    Print of medieval castle from the front.

    Print of a Green Lantern Ring

    Being a DC comic fan I, of course, had to print a Green Lantern ring. It was my first attempt at adding manual supports. My supports stuck too well, and I had to cut them off the ring.

    Green Lantern ring 1 - front view

    Green Lantern ring 2 - side view

    Green Lantern ring 3 - rear view

    Prints of Flash and Superman Rings

    After that, I thought I would give the Flash and Superman rings a try. I tried them by placing them face down on the build plate. The problem with that is the liquid pools on the ring – so it cures as it cures.

    Failed print of Superman rings

    Failed print of Superman rings

    When I purchased the resin I chose green for the Green Lantern ring and Kryptonite. Superman is my favorite of all the comic book heroes so of course I needed to print some kryptonite. The giant Lego kryptonite was a great option.

    Kruptonite 3 - front view - closeup

    Kruptonite 3 - front view - closeup

    Print of Superman’s Fortress of Solitude

    I found this cute little model of Superman’s Fortress of Solitude. It should be printed in white or clear resin, but I only have green for now.

    Fortress pring 1 - front view

    Fortress print 2

    fortress 3 - overhead view - closeup

    Print of Skull Dice.

    My last model is of the skull dice. It didn’t work. I suspect it was because there is no drainage, or the resin isn’t clear enough to see it.

    Skull Dice

    Skull Dice

    Software

    DLP and SLA slicing software is different from FDM slicing software. The company gives out the program called “FLYINGBEAR-Shine slicer” and “Creation workshop”. I’m not sure if it’s developed in house or if it’s a derivative of an open source software.

    The supports are different on DLP printers and have to be added through third party software such as Autodesk Meshmixer. The included slicer works great and odd times it will connect through FTP to the printer over the network. You can then upload prints to do on the printer. The Creation Workshop is another slicer that looks good but compared to the Flyingbear one, overcly omplicated. I stuck with the Flyingbear one because it worked most of the time. That, and the slicing time for the Creation Workshop takes a lot more time. Slicing creates an image for every layer, and then the printer prints each layer all at once where FDM uses G-code. The G-Code is just commands for the motors to move the tool-head line by line.

    Printer software display - Eiffel Tower printout Printer software

    Printer software

    Printed Tools

    There are no “upgrades” or “modifications” for this printer, but there are tools to print and use. Although, you need an FDM printer to print these.

    The first and the one I use the most is this lid to keep the resin-covered when not in use. This is one I designed myself in Fusion 360.

    Vat cover
    Vat cover.

    Next is a drain tray to let the build plate drip the resin in the tray. I found it faster and easier to use the scraper that came with the printer, and to push it off the build plate.

    SLA printer drip tray.

    PROS

    • High accuracy
    • Strong material
    • Tinted cover to see how the print is going
    • Big bright touchscreen controls
    • Easy to learn
    • WiFi uploading
    • 2K LCD with resolution up to 2550 x 1440
    • Z-Axis adopts Ball Screw to improve printing accuracy and stability

    CONS

    • Glitchy WiFi
    • Small build volume
    • Supports are difficult
    • Messy post-processing
    • Needs lots of room for baths and tools.

    Evaluation

    People online who have DLP printers say these are very messy. I now actually know how messy it really is. You need more space than with FDM printers, despite the printer being smaller. You need room for an alcohol bath and paper towels and a soapy water bath. It’s a lot, but worth it.

    I keep the water and alcohol in Tupperware containers that seal airtight. DLP printers are a great idea if you want to print figures or anything you want printed with super fine detail and almost no layer lines. It has a high precision Z-axis ball screw. If the WiFi would work at all times it’d be that much better, and it could be so for you.

    I can’t wait to see DLP become mainstream. That will happen when the cost of resin gets lower as the cost of printers did. It will happen just like it did for filament and FDM printing.

    Types of resins aren’t as clear as FDM filaments. The Wanhao resin I purchased is made for Wanhao SLA printers. There is no smell but it’s good advice to keep the room well ventilated, and using gloves in handling.

    resin

    Before I had an DLP printer, I would advise against buying one as your first printer. Now I would say, go for it. Yeah, the resin cost more but it won’t be long before its price drops. Even without the promised resin, the Flyingbear shine is a great choice for a great price.

    You May Also Like…

  • The Tevo Michelangelo 3D Printer: A Review

    The Tevo Michelangelo 3D Printer: A Review

    Pevly review: Tevo Michelangelo 3D printer with samples of amazing things you can print.
    If you have limited space and you want a 3D printer you can’t go wrong with the Tevo Michelangelo. It’s lightweight and compact, yet very robust.

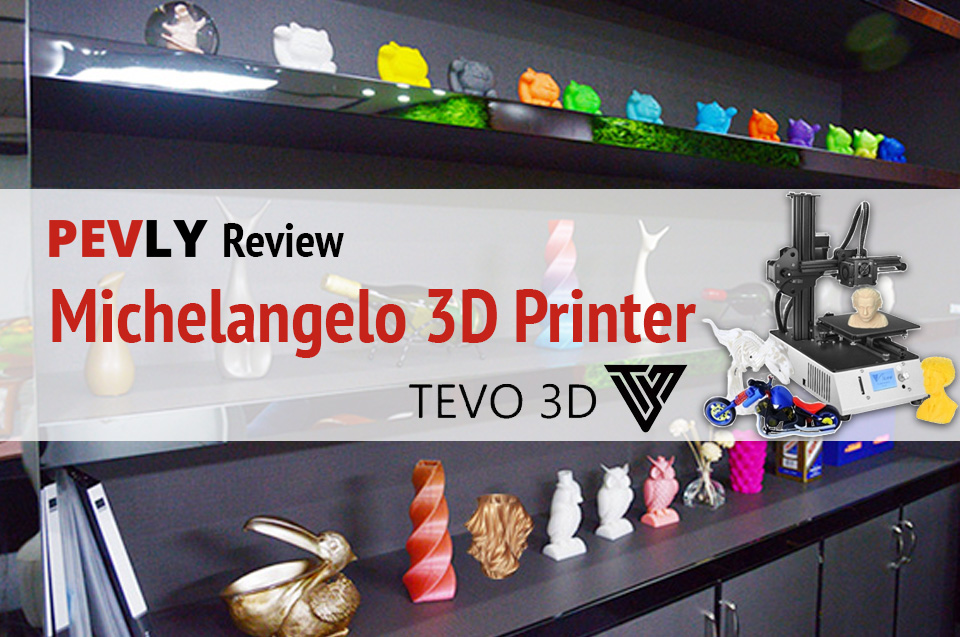
    I’m the type of person who thinks BIGGER is always better. When it comes to 3D printing I select mostly large volume printers. Then I got this little printer sent to me from Tevo for a review. The Michelangelo has a build volume of 150X150X150. This little guy has changed my mind!

    The great thing is that most models online are sliced up to print on smaller machines. You also have the option to scale the models down or in some cases, you can slice the prints into smaller parts on your own with the Meshmixer program which is free and easy to learn. 

    The Tevo Michelangelo 3D Printer: Specifications

    [go_pricing id=”tevo-michelangelo”]

    Unboxing

    Unboxing this printer was a breeze. It comes fully assembled, except the four feet which could easily be done at the factory. Either way it’s simple to install them on your own.

    Photo: Tevo Michelangelo 3D printer - assembly.
    The Tevo Michelangelo 3D Printer comes fully assembled, but if you ever need to take it apart, it’s easy to reassemble yourself.
    Photo: Tevo Michelangelo in the box.
    Unpacking the box.
    Photo: Tevo Michelangelo components with assembly manual.
    The Tevo Michelangelo comes fully assembled, but has an assembly manual in case you need it.

    Unpacking the Michelangelo.

    Unpacking the Michelangelo.

    SD Card

    The SD card contains 2 sample GCODE files as well as the manual in pdf format. It also contains a copy of the Repetier-host software.

    Software

    The Repetier-Host software on the SD card is not my favourite program to use with printers. The software just “hosts” a slicer engine. A slicer is a program that slices the 3D object into layers, then turns it into instructions the printer can understand. If you need a free program then I would recommend Slic3r or Cura, but if you can afford it I would recommend Simplify3D.

    Print Quality

    The Michelangelo doesn’t come with a heated bed. This limits the types of filaments you can print with. Basically, it limits you to PLA and TPU. PLA is the most common filament and TPU is a flexible filament. The reason for this is because PLA and TPU don’t require heat to keep it from curling up as it cools down.

    Photo: Tevo Michelangelo printer on desk.
    The Tevo Michelangelo 3D printer’s footprint’s barely larger than a regular inkjet. 
    Michelangelo printer bed with Magigoo adhesive applied.
    Before printing, I applied Magigoo to the printer bed. This adhesive keeps 3D objects in place while being printed, then allows easy removal. Magigoo lasts for over 100 prints, plus it’s odourless and safe to use. Better yet, you can easily wipe it off with water.

    Tevo Michelangelo printer unpacked and ready to go.

    Tevo Michelangelo LCD monitor..
    This 3D printer also has an LCD monitor so you can check the status of your print job.

    The Tevo Michelangelo 3D Printer with PLA Filament

    This printer got off to a bit of a rocky start. I printed the included Wave test GCODE file it printed well until about 90% of the way up. That is when the layers started to shift on the X-axis.

    WaveTest G-Code 3D printout.
    This Wavetest printout out great until it shifted on its X-axis when the file was 90 percent done.

    Closeup of the wave test.

    I printed a couple of dinosaurs for a friend and a couple of Benchis (benchmarks). They have a lot of layer shifting and artifacts. I wasn’t sure what was going on. After some troubleshooting, I discovered the small grub screws that hold the pulley to the motor shaft was loose on the X-axis.

    Tevo Michelangelo - PLA filaments. T-Rexes.
    At first, the T-Rexes has some layer shifting and artifacts while printing on the Tevo Michelangelo.

    Melting T-Rex

    print waste.
    There’s also more waste than I would like.
    Pink "Benchi" tugboat with printing issues.
    The Benchi (benchmarks) tugboats had the same layer shifting and artifacts until I figured out how to fix it.

    pink benchi tugboat

    Yellow benchi tugboat bottom with letters.

    Yellow "Benchi" tugboat with printing issues.

    Last yellow "benchi" tugboat from side close up.

    After tightening those screws I printed a new Benchi, a dinosaur, and a statue of Captain America. They came out way better than I expected. I got the same quality I get from the Tevo Tornado and JGAurora A5 which is saying something.

    Photo: Yellow benchi tugboat with printer issues fixed. Side view.
    Yellow Benchi tugboat with printer issue fixed.

    Photo: Yellow benchi tugboat with printer issues fixed. View of bottom with lettering.

    Photo: Yellow "benchi" tugboat with printer issues fixed. Side view.

    Photo: Pink T-Rex 3D printout with printing issue fixed.
    T-Rex 3D printout with printing issue fixed.

    Pink T-Rex - other side view with printer issues fixed.

    3D printout - Tevo Michelangelo - blue Captain America.
    Captain America 3D printout on Tevo Michelangelo with printing issue fixed – closeup view.
    Blue Captain America 3D printout on Tevo Michelangelo.
    3D printout of Captain America with the full-length view.

    The smaller build volume doesn’t keep this printer from practical printing. I purchased a new set of jewelers screwdrivers for my workbench. I plan to use them quite often and don’t want to get out the case and open it then put them back when I’m done. So I opened Fusion 360 which is a free computer aided drawing (CAD) for students and Hobbyists.

    Then I designed the cool little holder that I can screw to the side of the desk and have easy access to the screwdrivers. It printed easy and is plenty strong enough to hold them and not break if it gets knocked by something or someone.

    3D printout with blue set of jeweler screwdrivers.
    The Tevo Michelangelo also printed out the handles and holder for these jeweler screwdrivers.
    Holder for jewelers screwdrivers.
    Blue holder for the jewelers screwdrivers.

    I love playing in Fusion 360. There are plenty of free YouTube or other online tutorials to get you started. There are also plenty of advanced tutorials. I get a sense of accomplishment when I print something I came up with in my head.

    The last PLA print is the Moon City from Thingiverse.com. This is a beautiful model and the detail is amazing. The Michelangelo printed it beautifully and got all the details perfectly.

    Red 3d printout of Moon City from Thingiverse.com.
    Red Tevo Michelangelo 3D printout of Moon City from Thingiverse.com (front).


    Photo - Red printout of Moon City (rear view)
    Red Tevo Michelangelo 3D printout of Moon City from Thingiverse.com (back).

    (For more on the above 3D printouts, see my review of Neat PLA Filament.)

    The Tevo Michelangelo 3D Printer with TPU Filament

    Flexible filaments are good for things like phone cases and RC tires. I usually print soft toys for the kids. My friend asked me to print some dinosaurs for a 3-year-old. I chose this low polygon dino because it would print well in TPU. The Michelangelo has the same extruder as the Tevo Tornado so I knew it would print TPU without any issues.

    Tevo Michelangelo 3D Printer -- TPU filament -- green Godzilla - 3/4 view
    Green Godzilla, with TPU filament and a Tevo Michelangelo 3D Printer.

    Tevo Michelangelo 3D Printer -- TPU filament -- green Godzilla - other side

    Tevo Michelangelo 3D Printer -- TPU filament -- green Godzilla -- being held.

    Tevo Michelangelo 3D Printer -- TPU filament -- green Godzilla

    Tevo Michelangelo 3D Printer -- TPU filament -- green Godzilla

    Video with the Tevo Michelangelo Printing

    Modifications

    The Michelangelo doesn’t need any modifications. The one I did was a spool holder that mounts to the top of the Z extrusion. You can see it on Thingiverse.

    Photo of Tevo Michelangelo spool holder on Thingiverse.
    Tevo Michelangelo spool holder on Thingiverse.

    Pros and Cons

    Pros

    • This printer is among the best prints I have seen yet! I am blown away by how well it prints.
    • The Titan extruder works great and has little to no space after the gear. This makes printing with flexible filaments much better.
    • The extruded aluminum frame uses wheels instead of bearing on smooth rods. Rods can bend easily and bearings wear out.
    • Comes pre-built
    • Tevo has done a great job making their printers look nice as well as print nice. The logos and boot screens have been well executed.

    Cons

    • No spool holder. Hard to print without a spool holder, you have to make a makeshift one until you can print one.
    • No heated bed. This is a con but most only print with PLA anyway.

    FINAL JUDGMENT

    If you have limited space and you want a 3D printer you can’t go wrong with the Tevo Michelangelo. It is easy to move around because it’s light and all one piece. The printer doesn’t come with a spool holder but it’s simple to jerry-rig something to print one. The front access SD card is the best I have seen on any printer I have owned to date. They usually have them on the side back or behind the LCD screen.

    You May Also Like…